Make a Cute Pink Burner from Cardboard!
50sThis clip shows a creative and humorous DIY transformation of ordinary materials into a miniature burner, appealing to the love of repurposing and cute aesthetics.
▶ Play Clip"Delivers on the promise of a cute kitchen set DIY with clear steps, though some filler and sponsor content lower the density."
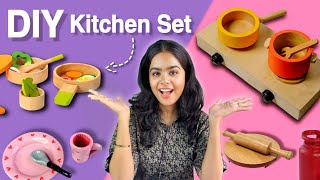
This video provides a step-by-step DIY tutorial for creating a miniature kitchen set at home using affordable materials like cardboard, paint, and clay. The project includes a burner, cylinder, rolling pin, pots, utensils, plate, and cup, all designed to look cute and realistic.
Use a cardboard box cut to size, fill with scrap cardboard to prevent crushing, paint pink, and create knobs with matchsticks and thick paper.
Use a paint bottle cut from the top, fill with paper and clay, top with coffee stir sticks, and paint red.
Use round MDFs or lids for the board, sand edges, add clay for texture. For the rolling pin, use an old paint brush and a sketch pen filled with clay and wood.
Use shaped clay to form a pan and spoons, then paint with chalk paint from Its Bits.
Handmade items have unique value and crafting is a hobby. Using waste material keeps costs low (clay cost about ₹30-40).
Roll clay, cut with round object, shape over a plastic lid. For the cup, use a sketch pen cap, apply talcum powder to prevent sticking.
All parts are painted and assembled. The creator encourages viewers to try the DIY and share comments.
The video demonstrates that creating a miniature kitchen set at home is fun, inexpensive, and allows for personalization. The final result is a cute, playable set that showcases the value of handmade crafts.
What material is used to make the burner's knobs?
Thick paper like a wedding card, double glued for thickness.
01:04
What is used to prevent clay from sticking to molds?
Talcum powder applied to the mold before placing clay.
09:03
What alternative can be used for the rolling board if MDFs are unavailable?
Any lid.
04:00
How much did the clay used in this project cost approximately?
₹30 to ₹40.
08:07
What type of paint is recommended for the rolling pin to give a wooden look?
Chalk paint.
05:07
Value of Handmade
Emphasizes that handmade items have a unique appeal and crafting is a hobby worth pursuing, even if similar items are available in stores.
07:27Talcum Powder Technique
Practical tip to prevent clay from sticking to molds, ensuring easy removal and clean shapes.
09:03Low Cost of Materials
Shows that the entire clay cost is only ₹30-40, making this an affordable DIY project.
08:07[00:06] equally interesting to make a kitchen set at home yourself. So, I used to play a lot with kitchen sets in my childhood and I wish someone had told me then that we can make it at home. But you don't worry. I am here to tell you how we will make it.
[00:20] so let's start. So what is most important in the kitchen? Come on, let's guess quickly. Correct. One burner and one cylinder. So let's make this first. After that we will make the rest of the things. So first we're making the
[00:34] burner. So look, according to the shape and size of the burner, I think you should buy such a box. But this box of mine was a little long, so I cut it. We will use it empty for now. So it can get crushed. So
[00:48] filling the cardboard here. So let's paint this now. So, burners are always in black, grey etc. colours. But we will make it a little cute. So to make our burner look absolutely perfect, I have painted it pink. But the work does
[01:04] not end here. Now the remaining parts of the burner also have to be made. So now we need any thick paper. I have used a thick wedding card here. To make the end a little thicker, I have double glued these papers. Now, after
[01:17] observing the burner at home, whatever I understand, I am making it accordingly. So now we will take matches. What are matches for? You will light the gas before cooking, right? No, we don't have to light a fire. How many lame jokes do I crack? So
[01:30] I need matches because I was not able to understand what to make this part of the burner from. Then I saw matchsticks. So I thought it would be best to make it from this. Tell me why? Think think. Hey, because matchboxes are so
[01:43] cheap and crafting with them wo n't cost us much. The most important part of crafting is that you have to be frugal like me. So let's paint the remaining parts with black color. Now that
[01:55] part with which we burn the gas. Meaning the part which rotates round and round. Understand what I am saying. So to make that part, you do not have quilling paper, you can also cut normal paper and use it.
[02:11] So now we will stick all these parts with our main part. However, you can also make a three-burner set. But I don't really want to cook, so I have made a set with only two burners. Now to protect it from dust, water and dirt,
[02:23] we will apply varnish on it at last. And I've used Pay It Bits varnish here. I am not sticking the front part. Rather, I am inserting it with the help of a pin so that we can rotate it round and round. But friend, even after working so hard,
[02:35] I felt that there was something missing in it. So I just took a black marker and made a border around it like this. And after making this, the look of our burner has become completely complete. So let's make the cylinder now. So I was wondering
[02:50] make the cylinder now. So I was wondering I thought that its only job is to keep it. Even if I play with the kitchen set 50 times a day, this cylinder will just remain there. And even if I don't play, it will still be kept. I
[03:04] mean brother, what is your work with the cylinder ? But if I don't make it then make the cylinder. So to make this I took a paint bottle. Cut it from the top. Filled some papers etc. inside. I put clay in it and cut these coffee stir sticks and
[03:21] placed them on top. Then I cut its lid and Then I cut its lid and our cylinder got completed. And now we will paint it. So since we
[03:35] made our gas pink in colour, we cannot make this also pink in colour because the cylinder is red in colour. I don't know, it always comes in red colour at my house. I am saying so much that you people must be caught. So now just
[03:47] people must be caught. So now just see the final look of the gas cylinder. [Music] So the next most important thing in the kitchen is the rolling pin and the rolling board. So for this you take any round thing. I had
[04:00] these round MDFs laying around. And if you don't have this, you can use any other lid. So now its corners were so sharp that we will have to flatten them by rubbing them a little. Well, this is
[04:14] not such a compulsory step. But because I want it to look real, I have rubbed it. And there was some clay left over from our cylinder craft so I added it to this. Now next we have to make a rolling pin for which I needed some strong
[04:26] wood. So I couldn't find it so I took an old paint brush. And there was a sketch pen that didn't work. I will use that too in this. So we will cut a part of it from the back. So look, I'm not making these things just to show them in videos.
[04:40] I want that if you guys are taking the time to watch the video and recreate it, then everything should be really strong and look real. It should not happen that I tell you to make it like that and the very next
[04:54] day it breaks and gets spoilt. So we have filled clay inside the sketch pen and inserted wood. So both the things are ready. Now we will paint it. So the rolling pin in my house is made of wood. Therefore, I will also give it a wooden look.
[05:07] And for this I am using chalk paints from It's Bit. In fact, all the materials I am using in this video are from Its Bits. If you want to buy any art and craft stationery DIY product, you can buy it from here.
[05:19] You will get it in very good quality. Also, if you use my coupon code Mansi05, you will get an extra discount of 5%. You can check the rest of the details in the description and with this our Chakla Belan is also ready.
[05:34] [MUSIC] So now let's make the pots. Not these ones, the small ones. So I am using shaped clay to make the pot. However, apart from clay, you can make utensils from other things also. When I was thinking about making it, I had a
[05:49] lot of different ideas. But I thought everyone would have clay. I can make the rest by using some jugaad (smart jugaad). If you say so, I will bring its next part also in which I will make its utensils using jugaad. So please tell me by commenting.
[06:02] How do you feel? What could this be? Come on, tell me. Let me tell you one thing. My sister never set, his entire attention was on my video, what I was making
[06:18] , what I was doing. She was watching what I was doing the whole time. And she was repeatedly guessing what are you making ? We will definitely make a pan, we will definitely make a plate , we will definitely make this. By doing this she was guessing. And she was getting very excited.
[06:31] And you people have also told me so many times that I should make a kitchen set. Perhaps That's why maybe my sister is also interested. And I was also having a lot of fun making it. It does not mean that only a small child will be
[06:44] interested in it. I have grown so much but I can still play with it. So anyway, here I have made a embroidery. I have made a pan. Now we will make one spoon for both of them. So the process is quite easy. You just keep watching.
[06:59] is quite easy. You just keep watching. [Music] So we've made that deep spoon and this one, I don't know what they call all these utensils. I have just made this flat spoon.
[07:14] spoon. [MUSIC] So everything's dry. Now we will paint it. Again I'm using chalk paint from It's Wetsy to paint this. Here is a very important question
[07:27] which might be coming in your mind that these kitchen sets are available in the market. We can buy it from there also. Why do you need to put in so much effort and make it at home ? So look, I feel that there is something different about handmade things.
[07:41] And the second thing is what is not available in the market. Every single thing that any crafter makes, be it a photo frame, bookmarks, clay art, labub dol, anything, is available in the market. But there is also something called hobby.
[07:55] Like if you like crafting, then you like it. You don't need any reason for this. And whatever things I make, I make them mostly using waste material. And all the clay I have used in this would
[08:07] hardly cost ₹30 or ₹40. And with this our utensils are And with this our utensils are ready.
[08:19] What is left now? We will cook the food but what will we eat in? Oh yes, I forgot that. Friend Mannu also came in the long video today. But no problem, she has talked about the address. You need a plate, a spoon, and a glass or cup. So to make the plate,
[08:34] I will roll the clay like this. Then we will cut it with any round object. And exactly we have to give it a plate shape. So for that I have already cut a plastic lid. And we will place it in the middle and press it a little from behind.
[08:47] and press it a little from behind. we have to leave it to dry. And here I want to give you a tip which I forgot to give in the beginning that whatever things you are using to make the clay,
[09:03] you have to use a lot of talcum powder in each of them. Like now I'm making a mug here. So I have used this sketch pen cap. And I have already applied talcum powder on this lid so that when we take out the clay from it, it does
[09:17] not stick to this lid and comes out easily. So if you want, you can make a simple glass also but it did not look so beautiful to me so I thought of making a mug. not look so beautiful to me so I thought of making a mug.
[09:34] out of the lid because of the powder. So now we will also make a small spoon. So just like we made that big spoon for cooking, similarly using the same process we will make a small spoon for eating. And after doing all this, I had some
[09:47] clay left so I made another spoon. So everything is ready for us. Now let's paint this too. So I'm painting the spoon exactly the same way so that it matches the rest of our set. And I will paint our cup and plate very
[10:01] beautifully and cutely. So you just keep watching. you just keep watching. [Music]
[10:15] I chose pink here because our burner was also pink. So I want everything to look the same. Meaning you are matching. It should not appear as if we have stolen each item from different places. And
[10:29] man, after painting these cups and plates, they looked so beautiful that I felt like eating or drinking something in them. So look, all our parts are ready. Now it's time for the final look of our kitchen set.
[10:59] I'll be mad at you. No, I mean you can buy it but you must try this one once. I would be very happy if you guys try it. So quickly what you liked the most among all these things and some things are missing because there are
[11:13] many things in the kitchen. So you can tell me that by commenting. So I will guys give this video lots of likes. The Like, share, subscribe, do whatever you can. And I keep bringing short videos.
[11:27] So let's meet again. Let's just do it. Gas and
⚡ Saved you 0h 11m reading this? Transcribe any YouTube video for free — no signup needed.