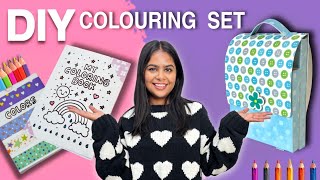
Make Your Own Coloring Set at Home!
42sIt challenges viewers to create a complete coloring set from scratch, sparking curiosity and DIY inspiration.
▶ Play Clip"The title accurately describes the project and the video provides a thorough, step-by-step tutorial."
This video provides a step-by-step DIY tutorial on creating a complete coloring set from scratch, including a custom coloring book, a set of coloring pencils, and a portable carrying case. The process covers page creation, drawing and outlining, book assembly, and building a decorative box with a magnetic closure and handle.
The video announces the goal: to make a full coloring set including a coloring book, colors, and a box.
A4 sheets are cut into four equal pieces to form the coloring book pages.
Rough pencil drawings are made on each page, then outlined with a fine tip marker or black pen.
After outlining, pencil marks are erased carefully to leave clean images.
All pages are collected, a colorful cover is added, and the spine is reinforced with cloth and glue.
The cover is decorated with washi tape and drawings to enhance its appearance.
A box for the coloring pencils is constructed from thick paper and decorated with washi tape.
Magnets are added for closure, hidden under tape and a paper flower, and a handle is attached to complete the bag-like look.
This DIY project results in a fully functional and personalized coloring set that can be used for personal enjoyment or gifted to others. The process is fun and rewarding, with room for customization.
What is the first step in making the coloring book?
Cut A4 sheets into four equal pieces.
00:32
Why should you place a paper between pages while drawing?
To prevent the marker from bleeding through to the back page.
01:14
What alternative method is suggested if drawing is difficult?
Get the images printed from the market.
02:58
What is used to reinforce the spine of the book?
A cotton cloth with glue.
03:53
How are the magnets hidden in the box?
They are covered with masking tape and a paper flower.
07:47
Prevent Marker Bleed
Using a piece of paper between pages prevents marker bleed-through.
01:14Printing Option
Offers an alternative for those who cannot draw.
02:58Cloth Spine Reinforcement
Adds durability to the handmade book.
03:53Magnetic Closure
Provides a clean, invisible way to close the box.
07:47[00:03] bored? Drawing, painting, colouring. I love to color in coloring books in my free time. Lie Guys Yes, it is not. That is what we are going to make today and not just a coloring book, we will make a complete coloring
[00:20] set. So we will need a coloring book, colors and coloring set box. So let's make a coloring book first. So first of all I am taking A4
[00:32] sheets. So here I am taking a lot of A4 sheets. And I will cut each sheet into four equal pieces. That means we will get four such small pieces from each sheet. So first of all we have to cut all these pieces. And after this we have to fold it from the middle.
[00:47] So in this way the pages of our colouring book will be ready. Now, like we have a drawing book, there are beautiful images in it in which we have to fill colours. So where will those beautiful images
[01:00] come from? Where will you come from brother? We will draw it ourselves. Are we any less than anyone ? So first of all I drew all the rough images with pencil. Now we have to take any fine tip marker or black pen and draw its outlines with it.
[01:14] I have placed this paper in the middle so that the marks of the front image do not fall on the back page. So do you know what happened? When I was using this CD marker, it was getting printed on the back of the page. Something like this. Then I used this second pen.
[01:26] And it turned out quite well. And not a single mark came back. And I bought both these pennies from the local market. So you can also check in the market near you. If you find such a pen, get it quickly. After this,
[01:38] I started making outlines of drawings, I had so much fun in it that I can't even describe it. Man, this is such a satisfying process that I forgot for a while that I was making a coloring book. I felt like I was doing
[01:50] something fun. Yes, I am doing fun work. But why should you people be deprived of this fun ? Once the coloring book is created, you will definitely have a coloring book. But the process of making it is also quite interesting. Now let's not talk too much nonsense.
[02:04] Quietly make your drawings. Let us go. [Music]
[02:20] Like cute animals, pizza, burger, kite. [MUSIC] Now don't think I like moss. This means I go to the terrace and fly kites all day long. I like it simply because a kite flying in the sky
[02:32] looks very beautiful. And I have also drawn some of my favorite cartoons.
[02:45] we will erase any pencil marks. Now erase it carefully. Do n't tear the paper while erasing. So look, all the pages of our coloring book are looks like I got it printed from the market.
[02:58] find drawing difficult then you can actually get it printed from the market. So here I have printed a page and shown you that in this way you can get your beautiful images printed. And in this manner, four images have to be printed on the front and back of the page.
[03:12] And we will cut this page into four equal parts in the same way. into four equal parts in the same way. [Music]
[03:26] this way our printed papers also became a part of our drawing book. Now there is nothing left to do. All the pages have to be collected. And now I am also pasting another paper on its front and back side. So here I have used colorful paper.
[03:40] You can use any paper [music]. Then we'll take two clips. These are cloth clips and with this we will hold all the papers. And now we will apply glue on the side in this manner and keep it aside to dry. Now the paper remains
[03:53] intact even better. For this I am taking a cotton cloth. I have taken a small piece of it. And after applying glue on it, we will stick it in our drawing or colouring book in this manner.
[04:16] we will need a cover for our drawing book. So here I am taking a thick paper and we will cut it to the size of our coloring book. And we will fold it from the middle in this manner. [Music]
[04:33] And we'll stick it to him. Who are you sticking with? Tell me the whole story. Hey Mannu I mean we will stick the cover with the colouring book. [laughs] Now let's decorate the cover a bit. So since this is a coloring book, I
[04:47] want to draw something on it in such a way that even if someone sees it from a distance, he cannot recognize that it is a coloring book. I have covered it a little with washi tape on the sides to make it look more beautiful. Now I will fill some colors in it. I am
[05:00] filling in a few elements. And look, our coloring book is ready. Now everyone sit down quietly because we are going to see what is in this coloring book.
[05:48] coloring book is ready. Now to fill colors in it, we need colors. So I have these little colors, but they do n't match our set. So I'm using pencil colors here. You can use any color you want to fill colors in your coloring book. If
[06:01] you want, you can take sketch pens, water colours, anything. But I brought this from the market, so it will not match with our colouring set. So I'm going to make another cover for it
[06:13] because the cover looked pretty rubbish anyway. So I removed that cover and opened it completely. And cut another paper of the same size. So here we have to take a little thick paper because we are making a box from it. And I
[06:26] folded the box in the same way. But now let's write something on this and decorate it a little. Now I am not working hard on this. So I'm going to cover it with simply washi tapes. Now we will keep all the colors in it and our color box is
[06:39] keep all the colors in it and our color box is ready. seems a bit incomplete. Let's complete it quickly. Now here I am using card sticks.
[06:52] You can use any thick paper again. If wedding cards come to your house, you can use them too. Like I always use it and show it to you. So I have cut it in this manner. And we have to make something like a pocket
[07:06] or you can say something like a box which is open from one side. So we have made this. And now I have made another one of a slightly bigger size than this. It remained a little short from the top. But no problem, I will fix it later.
[07:18] Now in this big box, I have cut something like a U shape at the top so that we can keep our book in it and take it out easily. Now we have to stick these two boxes together and the size which was left small, I have
[07:32] corrected it later. Now we have to give it a bag- like look. If you want, you can make its set in any way you want. But I want to give it a bag- like look. And we can open and close it properly. For this I am using magnets. [Music]
[07:47] But these magnets shouldn't be visible at all. For this I am sticking the magnet from the inside side. I have used masking tape here to stick the ends. Now if one magnet is placed inside then one will have to be placed outside also. And I will cover this also with masking tape.
[08:00] Now we will have to hide this masking tape also. So for this I had made a paper flower. I have cut it and pasted it here. Now look how easily it is opening and closing. Now let's give it the look of a bag. So
[08:13] above I made this handle part of the bag. And at the back I made the back steps And at the back I made the back steps from paper and pasted them. I am making and pasting whatever is there out of paper here on the bottom side.
[08:30] So our coloring set is ready. Man, this looks so cute. I can't believe I made this at home. So let's see its final look. made this at home. So let's see its final look.
[08:55] I gifted it to him. And he liked it very much. She kept sitting on this the whole time. She kept filling colours in it and said that she would take it to class tomorrow and show it to all her friends. Now if my niece
[09:08] liked it so much then you guys will also like it very much, do try it. Now you'll have your own coloring book whenever you're bored. You can take it anywhere and even flex it in class or
[09:22] gift it to your best friend. So, how did you like today's DIY? Do let us know by commenting. Rest, like, share, subscribe, do whatever you can. And I keep bringing short videos. So let's meet again.
⚡ Saved you 0h 09m reading this? Transcribe any YouTube video for free — no signup needed.