
I Carry a 22lb Backpack to Stream From Anywhere
54sThe surprising 22-pound backpack weight makes a bold, relatable hook for gamers who want portable streaming.
▶ Play Clip"Delivers a complete portable stream setup walkthrough with exact device connections — mostly on-topic with minor gameplay filler."
In this video, the creator demonstrates how to build a professional-grade, fully portable game streaming setup for handheld consoles like the Asus ROG Ally X and iPad Air M2, using only items packed in a backpack. The tutorial covers hardware selection, physical connections, and step-by-step configuration of OBS/Streamlabs Desktop for gameplay capture, facecam, and audio mixing.
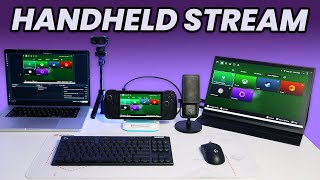
The entire portable streaming setup weighs about 22 lb and includes a handheld console, laptop, microphone, webcam, capture card, and monitor.
The AVerMedia capture card can record gameplay to an SD card without a computer by tapping the front button, and it also supports connecting a mouse and keyboard.
Plug a USB-C to USB-C cable into the capture card's port labeled '1' (the gaming console port) and connect the other end to the Asus ROG Ally X.
A second USB-C to USB-C cable connects the capture card's laptop icon port to the laptop or computer.
The UPERFECT 18-inch 2K portable monitor connects via HDMI to the capture card, with power plugged in; it supports 120 Hz on Windows, but an external display is optional.
The microphone and webcam connect to the laptop via a USB-C adapter, while wireless mouse/keyboard adapters plug into the capture card's USB 3.0 slot.
In OBS or Streamlabs Desktop, add a Video Capture Device source and select the capture card from the device dropdown to bring in the gameplay feed.
Ensure the base canvas resolution and FPS in software match the output resolution of the capture card to keep quality consistent, then right-click and transform to fit the screen.
Add an Audio Input Capture source, select the capture card as the device, and lower the volume to around 7 on the mixer to avoid clipping.
In Settings > Audio, set the Mic/Auxiliary Device to the Elgato Wave 3, which includes built-in clip guard to prevent peaking.
To hear game audio through the computer, open Advanced Audio Settings and change the capture card audio source's Audio Monitoring to 'Monitor and Output'.
By following these steps, anyone can build a portable pro-level streaming kit that works with multiple USB-C handheld devices, delivering clean gameplay, facecam, and audio through free streaming software.
Asus ROG Ally X
tool
iPad Air M2
tool
M1 MacBook Pro
tool
Elgato Wave 3
tool
Insta360 Link 2
tool
AVerMedia gaming capture card
tool
UPERFECT 18-inch 2K portable gaming monitor
tool
MOKiN USB-C adapter
tool
Wireless keyboard and mouse
tool
Tripod
tool
Twitch
service
YouTube
service
Streamlabs Desktop
tool
OBS
tool
What is the approximate total weight of the full portable streaming setup?
22 lb.
00:53
Which capture card can record gameplay to an SD card without a computer?
The AVerMedia capture card.
02:15
Which port on the capture card should be used for the handheld console connection?
The USB-C port labeled '1' with the gaming console identification.
03:20
In OBS/Streamlabs, what source type is added to bring in the gameplay feed?
Video Capture Device.
05:51
What must the base canvas resolution match for consistent quality?
The output resolution of the capture card.
07:00
What key do you press to crop a webcam source in OBS/Streamlabs?
Option on Mac, or Alt on Windows.
08:09
Which device should be selected for the game audio input capture source?
The capture card.
08:49
How do you enable hearing game audio while recording?
In Advanced Audio Settings, set the capture card audio source's Audio Monitoring to 'Monitor and Output'.
10:26
A full pro streaming kit fits in a 22 lb backpack
It proves that high-quality streaming can be fully portable with the right compact gear.
00:53Capture card doubles as a standalone recorder
The ability to record to SD card without a PC adds flexibility for on-the-go creators.
02:15Match canvas resolution to capture card output
This alignment is a core principle for avoiding quality loss in livestreams.
07:00Audio monitoring lets you hear game audio through the PC
A practical method for mixing game sound with Discord, Spotify, and stream alerts.
10:26USB-C handhelds are interchangeable in the same setup
Shows the setup is future-proof and works with multiple devices like the iPad Air M2.
12:17[00:01] handheld console gaming friends if you didn't know it already it is possible to live stream your gameplay from these devices to places like twitch and YouTube but the question that always comes up is what do you need to actually
[00:16] set this up in the best quality possible like a professional would well that's what brings us to today's video and since it is so portable and you can take these things anywhere right we're going to only use use the items within this
[00:36] the point that if you need to take your gaming console stream setup on the go you can do it so let's get to [Music] it I ended up weighing this backpack and it came in at basically 22 lb not an
[00:53] ideal amount of weight to put on your back but if you got to take your streaming equipment with you what choice still have so first up we have our handheld gaming console which is the Asus Rogue Ali X an absolute Beast of a
[01:08] gaming handheld and if we're being honest this thing is basically a gaming honest this thing is basically a gaming PC the next item in here is considered to be the second gaming handheld console I have but this is the iPad Air M2 and
[01:22] you'll see later in this video how you can interchange different gaming handhelds that are USBC compatible with this setup up we have a pair of this setup up we have a pair of headphones here this is a non exiting
[01:34] item in the setup build but it's kind of necessary we need an extension course so if you're out and about to optimally run this setup up next in order to get the gameplay picture from these devices into
[01:47] OBS or streamlabs desktop we have our laptop here which is my handy dandy M1 MacBook Pro to go with the laptop we have a USBC charger for it in this little sack I have a bag full of berries I'm just kidding they're not berries we
[02:03] have a microphone this is the Elgato Wave 3 now it is nice to be seen so for our face cam we're using the insta 360 link 2 also have a little tripod here to
[02:15] go along with it and that will allow us to stabilize this anywhere we want really very cool I have one more item within this magical Berry pouch here it within this magical Berry pouch here it is this is the a media extrao gaming
[02:27] capture card this device is literally built for recording and capturing your handheld gaming content this can be set up with or without a computer since you can tap the front button of this device to start and stop recording gameplay to
[02:40] an SD card you can also connect a mouse and keyboard which I happen to also have in this bag here's a mouse pad and one more thing in this backpack we need to
[02:52] more thing in this backpack we need to unveil is a gaming monitor with its everything on this this table moving items from my left side to the right side here starting off with my M1 Max
[03:06] MacBook Pro computer I'm going to make sure that this is turned on and has power connected to it I'm then going to take my gaming handheld we'll put the capture card and you're going to want to make sure you take the USBC to USBC
[03:20] cable that came with this capture card and plug in the side that says one into the USBC slot with the gaming console identification on it the other side of that cable we're going to plug into the assus Rogue alley X here now I do also
[03:35] assus Rogue alley X here now I do also have a power adapter for the Asus Rogue but we're going to use it on the capture card so that there's less wires coming out of the handheld all right I'm getting tired of all this stuff sitting
[03:49] on the table clean space all right the next thing you guys are going to want to do is take a USBC to USBC cable and plug this into the USBC slot with the laptop icon on the capture card and take the other end of that cable and plug that
[04:03] into your laptop or computer what I have here is the uperfect 18in 2K portable gaming monitor it has a 1 millisecond response time and on Windows machines
[04:15] I'm able to play in 120 htz it's super easy to set up just open it like a book and you can just set it on these grooves to position and stabilize the monitor now we just need to plug in the power source of this Monitor and and then the
[04:30] HDMI cable which we can plug directly into the back of this capture card in the HDMI slot and then we plug the other end of that HDMI cable into the monitor now as nice and beautiful as this
[04:43] monitor is it should be noted that having an external display is not a requirement to be able to stream using this setup I just added this in as it would enable my handheld console to be used more like a PC both The Mouse and
[04:56] the keyboard are wireless and I can just plug the adapters for these devices into this capture card via the USB 3.0 slot on the back of it and these will work as will see it all in action in just a
[05:11] moment up next we have our microphone and our webcam which I could use some extra slots on my laptop for so I do have this USBC adapter from moken that I with the wire to add and that's our headphones and these can either be
[05:27] plugged into the monitor if you're using one that has an audio jack like mine does or you can plug them into your computer so that you can hear your game audio as well as Discord Spotify and stream alerts up in front of me now I
[05:39] have a blank streamlabs desktop project canvas if you're using the software OBS similar to this and the steps that we're identical links to both of these applications are in the description
[05:51] below to get our gameplay feed into this software we're first going to want to select one of our scenes I have one here called gameplay and the then you're going to want to go to the right of that to where it says sources select the plus
[06:04] button here and you're going to want to find the video capture device Source select that add Source you can name this whatever you like we're going to name it a media go add the source and then within the device drop down here you're
[06:18] going to want to find the capture card that you have connected to your computer select that and when you do that you should see your gameplay picture pop up on the screen now if you want to adjust the resolution and FPS of this capture
[06:34] card Source what you can do is instead of using the preset we're going to deselect that and then go to our resolution drop down and choose the resolution that we want picture here is obviously too small as it is so the
[06:46] first thing I'm going to want to do is right click go to transform and then go to fit to screen so that way it is flush with the entire canvas that I have and then the other thing we're going to want to check is by going to our settings
[07:00] and then going to video we're going to want to make sure that our base canvas resolution matches the output resolution of the capture card these two need to be aligned so that way your quality is consistent that goes for the FPS value
[07:14] down here as well if all that looks good you can go ahead and select done and we can move on to the next thing which is adding our FaceCam to this project so to to our sources by selecting that plus button we're going to add another video
[07:28] add the source this time it's going to be a new source instead not an existing be a new source instead not an existing one we can name this one insta 360 link two and then same thing again we're going to select that device drop down
[07:42] our webcam that we have connected to our computer which is mine right there we can use the preset if we want or you know I want my quality to be a little bit higher here for the face cam even though we're shrinking it down I'll
[07:55] choose 1080p here I think that looks pretty good we'll select done and then I'm going to take these Corners drag it on in and position this face cam where I'd like kind of like it here I'm also going to readjust the face cam itself so
[08:09] that I have the ideal positioning Al together and now one thing I can do to bring in the sides and the top and bottom of this webcam is by pressing the option key or the ALT key if you're on Windows and then I can just find the
[08:22] Windows and then I can just find the edge and bring these on in just like the next important thing we want to add add to this is our audio let's start off with our game audio to add that in we're going to want to focus within the scene
[08:36] that we're in so we're going to add another source here and then we're going to add an audio input capture Source select the add Source option name this whatever You' like we'll go with game audio add source and this is going to
[08:49] pop up a window where you can select the device drop down and then choose the capture card again because that's where the audio is flowing through so now when we get out of that window you'll see that our game audio is coming through
[09:02] right here on the mixer now it is coming through quite loud right now it's picking into the yellow uh and typically I want that to be a little bit less so I'm going to put it around the 7 Mark here so that way when we add our
[09:14] microphone audio which to do that we're going to go to our settings and then go to audio within here we're going to find our mic auxiliary device select this choose the Elgato Wave 3 mic that we plugged into to the laptop here once I
[09:31] do that I can go ahead and select done and we're going to see that audio coming through right into the mixer now luckily because this microphone is so amazing it has built-in clip guard features to where it's not going to Peak but you
[09:43] microphone where it might be stretching red area and in that case you're going to want to bring that down that way your microphone audio and game audio are happy and balanced as for listening to
[09:56] my audio using this road headset I have here I can either continue to listen change anything here but if I want to listen to Spotify or hear people on Discord then I'm going to need to listen to my game audio through the computer so
[10:12] to go to your mixer go to the right hand side where you see the open advanced audio settings select that and you're going to want to find the capture card audio source that would be right here where it says game audio let's select
[10:26] that drop down and then we're going to go to audio monitoring and right now monitoring the audio is off but we're going to want to set that to Monitor and output so that way we can hear the game audio as well as have it recorded all at
[10:40] give this handheld console gaming streaming setup a bit of a test and see streaming setup a bit of a test and see how well it
[10:53] don't expect to get punished my friend I don't think so don't think so now let me finish drinking my
[11:06] potion oh we're chilling bro we're chilling oh my gosh oh my gosh my
[11:34] do that too bro nice try nice try nice try
[11:47] you all that switch cars oh he blew up get out that switch cars oh he blew up get out of here man get out
[12:01] Freddy's 4 on keyboard and mouse through the handheld and the capture card we the handheld and the capture card we almost made it through night one and I
[12:17] night nope now as promised I did switch out the Asus Rogue to game on my iPad Air M2 and the experience was exactly the same and the experience was exactly the same just with a different gaming hand
[12:33] held okay that does not look like Trey young in this video are linked in the description below via my affiliate link do buy through them thank you guys so much for staying to the very end like
[12:48] subscribe all that good stuff and I'll see youall in the next one peace
⚡ Saved you 0h 12m reading this? Transcribe any YouTube video for free — no signup needed.