
Why I avoid bright colors for bird houses
56sThis segment provides a practical safety tip about paint smells that bird lovers will appreciate and share.
▶ Play Clip"Delivers exactly what the title promises: DIY bird house and feeder from waste materials, with clear steps and natural materials."
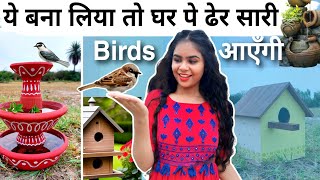
This video presents two DIY projects for birds: a painted birdhouse made from leftover wood and a three-tier bird feeder crafted from clay pots. The creator emphasizes using natural materials and minimal artificial elements to create bird-friendly items.
A carpenter's leftover wood was used to make a simple birdhouse. The creator suggests either hammering the wood together yourself or having a carpenter make the shape.
Muted, natural colors (browns and light shades) are used to avoid strong smells. After painting, the birdhouse is sun-dried for 3-4 days to reduce odor.
Wood stain is applied to the roof for a natural look. A floral pattern is added using a stencil from Its Bits.
Products from Its Bits (wood stain, chalk paint) are used. A coupon code Mansi05 offers 5% discount.
Clay pots (kulhars) are joined with shaped clay to create a three-tier feeder: base for small plants, middle for water, top for grains.
Only the outside of the feeder is painted with terracotta color; the inside is left natural for the birds' safety.
White chalk paint is used to draw simple patterns on the feeder for added decoration but keeping it simple.
The video shows how to create a charming birdhouse and feeder from waste materials, with an emphasis on natural aesthetics and bird safety.
What material is used to join the clay pots for the bird feeder?
Shaped clay (or cement as an alternative).
04:10
How many sections does the bird feeder have and what are they for?
Three sections: bottom for small plants, middle for water, top for grains.
04:25
Why does the creator only paint the outside of the bird feeder?
To avoid chemicals inside that might harm the birds.
05:08
What is the recommended drying time for the painted birdhouse?
3-4 days in the sun.
01:31
Which company's products are used in this video?
Its Bits.
02:44
Upcycling leftover wood
Shows practical reuse of carpenter's waste to create a functional item.
00:34Sun-drying to neutralize paint odor
Simple but effective method to make painted items safe for birds.
01:31Three-tier feeder from clay pots
Innovative design that provides multiple bird needs in one structure.
03:28Painting only exterior
Consideration for bird safety by avoiding paint on surfaces they contact.
05:08Natural wood stain effect
Achieves aesthetic appeal without harsh chemicals.
02:15[00:05] and they have also made a cute nest, so from there I got the idea for my next video that I have made a lot of things for myself, so why don't we make something for the birds this time and whatever we make, we will
[00:18] and whatever we make, we will not use too many artificial things in it, so let's start quickly, as I told you that a lot of
[00:34] birds come to our house and that is why a few days ago when the carpenter was doing work at our house, a lot of wood was left in it, so we got this bird house made from him, so there is nothing in it, it is just we got this bird house made from him, so there is nothing in it, it is just
[00:51] he made it for us, so if you know how to join such wood by hammering, then you can make it at home, otherwise you can also get a similar shape made from a carpenter, so now we will decorate it and it I don't want to
[01:04] use too many bright and muted colors for painting here, but I want it to but I want it to I'm not applying it as if because I don't want too many
[01:18] layers of paint on it, and then the birds might not like its smell. And yes, you guys might think that the smell of this paint that I'm applying might also be irritating to the birds, so what will I do? After painting, I'll keep it in the sun for three to four days
[01:31] so that its smell reduces a little, so that the birds are easily attracted to it and can come and sit on it. This bottom part, here, I had a little color left, which was almost finished, so I
[01:46] applied that. I'm using brown and shades of brown. And on the side walls, I'll use light colors only. Now, you can decorate it as much as you want, you can also use clay, etc. Yes, but I didn't want to do that.
[02:01] I didn't want to do that. Another reason for this was that last week I made a very complicated DIY. It took a lot of time. So this time I wanted to make something simple and relaxed.
[02:15] So I thought I'd paint my birdhouse. Now, on the roof of this birdhouse, I applied wood stain on a cloth so that it looks a little like natural wood. Now, completely plain was n't looking good, so
[02:29] I thought there should be some floral print on it. So I used a stain from Its Bits here. In fact, whatever materials I'm using, wood stain and chalk paint, I got all these things from Its Bits. So, if you like DIY,
[02:44] you can buy any art and craft related product from here. And if you use my coupon code Mansi05, you'll also get an extra discount of 5%. in the description. So, with that, we're ready.
[03:00] I'm quite happy with it. I don't know if our birds will like it or not. So let's our birds will like it or not. So let's see its final
[03:28] also make arrangements for their food and water. So, till now, we used to keep food and water for them in a vessel, but in such boring vessels, I thought why keep food and water for them, let's make something for them too. I had a lot of clay
[03:43] pots at home, like kulhars, etc., in which we drink lassi or tea. I used to get them from anywhere, so I used to collect them and keep them. I had a lot of such pots, so I thought this is natural, and we can keep food and water for the birds in this, so
[03:56] is natural, and we can keep food and water for the birds in this, so we will make something from this. So, join them, I am using shaped clay, which is from its bits. If you want, you can also join it with cement. It is not necessary that you have the same
[04:10] vessel. You may have some other type of clay pot, so you can combine them with each other. You can join them. Right now, I had these two large bowls, so I'm joining them. But in the middle, I've placed something like a kulhar. And here,
[04:25] I've placed a glass on top of it, and I'll attach a small lamp on top of it. So, there are a I'll attach a small lamp on top of it. So, there are a total of three sections here. So, I've part, I'll plant small plants with small
[04:40] flowers. And in the middle part, we'll keep water. And in the upper part, we'll keep grains or some food for the birds. Right now, plant in it, so for the video,
[04:54] I'll fill it with water. But when I have one, I'll plant them in it. Now, I'm going to paint it. I'm using terracotta color so it so it looks natural. I don't want its color to look too bright or anything
[05:08] different. And this paint, I'm only painting the outside, not the inside because I think it would n't be good for the birds. You just have to apply this color on the outside, but
[05:22] one problem was that if we paint only on the outside and not on the inside, then the paint only on the outside and not on the inside, then the I have a solution for that, I will show you at the end how I have covered it,
[05:36] but where we do not have to keep water etc., we are painting only that place we are painting only that place [Sangeet] so our painting is complete, now we will just draw some patterns etc. on it
[05:52] so that it looks a little different and our birds like it. So when you keep it in your home garden or balcony, it will look very pretty, it looked like a fountain, and it looked very beautiful. So
[06:07] I have made a very simple pattern on it, I have not done anything too fancy, it is quite simple and you must have always seen such patterns, so I just took white chalk paint and made this pattern with that
[06:20] paint and made this pattern with that [Sangeet] if you want, there is a pattern You can also make it plain or you can add more colors etc. to it, you can make it colorful, you can do it as per your choice
[06:35] but because I wanted it to be very simple, that's why I made this because many times people say in the comments that you should have used that color and not this, so this is completely optional, you can do whatever you like according to your house, it is
[06:54] same, so in this way we have completed all the patterns and now let's see its final look [Sangeet] [
[07:16] Sangeet] [Sangeet] [Sangeet] [Sangeet So how did you like today's DIY, do tell me by commenting and if
[07:28] you liked today's video even a little bit then you already know what to do, like, share, subscribe, do whatever you can, I keep bringing other short videos, so let's meet again [Sangeet] [Sangeet]

⚡ Saved you 0h 08m reading this? Transcribe any YouTube video for free — no signup needed.