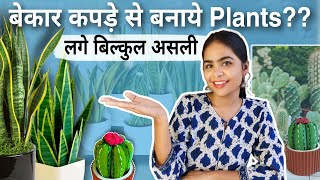

Fake Snake Plant Leaves from Plastic
59sShows a simple, budget-friendly way to create realistic fake plants from waste, appealing to DIY and sustainability enthusiasts.
▶ Play Clip"Title promises realistic fake plants from trash, and the video fully delivers with two detailed DIY projects."
This DIY video demonstrates two creative projects to make realistic fake plants from household waste: a snake plant from old plastic and a cactus from old clothes. The tutorial is detailed and accessible, encouraging upcycling.
Making fake plants from old clothes and plastic, aiming for realistic look.
Draw and cut V-shapes from a plastic pouch, about 20 pieces, with curved tips for safety.
Sand plastic for paint adhesion, apply dark green base coat, then light green watery shade for detailing.
Fold bottom of leaves, apply varnish for protection, plant into pot with wall putty.
Cut paper template for cactus shape, trace on old green cloth, sew two pieces together.
Make three pairs, turn inside out, align and sew through middle line.
Fill with old cloth scraps, add white thread for thorns, improve realism with extra shading.
Use old plastic container, texture it, place cactus, add optional quilling paper.
Both projects turn waste into convincing home decor, with the snake plant being more realistic. The video encourages experimentation and creativity.
What type of plant leaves were made from plastic?
Snake plant leaves.
03:01
Why was sandpaper used on the plastic leaves?
To make the surface rough for better paint adhesion.
01:30
What was used to fill the cactus instead of cotton?
Old cloth scraps.
07:53
How many leaf pieces were cut for the snake plant?
About 20 pieces.
00:57
What method was used to attach the cactus segments together?
Sewing through a middle line after aligning pairs.
07:25
Realistic snake plant leaves
Demonstrates that simple materials can produce convincing faux plants.
03:01Adding thorns with thread
Shows a creative method to add texture and realism to fabric plants.
08:39Cactus final look
Despite initial doubts, the cactus turned out cute, highlighting value of experimentation.
10:08Product promotion
Mentions Its Bits and discount code, but detracts from upcycling message.
04:09[00:03] [Music] Today we're going to make trees using old cups, yes, from old clothes and this old plastic.
[00:15] how I can make trees from these tattered things. This isn't a new thing. Earlier, we had made some plants using waste material that looked absolutely real. So, today too, we'll try our best to make plants that look real. And all the
[00:30] stuff I'm going to use, you probably have it at home. So home. So let's start the video. First of all, I had a plastic pouch. I do
[00:45] If you don't have this, Maybe some clothes etc. used in it, so it was of no use anyway. So,
[00:57] I thought that since it's so dirty and old, I'll make my own craft from it. So, we drew long V-shapes on it and after drawing, we cut all these shapes. We'll do it.
[01:13] cut both the corners of the bottom side as well. And the one on the top, I haven't kept it completely pointed so that it doesn't prick anyone. Instead of keeping it pointed, I've made it a little curved. Now you have to cut a lot of shapes like this. I cut about 20 pieces like this,
[01:30] cut a lot of shapes like this. I cut about 20 pieces like this, Now we have to paint on it. So before painting, I'll sand the surface a little with sandpaper, make it a little rough so that the paint
[01:44] sticks easily. And here use these only. So first of all, we have to take a dark green color and
[01:57] apply a layer on it. After one coat, it did n't look that good, so I'm applying two coats on it. [Music]
[02:16] we'll paint the back side. But you'll see that the color on the back part is there. It's already looking green because it was a transparent sheet. So, we'll just coat the back side once and it'll be complete. That's what I mean. Now, we don't have to coat it any further.
[02:31] We just need to set the detailing on it. For which I'm using this light green color. You have to first mix a lot of water in this light green color and then paint. You should n't just pick up the paint and apply it directly,
[02:44] otherwise, only the paint will be visible; it wo n't look like shading. That's what I [Music] So, we've created this pattern on the front side. We'll repeat the same thing on the back side
[03:01] You must have understood by looking at it that this is the leaf of a snake plant. So, I'm making a snake plant here. But if you want to make any other plant, you can make it using this process. Now, we have to fold the lower part slightly in this
[03:15] way. I'll tell you what will happen by folding it like this later. But first, we'll apply a coat of varnish on it so that it doesn't get waterlogged. etc. so that it does not get spoiled then all our leaves are ready and it looks like I have
[03:28] really plucked a lot of leaves of snake plant from somewhere but this is not real but it looks exactly like real now to plant all the leaves we pot you
[03:41] can use any plastic container etc and on top of this I am applying Its Bits chalk paint now I have taken wall putty and we have mixed water in the wall putty and we will put it inside this pot I have put some extra stuff below so that my
[03:56] wall putty is not wasted much so in today's video all the materials that I have used like chalk paint varnish I have taken all those things from Its Bits so you also want to buy any DIY art and craft product you can buy from here
[04:09] and let me tell you the best thing if you use my coupon code Mansi05 then you will also get an extra discount of 5% so we had folded the leaves from the bottom so that the wall So that it can be easily applied in the putty, now when it dries well then we will
[04:23] see its final look [Sangeet]
[04:40] So let's start our next DIY, so in the next DIY we are making a silk ant and this one DIY is going to be an experiment, I don't know how it will turn out but I have decided to
[04:54] try making it, it will turn out good or bad, I don't know at all right now and I do n't even know whether it will turn out or not, so first of all I have cut a paper in this way in a shape like a leaf, it is not even a leaf, I have cut it in whatever shape it is
[05:09] cut it in whatever shape it is and a thick one, now I am taking a paper and on it we will trace this shape [Sangeet] so we will trace it, after that we will cut it, so this will become a template
[05:24] and I am mentioning its size here so that you know what size you have to take, you can make it bigger or smaller, there will be no problem, after this I am taking a cloth here, you can use any old cloth,
[05:39] so I have this It was green in color, so we should use a color similar to green. Now we will trace this shape. Actually, I saw this idea on a printer, but they were making it in a completely different way. I mean, they were using some other material, some
[05:53] felt sheet, maybe they used that. And it was turning out quite easily because their material looked exactly like a cactus.
[06:06] And it was a very hard material. But we are making it out of cloth, so let's see how it turns out. And because this cloth is very thin, it does n't look like it can be made into a cactus. But let's try it. If it's done, then it will be
[06:22] cactus. But let's try it. If it's done, then it will be n't have to buy anything expensive. The cloth lying around at home will do. So here I have taken two cutouts. We will attach both the cloths together and then we will sew it from the sides. If you
[06:37] want, you can also sew it by hand, but I have a machine, so I used the machine. don't have a machine, you can do it by hand as well.
[06:57] when we join these six pieces with the pair of dodos, we will have a total of three pairs ready. Now, I have made small cuts on its sides so that it is easy to fold it inwards. Now, we will turn this cloth over and to turn it over, you
[07:12] can use a pencil, pen, etc. Now, in the same way, I will turn the other two pieces as well. way, I will turn the other two pieces as well.
[07:25] three pieces are ready. Now, we will align them properly on top of each other. But these were moving around a lot, so I thought of pinning them up. But I did n't have pins, so I took a needle and secured it from both sides with a needle. I
[07:40] drew a line in the middle so that we know that we have to sew it through this line. So, sew it from here. You can sew it again by hand as well.
[07:53] whatever old spare ones I have. We have taken the clothes that were there and will cut it into small pieces, so you can fill cotton in it, but why should we waste cotton when we have extra clothes, friend? And you can also
[08:09] use any old cutting etc., do not cut a new cloth and fill it in it, so do not cut a new cloth and fill it in it, so now we will just keep filling all the pieces in it, just like we fill the pillow with cotton and make it puff up, similarly we have to
[08:23] stuff these clothes in it so that it puffs up completely, so we will not keep it completely empty, so
[08:39] using this white thread to make the white colored thorns in it, so before this I will keep stitching on all its six sides like this and it will look a little like a thorn and
[08:53] no pink or red colored flower in the silk, so we will put that on top and again I do not have any idea for this, I have just taken an old cloth and this It was quite shrunken, so I thought let's take advantage of its shrinkage and
[09:08] try to give it a flower-like shape. Now this was also an experiment. I do n't know if it will turn out like a flower or not, but let's try it. When we're experimenting so much, let's try one more. But in the end, what I was
[09:21] afraid of happened. It did n't look that realistic. It looked a bit cartoonish. So I thought let's add some details to it. We ca n't leave it like this, so I
[09:37] added some more shades of green and added some more thorns, etc., and it started looking a little better. Now we'll make a pot for it too. I had an old plastic container. We'll use that and
[09:56] we'll use the textured part that comes out from the bottom. To make this pot, I tried my best to make this plant look a little realistic, but I don't know if
[10:08] it looks real or not, you guys decide. And if it doesn't look real, too. Yes, but I know one thing that it looks very cute in the end, it looked exactly like a cupcake, so you tell me how you feel, if it does
[10:23] n't look real then tell me that and whether it looks cute or not, that too, the quilling paper that I put inside is completely optional, it looked good to me, so I put it, so let's see the final
[10:55] look, so which one did you like the most in today's DIY, what to do, like, share, subscribe, do whatever you can and I keep bringing short videos, so let's meet again

⚡ Saved you 0h 11m reading this? Transcribe any YouTube video for free — no signup needed.