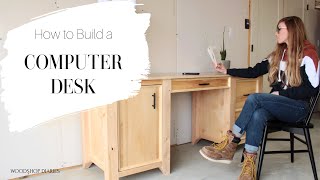

Dad's Epic Desk Build with Pivot Hinges
45sThe hook introduces a unique desk build with a pivoting drawer, sparking curiosity and engagement.
▶ Play Clip"Title accurately describes the build using 2x4s and plywood; video delivers exactly what it promises."
In this video, Shara from Mochup Diaries demonstrates how to build a custom computer desk for her dad's office, featuring a pivoting door, drawers, and a pullout keyboard tray. The desk is part of a matching furniture series and uses 2x4s and plywood, with detailed steps for construction.
Shara introduces the computer desk build for her dad's office, which includes a pivoting drawer, drawers, and a pullout keyboard tray. It's part of a matching series.
The video is sponsored by CraigTool, featuring the new 720 Pro pocket hole jig. Printable plans are linked below.
Legs are made from 2x4s glued into pairs, trimmed to 3-inch squares, and tapered at 60 degrees for detail.
Side panels are built using 2x2s and 3/4-inch birch plywood, assembled with pocket hole screws and wood glue.
Two cabinets are built: one with a solid bottom for a door and shelves, the other with 2x2s for drawers.
Drawer slides are installed, drawer boxes are built with dado joints and plywood bottoms, then installed.
Shelf pin holes are drilled for adjustable shelves. The door is made from plywood with cove molding trim.
Due to thick molding, pivot hinges are used on the outside edge. The first door was too big, so a new one was made.
The top is attached with screws. A keyboard tray is built with drawer slides and a front that folds open using concealed hinges.
Three coats of poly acrylic are applied, handles added, back panels stapled on, and a shelf installed.
The desk was successfully built with a few challenges, especially with the pivot hinges, but overall it was a fairly easy build that matches the previous pieces in the series.
What material is used for the desk legs?
2x4 boards.
01:23
What angle is used to taper the legs?
60 degrees.
02:17
What type of hinges are used for the door?
Pivot hinges.
08:25
Why were pivot hinges used instead of concealed hinges?
Because the door is almost 1.5 inches thick due to cove molding, and concealed hinges would not work for an inset door.
08:38
How many legs are made for the desk?
8 legs.
01:35
What is the purpose of the solid bottom in the door cabinet?
To provide a base for the door and shelves.
04:25
What type of drawer slides are used?
16-inch ball bearing drawer slides.
05:56
How is the keyboard tray front attached to allow folding?
Using full overlay concealed hinges for frameless cabinets.
13:31
What finish is applied to the desk?
Three coats of poly acrylic.
13:45
What is the overhang of the top panel on each side?
1 inch.
11:03
CraigTool Sponsorship
Introduces new pocket hole jig features that simplify the build.
01:09Pivot Hinge Challenge
First-time use of pivot hinges in a non-standard way due to thick door.
08:25Door Resizing
Demonstrates problem-solving when the first door didn't fit.
10:21Final Assembly
Shows the completed desk with all features working together.
13:45[00:00] Hey guys, it's Shara from Mochup Diaries and today I'm going to show you how I built
[00:12] this computer desk for my dad with a pivoting drawer, a couple of drawers, and a pullout keyboard tray. So if you're ready to get building, let's go.
[00:30] If you've seen several of my latest videos, you'll know that I'm kind of building a series of projects for my dad's office space. It started last year with this modular filing cabinet console, and then a few weeks ago I built a table desk combo, and then this open shelf
[00:43] with storage piece. And now he's getting a new computer desk so that everything in his shop matches. There may be a couple more pieces in this series later, but I'll have to confirm details with my mom first as she's in charge of the office aesthetics. In the
[00:57] meantime, this was an interesting build that I'm really excited to get into. I ran into a couple challenges with the door as it was my first time using pivot hinges, and I wasn't using them in the traditional way, so stay tuned for that.
[01:09] Now let's get building. This video was sponsored by my friends at CraigTool who just recently came out with a couple of new pocket haljigs. I'll be using the new 720 pro in this video, so keep an eye out. I've got the printable plans and detailed step-by-step tutorial linked
[01:23] below if you want to build one of your own. I started this project out the same way that I started the desk, table, and the open shelf project by making the legs. I made identical
[01:35] legs for all three of these projects, so this process may look familiar if you've seen any of those videos. I trimmed down my 2x4 boards to 32 inches, then glued them together into 8 total pairs to make 8 total legs for this desk.
[01:49] Once the glue was dry, I trimmed about a quarter of an inch off each edge on the table saw, just
[02:03] to clean up after the glue, and to make them a 3 inch square leg. Then I trimmed them down to their final lengths on the miter saw. And just like before, after they were trimmed down,
[02:17] I adjusted my miter saw angle to 60 degrees to taper two sides of each leg from the center out. This is an optional step, but it does add a little extra detail to fancy things up a bit.
[02:37] After all 8 legs had been tapered, I cut down some 2x2s and some 3 quarter inch birch plywood panels to use for the sides of these desk cabinets. If you want to learn more about how I cut down my plywood sheets, I have a video that I'll link below.
[02:57] Once everything was sanded well, I brought out my new Craig 720 pocket hole jig to try out. I'll link the product page with all the details about this jig in the description, but I wanted to point out 3 of my favorite new features that they've added to this particular
[03:10] jig. First, it has boldout support wings for extra support when drilling large plywood panels, which I'm about to do. Second, it has onboard tool storage for drill bits and the little wrench that loosens the set screw on the drill bit stock color. So maybe now I won't
[03:26] be losing it all of the time. And third, the automax clamping feature is set up to automatically adjust for your board thickness. So whether you're drilling into one and a half inch thick or a 3 quarter inch thick material, you don't have to change anything on the jig anymore like
[03:42] the older models. So I drilled my pocket holes into the 2x2s and the plywood pieces and began assembling the side panels using wood glue and pocket hole screws. I've mentioned this
[04:02] before, but I prefer using wood glue and one pocket hole screw with 2x2s because I've had issues with them splitting when I use 2 screws. But you can use 2 screws here if you'd prefer, or a different joinery method all together. I made sure to pay attention and face the
[04:25] tapers the right directions on the legs when assembling. And once I had all four identical side panels, I started building the two desk cabinets. One of these cabinets will have a door and shelves, so it needed a solid bottom. So for this, I cut a 3 quarter inch plywood
[04:42] panel and attached it between 2x2s using pocket hole screws to make this bottom shelf. Then
[04:56] I assembled the door cabinet using this bottom shelf at the bottom and 2x2s at the top. It's important here to attach the bottom panel equal distance on both sides from the top 2x2s
[05:11] to keep everything square. Once that cabinet was assembled, I repeated the process for the second
[05:37] cabinet. Only this time, I just used 2x2s because there's no need for a solid bottom since this cabinet will just have drawers. If you wanted to make a solid bottom, that's totally fine. It's just not really necessary. Now that both cabinets are built, it's time to customize
[05:56] each one. Because I love drawers, I started with the drawer cabinet first. I installed two pair of 16-inch ball bearing drawer slides into this cabinet, one at the bottom, and one 12 inches from the bottom. Because the drawer fronts will be about an inch and a half thick, I inset these
[06:12] hinges an inch and a half. If you want to learn more about how to build and install drawers and drawer slides, I will link a detailed guide in the description below.
[06:25] I ripped a piece of plywood off of my plywood sheet to build the drawer boxes from. I trimmed these drawer box pieces down to size on the miter saw and then cut a dado in them for the quarter-inch plywood bottom that I will add later. I edgebended the tops of the drawer box pieces just to give it a
[06:41] cleaner look and then I drilled pocket holes in the front and back pieces. Then I assembled using pocket hole screws and installed a quarter-inch plywood bottom before adding the last piece.
[07:05] And finally, I installed these drawer boxes into the cabinet.
[07:19] If you're curious about the sizing and spacing here, all the dimensions for this project can be found in the plans linked below. I still needed to build the drawer fronts, but for now I set this cabinet aside to work on the door cabinet. The door cabinet will have a shelter to install in it, so to give
[07:36] my dad some options on where he wanted these shelves to go, I used my Craig shelf pin jig to drill shelf pin holes in this cabinet so that he can have adjustable shelves. I drilled holes in each side along the back edge and then I used a spacer block to drill holes about seven inches from the front
[07:51] edge on each side. Then I started working on the door. I cut the door from three quarter-inch plywood and edgebended the sides, then I just cut to fit cove molding to trim out the edges.
[08:06] I glued these pieces onto the front and used some painters tape to hold them in place while the glue dried.
[08:25] Now a note about the hinges. So this project is a little different than how I would normally mount a door. Since this door is actually three quarter-inch plywood with an additional 11,
[08:38] 16th cove molding on the front, this door is almost an inch and a half thick right here. So a normal concealed hinge would not work here because it would not allow for the thickness of the
[08:53] molding. It would if it was a overlay door but since it's in set, it's just not going to work. So I picked up a couple of pivot hinges. So technically it's supposed to go on the, it's
[09:06] supposed to mount on the backside here and pivot on obviously this little rod. Now that's not going to work because no matter where I put this pivot, this trim is still going to hit. So we're going to
[09:20] put it on the outside edge like this instead of on the back and that way it can pivot here and we should be able to have enough material over here to screw this hinge into. Think that it will
[09:34] work and whatever works works. I've linked the exact hinges that I used below. To install these, I found a drill bit that was slightly larger than the bushing but not quite as large as the flange
[09:46] of the piece that came with the hinges. I set that bit aside for now and measured five eighths inch from the left edge and three eighths from the front edge. It appeared that the hinge would be able to pivot freely there so I first drilled a small pole. This was really close to the side of the
[10:02] cabinet so I had to drill it at a slight angle but it was fine. Then I used my larger drill bit to drill a hole for the bushing to fit into. I used a scrap wood block and a hammer to tap it into place. I repeated this process at the top and then I tested with the door to realize it was too big.
[10:21] So at this point I took a deep breath and celebrated that the hinges worked and also mourned that I was going to have to remake this door. I took the time to go ahead and build a new door and the door fronts at the same time so that they'd both be ready to install later.
[10:37] These were all just plywood pieces cut to size with cold molding glued around the front edges. So I glued and taped the pieces in place and let them dry.
[10:49] While the glue dried on those I screwed a two by two between the two cabinets at the top back corner to prepare to attach the top panel. I cut the top of this desk from three quarter inch
[11:03] plywood cutting big enough that there would be an inch overhang on each side of the cabinets and along the front. I edge banded the sides, gave it a good sanding and then centered this top piece onto the cabinets. I used two inch wood screws to the top two by two's in multiple places
[11:20] around this desk to secure the top. I made sure to keep the space between the cabinets equal from the front and the back before attaching. Now the middle of this desk has a keyboard tray.
[11:32] So to give the drawer slides somewhere to mount to I screwed three quarter inch plywood scraps between the legs on each cabinet in the middle so that they were flush to the outside edge. Then I could mount these drawer slides onto these pieces.
[11:48] I've run interesting my scrap plywood pile and found some pieces that I could cut down to build the keyboard tray and to use as the tray front. I edge banded the sides that would show,
[12:00] sanded everything well and then screwed these sides into the bottom panel. Now I needed the bottom of this tray to be four and an eighth inches from the top edge.
[12:13] So I cut some scrap blocks to help me clamp the tray in position while I screwed it into the drawer slides.
[12:27] For the tray front I was going to install this using overlay concealed hinges. So I used my cred concealed hinge jig to drill out the cup holes to install the hinges. But before installing them I glued cove molding around the front to match the rest of the cabinet.
[12:46] The last detail that I added was just lining the left and the right side of the desk with cove molding to match the drawer and the door fronts. I just glued these pieces in place. While the glue dried on that I went ahead and installed the drawer fronts using screws
[13:01] through the inside of the drawer boxes to attach them and then I installed door onto the pivot hinges. I screwed the bottom hinge into the door first and then pushed the door into place into the top hinge. In order to screw the door to the top hinge I had to crawl through the back side of
[13:18] the cabinet and it was a pretty tight fit. But once everything was together and screwed in place to my surprise this worked out really well. I installed full overlay concealed hinges for
[13:31] frameless cabinets onto the keyboard tray front. Then I installed the keyboard tray front onto the tray. This will allow the front to fold open as needed for typing.
[13:45] Once everything was dry and well sanded I applied three coats of poly acrylic to the desk,
[13:59] added some handles and then cut two quarter inch plywood panels to staple onto the back of each cabinet. You can drill holes into these back panels for cords if you need to.
[14:13] And the last thing was just adding some shelf pins and a shelf. And finally this desk was complete. This project had several steps and there was a lot of back and forth waiting for glue to dry and moving on to the next thing and then coming back and fixing
[14:28] the last thing. But all together it was actually a fairly easy build. I learned something new using pivot hinges for the first time and I really enjoyed designing this desk to match the last two pieces that I've built for Dad's office. I really hope you've enjoyed this whole matching series and if
[14:45] you haven't seen the others be sure to check those out next. If you've enjoyed this project I would love it if you subscribe so you don't miss out on what's coming next. There may or may not be more pieces in this matching series coming soon. Anyway thanks so much for watching and until next time
[15:01] happy building.
⚡ Saved you 0h 15m reading this? Transcribe any YouTube video for free — no signup needed.