Should you remove baseboards? Pros and cons
60sDebates about whether to remove baseboards or use quarter round are common among DIYers, making this segment highly engaging and controversial.
▶ Play Clip[00:00] My neighbor asked if I could come over and install new flooring. They did a lot of heavy lifting by removing the old carpet. They were also happy that the walls were painted and all they needed to do was install the floors.
[00:12] Right then I knew this was going to be a little miserable and a perfect roll I'd like to remove the base board because that would make the installation of the new floor much easier. This is what it looked like before and here's what it looks like now.
[00:27] In this video I'm going to show how to install these floors but a very first time so if you're a newbie, this video is for you. Before I take you back to the concrete floor, I want to thanks to a sponsor, Norboard. The main reason I started making things is the fact that I enjoy working with my hands.
[00:42] An office job is not for everyone I personally enjoy being in the trenches and taking part of the building process, seeing things come together. Norboard's mission is to shed some light that there's a shortage of framers in the construction industry.
[00:54] This is an amazing opportunity that has great pay and there's no college requirement. Becoming a carpenter is something you can do in a short period of time. Not just power so picking up a new skill will set you apart. I learned to do what I do by trial and error but there's an easy way.
[01:08] There's training and there's apprenticeship programs that you can take part in. It's never too late to try something new and it's never too early to start. Check out becomeaframer.com slash DIY creators to learn more information on becoming a
[01:20] gamer. And enter for a chance to win a home depot gift card and it's really cool as to win pro-framing hammer. Now if you take the baseboard off, this will allow you to run the laminate closer to the wall
[01:44] and eliminate the need for quarter round. If you don't have the tools or you're intimidated by it or you just don't have the time, that's a legit reason to go at the quarter round. As I said this video is for complete beginners so we're going to take you all the way back
[01:59] to the basics. Let's talk about how to measure your room and get the right amount of materials. The way this room is laid out I would divide it into three different parts where I would take the measurements and then add those together.
[02:12] And with that information you can now pick out the flooring you want. You'll also need underlayment and if you're not removing the baseboard you'll also want to pick up quarter round. And to get the right amount and that all you need to do is just measure the baseboard going
[02:25] around the entire room and that'll tell you how much you need. And finally you'll need some transition pieces to go from one floor to the next. Let's assume you have all the materials you need, the very next thing you need to do is clean
[02:38] the floor. This room previously had carpet and there was a few remaining nails from the texture. A pry bar do a really good job of removing those. With those removed I can now clean up all the debris on the floor and start off with a clean
[02:51] slate. Now let's shift our focus over to underlayment and you may have seen that there are a few different versions available at different price. Underlayment in general is meant to be a moisture barrier and that keeps the element of floor
[03:04] dry. Normally you'll see a standard or premium version. Some of these provide a higher rating for sound blocking and the more expensive brands say there are mold and mildew resistant. Since I'm working with concrete slab here I want to make sure I cover the entire slab with
[03:18] these. Depending on the brand you get you'll need to pick up a roll of tape to cover the seam. This is the standard version and it already comes with its own tape on it so all you have to do is peel and stick.
[03:30] The tape is only on one side so once you place the opposite side to the wall you just work your way out from there, tape it to the next one and then so on.
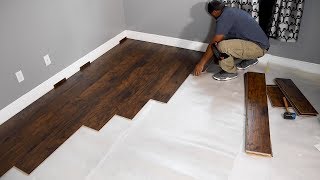
[03:48] After working the underlayment in place it's time to move on to the floor. So choosing the direction of the floor can stump a lot of people. I personally think this board on to your taste in which you want. If you carry this throughout the house then probably make more sensors carry it right into
[04:03] the bedroom or if you're just doing different laminate in different rooms you can go with the length of the room or you can go the opposite direction. For this installation I'm going to lay the floor following the longest distance in the room.
[04:15] If I was to do this floor again my starting point would be different. With the base board on it would have been easier to start from the door and work my way to the opposite side. So let's head over to the lighter saw and I'm going to cut a few pieces that's going to
[04:28] be for spacing and these are going to be for the gap expansion. And that means over time the floor is going to change state due to temperature changes
[04:41] and what you don't want is the floor to buckle because it doesn't have room to expand. So I'm going to place the spacers at the starting point this way I never lose my gap.
[04:53] When it comes to the first floor I like to spend a little time there trying to prep it and get it all ready to go. It's also a good idea to cut off the tongue on the first row of planks. The first row call for three planks. Two of those are full and one of those I need to cut that and I need to modify the trim
[05:07] going around the closet. While it is possible to cut trim without using an oscillating tool, if it's possible using an oscillating tool it's just so much easier.
[05:19] Now after cutting the bottom of the trim off you see that the laminated plank can slide right under. Now I need to cut the profile for the plank so that it can slide under the trim. But before committing to that I needed to use tape so I can mark where I wanted to cut
[05:34] because it's really hard to see if I marked on the laminated piece itself. The tape also cut down on a chip in from the laminated edge. Now that I have this all sorted out I'm going to make sure I have the proper spacing going around the laminated one.
[05:49] So let me point out how I like to go about the first three rows of the plank and then it's all repetitive from here on out. For the first row I use an entire plank for the second row I went half of that and for the third row I went half of the second plank.
[06:03] And if you want to carry that consistent look all the way out you could but it may take up more planks by just trying to keep a consistent design. If that's not that important to you you can utilize the last cut off plank to start the next
[06:16] row. The way these go together it's fairly simple. I want to take the tongue, place it in the groove at an angle and then snap down. And this gets pretty repetitive until you make it to the other wall.
[06:53] So a quick tip is anytime you're cutting the last plank in that particular row what you want to do is flip it around, mark it that way, and then make your cut.
[07:09] Now I like to use a cut off section from the planks and use that as a way to tighten up the joints. Even if they look tight I tap it a little just to make sure that everything is locked together.
[07:32] Now I've kept these joints pretty tight going the entire distance across the floor. But when you get to the last row you'll want to use what they call a pull bar to tighten that one up.
[07:44] As I said earlier it would have been easier for me to start on this side of the room. And the reason for this is the molding did not come off which would have made it easier. So now I have to work almost backwards in trying to get it to go under the door frame.
[07:59] And that was a little challenging but keep in mind I do have a little wiggle room here with the quarter round molding which I can hide any gap issues. And speaking of quarter round I'm going to shift my attention to that now. Normally I'd install the transition and leave the quarter round to the end.
[08:13] As I was doing the installation of the floor I realized two different things was happening here. The two interesting to the room there were different levels. One was high and the other one was low. My only concern there was I didn't think that the transition piece we had might have worked
[08:27] so I pushed that off to the end and shift my focus over to the quarter round. For me to cut down on the back end for if I like to cut all the pieces and lay them out before I start to nail them on. I cut all the quarter round to a 4 to 5 miter which gave the cleanest look.
[08:41] I can't think of any real starting challenge on these so you can pretty much start anywhere and just work your way around the room.
[08:55] You can use a nail gun or you can go nail and hammer. Now I prefer to use a pin nailer it's not as strong as an 18 gauge nail gun but it leaves
[09:07] the smallest holes in which you can cover while you apply and caulking. As you're working on the quarter round you'll find that you need to extend some of these the best way I find to approach these is cutting those out of matter as well.
[09:19] These are very easy to cut you can cut those out of the matter saw or you can also use a miter box.
[09:32] If you really want to finish off the quarter round with a nice touch I'd say miter the ends and cap it off.
[09:52] Now that I put my undervited attention to the two doors it's time to install the transitions. When you have two flooring that meet up at the same height you want to go with a T mode transition like this.
[10:04] So after a trip to the store my neighbour informed me that they didn't have any T mode at the store. I do find it to be odd but I didn't want to hope the job by not having what I needed so I wanted to see if I could make some modification here at the door and I was able to make it work.
[10:23] I drilled and installed the miter track and I also gave it a bit of a shim so that it sat higher than the tile and also the laminate flooring. After installing the metal track all I have to do now is hammer the transition piece
[10:37] right into the metal track. There is enough tension under metal piece to hold the transition piece down so these can be pried off if needed. Even though they have a nice finish on them they're not high quality products so they will
[10:50] come apart if you disturb it too much. Now I shift my focus over to the bathroom. This is the situation I've never been in before. One I already had an existing transition here in the bathroom and what makes this different
[11:04] is the fact that I have to cover a transition with another transition. In a way I wish I had a better way to address this but for now this is it. A transition piece not only provided decorative solution from one for to the next but it also
[11:18] provide protection to the edge of the laminate. I installed a metal track similar to the one I did at the other entry. The only difference is I put the track on top of the laminate flooring.
[11:30] For the final touches I cocked around a trim and also between the base board and the cord around. And again this is a perfect opportunity to touch up all the little nail holes. There is a bigger than normal gap under this trim.
[11:42] I'm not sure if the purpose of that was so that the carpet can go under it or not but I want to fix this by using some caulking. And although I'm not fixing it in a sense of taking the issues away I'm going to mask
[11:54] it by using caulking to make it look more presentable. And once I'm done here all my neighbor have to do is paint the base board and trim or just do some touch up work.
[12:13] Before turning this over to my neighbor all I had to do was clean up my mess and my job was done here.
⚡ Saved you 0h 13m reading this? Transcribe any YouTube video for free — no signup needed.