
Save $350: DIY Faucet Replacement
42sHigh cost-saving appeal with clear before/after, relatable to homeowners.
▶ Play Clip"Delivers exactly what the title promises: a clear, step-by-step faucet replacement guide with practical tips."
This DIY tutorial demonstrates how to replace a bathroom sink faucet and drain using common hand tools, saving the average cost of hiring a plumber. The video provides step-by-step instructions from shutting off the water supply to installing the new fixtures and checking for leaks.
Replacing a faucet and drain yourself saves about $350, as the national average for a plumber is $400 while the kit costs around $50.
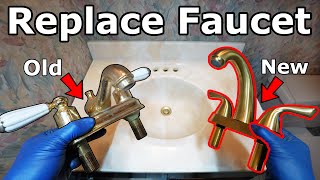
The old faucet is corroded and the drain is leaking from the pivot rod, necessitating replacement.
Turn the hot and cold water valves clockwise until snug to shut off water to the faucet.
Use an adjustable wrench to loosen supply lines, but place a catch can underneath to catch residual water.
Remove hoses, screw-on washers, and the clevis strap to free the faucet from the sink.
Use soapy water and a plastic scraper to remove old gasket material without scratching the sink.
Place the new faucet with gasket over the holes, ensuring the gasket matches evenly to prevent water intrusion.
Hand-tighten washer nuts, then snug them alternately to secure the faucet evenly.
Attach new supply lines, noting the rubber gasket inside the hose eliminates the need for tape or compound.
Disconnect the jam nut and slip nuts to remove the p-trap and drain assembly.
The p-trap holds water to block sewer gases and catches debris, preventing clogs deeper in the line.
Press pliers into the drain to create resistance while unscrewing to prevent the drain from spinning.
Align the new drain's hole with the sink's overflow hole to ensure proper drainage even when the stopper is closed.
Place the rubber gasket with the wider end against the sink, then hand-tighten the nut snugly.
Attach the p-trap with the washer's flat side against the nut, then tighten both nuts snugly.
Turn on the water and check with a paper towel for any leaks; the installation is leak-free.
Replacing a bathroom sink faucet and drain is a straightforward DIY project that saves money and requires minimal tools. With careful attention to alignment and snug connections, you can achieve a professional result without leaks.
What is the national average cost for a plumber to replace a bathroom faucet?
$400
00:17
How much does the replacement kit cost?
Around $50
00:17
What is the purpose of the p-trap?
It traps water to block sewer gases and catches debris to prevent clogs.
06:24
Why is it important to align the hole in the new drain with the sink's overflow hole?
To ensure the emergency drain can drain water even when the stopper is closed.
08:11
What tool is used to remove the p-trap nut?
Tongue and groove pliers
05:57
Why should you use a plastic scraper instead of a metal one to remove old gasket?
To avoid scratching the sink.
03:09
What is the correct way to tighten the faucet mounting nuts?
Hand-tighten each, then snug them alternately to ensure even pressure.
04:00
What should you do to prevent the drain from spinning when unscrewing it?
Press pliers into the drain to create resistance.
07:28
Cost Savings
Highlights the significant savings of DIY vs. hiring a plumber.
00:17P-Trap Explanation
Clearly explains the function of the p-trap in preventing sewer gases and clogs.
06:24Overflow Hole Alignment
A crucial detail often overlooked, ensuring proper drainage.
08:11No Tape Needed
Clarifies that rubber gaskets eliminate the need for thread tape or compound.
04:26[00:03] going to teach you how to replace a bathroom sink faucet and bathroom sink drain using common hand tools that way you guys can get this job done at home yourself and save a ton of money now the national average for a plumber to come
[00:17] out and do this is 400 and this kit right here which comes with everything you need cost me around 50 i'll be sure to link this kit and the you can easily find them and get the job done yourself so we're saving around 350
[00:32] the reason why i need to do this is because you could see this faucet has seen better days it is all corroded and i actually did try polishing it out you plating is so thin it just goes down to the metal underneath same thing with our
[00:46] drain not only that underneath here is so corroded from this being so old that it is leaking so let's go underneath and let me show you all right so let's clean this out real quick so we can get under the sink good so now that we have access
[00:59] under the sink let's turn the water on so you can see how bad this is and that leak even though we only ran the water for a few seconds it's pouring out so it's leaking from this rod right here which is the pivot rod which opens and
[01:12] closes the drain in the sink so in addition to replacing the faucet we're also going to be replacing this pipe here which comes with the kit so let's to do is close the hot water and cold
[01:24] water going to the faucet and these you want to turn clockwise so tighten them down and as you tighten it shuts the water off and when you're shutting these off don't over tighten them just turn them until they're snug just like that
[01:37] next we want to turn on both the hot and cold water at the faucet to make sure off we're going to go back underneath and disconnect this old faucet from the sink so first we need to remove both supply lines that's the hot water supply
[01:50] before you loosen these up get some type of container or towel anything to catch the residual water that's left in these lines so with the catch can in place we're using an adjustable wrench for this entire job which is convenient so
[02:03] you could unscrew it the rest of the way by hand and you can see this is why you have to have a catch can look at all that water okay so now that this is disconnected let's break loose the other side good and we'll remove this side the
[02:16] rest of the way by hand and set that off to the side as well faucet and the sink meet we need to remove the two hoses from the faucet so use your adjustable wrench and break that nut loose and remove it the rest of
[02:29] and now the cold water hose is removed next there's a screw-on washer that faucet in place so let's get that clevis strap that way we could pull the lift rod out of the faucet like that and
[02:43] then we could break loose the hot water line and remove it the rest of the way and finally we just need to remove this last screw-on washer all the way and now our faucet is loose and could be removed so out with the old
[02:57] and in with the new but before we install our new faucet we need to clean the old gasket off the sink so let's grab some soapy water and spray down the hard to remove gasket material and then grab a plastic scraper and remove the
[03:09] rest of the gasket that's really stuck on there and please don't use a metal to scratch up your sink the plastic works great because it doesn't scratch the sink here's a before and after okay so with a
[03:22] lay it down over the holes then grab so it matches the gasket be sure you match the gasket even around the entire faucet that way we don't get any water
[03:34] intrusion underneath the faucet and it looks good and check it out that looks so good especially compared to the old one not only is it nice because it's not corroded but it's a lot more modern than the old one the old one's pretty old
[03:46] school so that is looking absolutely beautiful we are done up here let's go underneath tighten that down and get the hoses connected so we can run the water these washer nuts so tighten down each one by hand
[04:00] and once they're both snug you want to work back and forth snugging each one up that way the faucet gets tightened down evenly all right so with the nuts tightened down this is secured so this won't budge
[04:12] also this gasket is seated against the surface of our sink so we won't get any leaks so that's in place now what we need to do is install our water lines came with it or reuse your old ones whatever you want i'm going to use the
[04:26] let's go underneath and let's tighten this down actually real quick if you look inside the end of the hose you can see there is a rubber gasket i want to don't need to use anything on the threads we don't need to use tape we
[04:39] don't need to use any type of compound to prevent any leaks this gasket will seal it up so let's just tighten down the nut by hand and then grab your good alright so our new line is a lot longer
[04:52] than the old one and to make it fit without any kinks what we're gonna do is we're gonna loop it around like this and tighten it down so hand tighten the nut all the way and snug it up with your adjustable wrench and no need to over
[05:04] tighten these just tighten it so it's snug now we can get the hot water hose on and you can see the hoses are actually color coded blue for the cold snug the nut down good do that little loop with the hose
[05:17] so it fits and there's no kinks and then tighten down the other end of the hose tighten down the other end of the hose to the valve and snug it up like so all right so our hoses are tightened down they are nice and neat and they are
[05:30] in so we have completely finished installing our faucet now all you would but we're gonna have a giant leak because our drain is leaking so we need to replace this drain first it's super easy to do let me show you how all we
[05:44] need to do to remove this is disconnect the nut up here holding it into the sink that needs to be loosened and then another slip nut right here and the p-trap will come out and we'll be able to remove this so let's start by
[05:57] tongue and groove pliers and a tongue and groove pliers is designed so the jaw opens up pretty wide and it accommodates large fasteners like this okay so with that jam nut loose this whole drain is loose but in order to
[06:11] remove this what we need to do next is remove the p-trap so grab a catch can because there's gonna be water in the p-trap then we can remove this nut up and the nut down here by hand and let's give this a pull
[06:24] good and the p-trap is removed so this is actually a pretty important part to this is called a p-trap because what it does is it traps water in here this right here is your sewer line so if we didn't have a p-trap and this just went
[06:38] straight out into your drain you would get gases from your sewer line from the sewer in the street into your house it would smell horrible but what this does is it creates a trap for water to sit down here and basically block any gases
[06:51] from your sewer getting into your house also this is the first thing to clog all the dirt hair anything that collects in here is going to collect right here and not deep into your sewer line which is a lot harder to unclog so if your drain
[07:03] drains slowly just take the p-trap off and clean it out in this case our p-trap is already clean there's nothing in here our drain drains at the proper speed but if your drain doesn't drain quickly this is probably clogged up take it apart
[07:16] you're good to go so let's slide this nut off the drain pipe and now to remove the problem is as we're unscrewing this the drain in the sink is spinning as
[07:28] well so we aren't actually unscrewing anything so to stop this from spinning i'm going to press my pliers into the drain and create some resistance and now when we spin the pipe we're actually unscrewing it oh and look at that that
[07:40] is disgusting and the same thing at the sink look at all this crud in here i'm glad i'm wearing gloves okay so clean this gunk out and i can tell you you through the screen so the emergency drain drains straight down right into a
[07:56] right here but you're not gonna be able to see i do have a mirror and here's a better look you can see the hole in the mirror which is right where my finger is when we do the install i'm gonna just put that piece of tape right there and
[08:11] the reason why that hole is important is because our new drain has a hole right there you see that hole in that so when this goes in we have to align that hole with this hole so that our emergency drain could drain the water even when
[08:25] that's completely closed so here we go you can see our drain hole is right up straight towards the hole hole's aligned with our emergency drain hole so with the new drain in place
[08:40] let's get the new rubber gasket on being sure the wider end of the gasket is going up against the sink like this now we can install this nut so thread it on and get it nice and tight up against that gasket this only needs to be hand
[08:53] tightened but make sure it's snug like that now all that's left is installing the p-trap so grab the top nut and washer and we'll put the nut on first and when installing the washer there's a flat side of the washer and
[09:05] then there's a rounded or curved side of the washer the flat side should go up and press against the nut like that then just get the p-trap in place and we'll tighten down the back nut so it's snug just like that and then let's tighten
[09:17] down that top nut so it's snug and the gasket's gonna seat against that nut that way there's no leaks so with the p-trap installed finally we could open up the valves for the cold water and for the hot water
[09:30] all right so everything has been reconnected our water is on and we have a paper towel here so we could easily spot any leaks so now moment of truth this looks let's see what we got here hot water
[09:45] cold water it's looking good we could stop it from uh draining there that's working have any leaks and not one drip at all beautiful so
[10:00] that is exactly how you replace a leaking faucet and drain super easy to do this is a great project because it requires minimum tools it's really hard to mess up it's inexpensive to do you
[10:12] save yourselves a ton of money and it looks awesome when you're done so it's very rewarding so hopefully the video was helpful if it was remember to give subscriber consider hitting that subscribe button and all the tools and
[10:25] linked in the description so you could easily find them
⚡ Saved you 0h 10m reading this? Transcribe any YouTube video for free — no signup needed.