Avoid Tiny Slivers: Last Row Trick
51sSolves a common DIY frustration, making the floor look professional.
▶ Play ClipThis video provides a step-by-step guide to installing laminate flooring, focusing on Pergo TimberCraft Plus. It covers preparation, installation techniques, and finishing touches for a waterproof, hardwood-like floor.
Laminate floors look like hardwood and are easy to install. The featured product is Pergo TimberCraft Plus, which is waterproof and can be wet mopped.
Check manufacturer's instructions for specific tips. Use a reference list in the description for tools.
Subfloor can be uneven up to 3/16 inch over 10 feet. Undercut door frames using an oscillating saw.
Use spacers for a 3/8 inch expansion gap. Measure room square footage and add 10% for waste. Acclimate flooring for at least 48 hours.
Start along the straightest wall (usually exterior). Calculate last row width to avoid thin slivers.
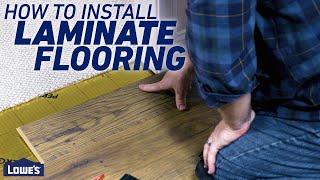
Lay first row with tongue facing wall, cut off tongue on first piece. Blend planks from different cartons. Offset joints by at least 6 inches.
Use click-lock system: insert tongue into groove and rotate down. Install two rows at a time in an alternating pattern.
Use a jigsaw for obstructions. For the last row, cut planks lengthwise. Use pull bar to tighten.
Remove spacers, fill expansion gaps with backer rod and silicone sealant. Install baseboards and transitions without nailing into the floor.
"The title accurately describes the video's content, which is a step-by-step guide to installing laminate flooring."
How long should laminate flooring acclimate in the installation room?
At least 48 hours.
2:01
What size expansion gap is recommended for Pergo floors?
3/8 inch.
1:37
What is the maximum subfloor unevenness that Pergo laminate can tolerate?
3/16 inch over 10 feet.
0:53
How do you lock Pergo planks together using the click-lock system?
Insert the tongue into the groove along the long side, then rotate down to lock.
4:00
What is the minimum offset required between plank joints to avoid H-joints?
At least 6 inches.
3:36
What materials are used to fill expansion gaps for waterproof protection?
Compressible PE 3/8 inch backer rod and 100% silicone sealant.
5:58
What tool is used to cut flooring around pipes or floor vents?
A jigsaw.
5:00
Alternating Plank Pattern
Explains the two-row alternating installation method to ensure a staggered, professional look.
3:01Waterproof Laminate
Highlights that the flooring is waterproof, allowing wet mopping and protection against spills.
0:18Starting Wall Selection
Advises starting along the straightest wall, typically an exterior wall, to ensure a straight installation.
2:14Waterproof Sealing
Emphasizes sealing expansion gaps with backer rod and silicone to maintain waterproof integrity.
5:51[00:00] hi guys i'm steve laminate florists have
[00:03] the same great look as hardwood floors
[00:04] and they're easy to install and today
[00:06] I'll walk you through the steps to
[00:08] install your own Lowe's has many styles
[00:12] of laminate floors to fit any home but
[00:14] today we're using pergo timber craft
[00:16] Plus web protect so protects against
[00:18] spills and pet accidents it's waterproof
[00:20] so you can even wet mop it and this one
[00:23] is antique barnwood style so it's gonna
[00:24] look great now before we begin we've got
[00:27] to make sure we have all the necessary
[00:28] tools to help you out you put a handy
[00:31] reference list in the description below
[00:32] also make sure to read the
[00:35] manufacturer's instructions they'll
[00:37] include helpful tips for installing on a
[00:39] variety of subjects specific to the
[00:43] flooring you're installing them as
[00:45] always if you're not confident about
[00:47] installing something yourself see a
[00:49] Lowe's associate for help the first step
[00:51] is to prep your subfloor pergo is pretty
[00:53] forgiving can stand up to 3/16 of an
[00:55] inch unevenness across ten feet but for
[00:58] more information on leveling your
[01:00] subfloor we put a link to that video in
[01:02] the description below now as you can see
[01:04] we have a door framed undercut to get
[01:07] the height of the cut stack a piece of
[01:09] underlayment and laminate next to the
[01:11] doorframe and use an oscillating saw to
[01:13] cut also you might have to install
[01:16] underlayment some flooring comes with
[01:18] pre-installed underlayment on the planks
[01:20] but again refer to your manufacturer's
[01:22] instructions for the product you're
[01:24] using I've also put spacers around the
[01:28] perimeter of the wall to provide an
[01:30] expansion gap I've taped them to the
[01:32] baseboards so they don't move around
[01:34] during installation for this pergo floor
[01:37] they recommend a 3/8 inch spacer but
[01:40] check your manufacturer's instructions
[01:41] to be sure meanwhile I've measured the
[01:44] square footage of the room with
[01:46] multiplied by length so I know how much
[01:48] flooring to get then I added 10 percent
[01:51] more just to count for any waste or
[01:53] mistakes
[01:54] next I brought the flooring in to the
[01:56] installation room to let the planks
[01:57] acclimate to the temperature and
[01:59] humidity you want to do this at least 48
[02:01] hours prior to installation so now that
[02:04] we're ready to install I've chosen to
[02:06] start along this wall based on the
[02:08] manufacturer's instructions you want to
[02:10] go from left to right along the
[02:12] August straightest wall typically
[02:14] exterior walls are more straight than
[02:15] interior walls also to make sure you
[02:18] don't end up with any tiny slivers for
[02:20] the last row measure the length of the
[02:22] room and divide by the width of the
[02:24] plank not including the tongue or groove
[02:26] so if you have a room like this that's a
[02:28] hundred eighty three point seven inches
[02:30] wide subtract three eighths inch from
[02:33] each side then divide by the width of
[02:35] the plank six point one two five and
[02:38] you'll get about twenty nine point eight
[02:40] seven planks take the remaining bit to
[02:43] find the width of the last row that's
[02:45] point eight seven and multiplied by the
[02:48] width of the plank six point one two
[02:50] five and you'll get a last row that is
[02:53] roughly five and three eighths inches
[02:55] I've inspected the planks and it looks
[02:58] great so now we're ready to begin the
[03:00] first thing you want to do is lay down
[03:02] the first row with a tongue side facing
[03:05] your starting ball the one thing I
[03:07] recommend is blending planks from
[03:09] various cartons to ensure a mixture of
[03:11] colors and shades when you're happy with
[03:14] the layout cut the tongue off the long
[03:16] side of the pieces don't forget to also
[03:21] cut the tongue off the short side of
[03:23] your first piece as it'll need to fit in
[03:25] the corner against the spacers now
[03:28] before we assemble row one and put it
[03:30] into place lay out a second row of
[03:31] tongue side facing the wall again make
[03:35] sure to offset the board's by at least
[03:36] six inches to avoid H joints then cut a
[03:40] plank at length is needed but save your
[03:41] trim sections because you can use these
[03:43] pieces to start other rows okay now that
[03:49] we've got a cut you're going to want to
[03:51] install the planks using this all
[03:52] turning pattern going to rows at a time
[03:56] all pergo floors have a click lock
[03:58] system to make it easy to do yourself
[04:00] just insert the tongue into the groove
[04:03] along the long side then rotate down
[04:05] locks into place do the same for the
[04:09] next two planks join in the short end
[04:11] first to close the gap in the long side
[04:13] lift the outside edge of the plank just
[04:16] about an inch and firmly push until the
[04:19] edges meet then rotate down to lock
[04:22] because this is a floating laminate
[04:24] floor we're not using any adhesive nails
[04:27] or staples so now we can simply slide
[04:29] the first two rows into their final
[04:32] position now that they're in their place
[04:36] measure and cut your final end pieces
[04:38] and corner pieces again accounting for
[04:41] the expansion gap then use your tapping
[04:45] block or pull bar to tighten repeat
[04:48] these steps using the same alternating
[04:50] plank technique to complete the floor
[04:57] if you encounter any obstructions like
[04:59] pipe or floor events use a jigsaw to cut
[05:01] the flooring to fit always maintain that
[05:04] expansion gap for the last row you may
[05:07] have to cut the pieces to fit measure
[05:10] the width needed subtracting the
[05:12] expansion gap and cut lengthwise
[05:17] when installing around the doorway slide
[05:20] the plank at least a quarter inch under
[05:21] the doorframe leaving concealed 3/8 inch
[05:24] expansion gap then with your tapping
[05:27] block or pull bar tap the long size
[05:30] closed first
[05:31] then tap the short side closed to finish
[05:34] up measure and cut your final corner
[05:36] plank insert the tongue into the long
[05:38] side align the short side rotate down
[05:42] then use your pull bar and hammer on the
[05:44] long side to lock into place then tap
[05:47] the short side closed next remove all
[05:51] spacers and for wall the wall waterproof
[05:56] protection fill all the expansion gaps
[05:58] with compressible PE 3/8 inch chrome
[06:00] backer rod and covering with 100%
[06:02] silicone sealing coat the perimeter
[06:05] including any door frames or other fixed
[06:07] objects making sure the silicone
[06:09] connects from the edge of the floor to
[06:11] the wall but only a light coating is
[06:13] needed so wipe away any excess then
[06:16] install any baseboards transitions and
[06:20] shoe moldings to the walls make sure not
[06:23] to drive any nails into your new floor
[06:25] now you have a gorgeous affordable
[06:28] waterproof floor that replicates the
[06:30] look and feel of real hardwood and you
[06:33] did it yourself
[06:34] [Music]
[06:46] you
⚡ Saved you time reading this? Transcribe any YouTube video for free — no signup needed.