Where to Get Cheap Overlays?
30sSaves money and avoids buyer's remorse for new streamers.
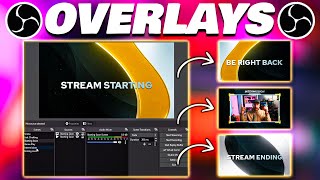
▶ Play ClipThis tutorial provides a step-by-step guide on finding, downloading, and installing stream overlays in OBS Studio. The presenter recommends starting with affordable pre-made packages from specific vendors and demonstrates the process using a free 'Luxury' overlay from Visuals by Impulse, covering both static and animated asset installation.
Making your stream look good with overlays isn't hard; this video shows step-by-step where to get overlay packages and how to install them in OBS.
Recommends starting with pre-made overlays from Visuals by Impulse, Nerd or Die, and Own3D. Using pre-made packages is cost-effective for beginners, costing $20-40 instead of hundreds.
Shows how to create scenes: Just Chatting, Starting Soon, Gameplay, Intermission, BRB, and Ending Soon. The Gameplay scene is set up first as a template.
For animated overlays (like the Luxury package), use Media Source and enable looping. For static overlays, use Image Source. Animated files are videos that will stop after playing once without looping.
Shows how to group the webcam source with its overlay by selecting both (Shift+click), right-clicking, and choosing 'Group'. This allows moving/resizing both together.
Explains that the order of sources in OBS matters (bottom is background, top is foreground). Demonstrates adding a stinger transition and setting the transition point to 2000 milliseconds for proper closing effect between scenes.
Demonstrates what happens when looping is not enabled: the animated overlay plays once and then disappears. Emphasizes always looping animated media sources.
Adding overlays from pre-made packages is a cost-effective and easy way to improve your stream's appearance. By following the step-by-step process of creating scenes, adding the correct source types, and enabling looping for animations, anyone can set up a professional-looking stream quickly.
"The title accurately reflects the content—it's a straightforward tutorial on how to install and use overlays in OBS, delivering exactly what it promises."
What is the recommended cost range for beginner overlay packages?
$20 to $40
0:35
Name three recommended places to get pre-made overlays.
Visuals by Impulse, Nerd or Die, Own3D
0:40
What source type should you add in OBS for an animated overlay?
Media Source
3:48
What source type should you add in OBS for a static overlay?
Image Source
3:31
Why must you enable 'Loop' for animated overlay media sources?
Otherwise the video file plays once and disappears.
4:48
How do you group a webcam with its overlay in OBS?
Select both sources (Shift+click), right-click, choose 'Group', and name the group.
5:33
What is the correct transition point/offset (in milliseconds) for a stinger transition using this overlay?
2000 milliseconds
11:49
What happens if you don't loop an animated overlay?
It turns off/disappears after playing once.
8:30
Start with Pre-made Overlays
This principle saves beginners money and commitment—low initial cost for testing a look.
0:26Grouping Sources in OBS
This technique allows moving/resizing a webcam and its overlay as a single unit, preventing alignment issues.
5:31Consequence of Not Looping
A clear demonstration of a common pitfall—animated overlays disappearing without looping.
8:30Stinger Transition Timing
The exact setting (2000ms) ensures the transition graphic closes completely before switching to the next scene.
11:42[00:00] making your stream look good and stand
[00:01] out to others is not really that hard
[00:03] I'm going to show you step by step
[00:05] exactly how to do that from where to
[00:06] actually get these overlay packages and
[00:08] how to actually install them in OBS
[00:09] without further Ado let's Dive Right In
[00:11] now there are a ton of different places
[00:13] to get these overlays from whether they
[00:14] be free or custom made or even just a
[00:17] couple of bucks like 40 or 50 but
[00:19] personally I recommend you starting out
[00:20] with one of these three places I
[00:22] mentioned or another place that might
[00:23] just have pre-made assets reason why you
[00:25] want to use pre-made stuff when you
[00:26] first start out is because if you start
[00:27] using this and you decide this really
[00:29] isn't the look you're going for a few
[00:30] months down the road it would be really
[00:32] upsetting if you spend a few hundred
[00:33] dollars and then you wasted that versus
[00:35] if you only spent like 20 or 40 bucks on
[00:37] a package and then stopped using it
[00:38] after a couple of months all right so
[00:40] the three places I recommend are either
[00:41] going to be visuals by impulse nerd or
[00:43] die or owned or own 3D I don't I don't
[00:46] know which one it really is but either
[00:48] way they'll be down in the description
[00:49] below these can be three places that
[00:50] I've used before personally myself and
[00:52] I've also seen them in the industry for
[00:53] a very long time so I highly highly
[00:55] recommend checking these places out as
[00:57] they have reasonable prices and some
[00:58] pretty good overlays to start out with
[00:59] especially when you're new to streaming
[01:01] now personally in this video I'm going
[01:02] to be using visuals by impulse I'm
[01:04] actually going to show you a free
[01:05] package I found and if you guys want to
[01:07] download it as well Linked In the
[01:08] description that way you guys can follow
[01:09] along and you can see how installing it
[01:11] actually works alright so first things
[01:13] first let's go to visuals by impulse
[01:16] okay head over their website then we're
[01:18] going to want to go over to the store
[01:19] and once we go to the store we'll want
[01:22] to scroll down so here you can drill
[01:23] down into the different categories they
[01:24] have whether it's animated stream
[01:26] packages stream deck icons that kind of
[01:28] stuff we're just gonna hit free and yep
[01:30] so you can see all these free icons here
[01:32] for your stream deck there's a pizza
[01:33] party bundle but the one I'm going to be
[01:35] showing you guys how to install and how
[01:36] to use today is going to be luxury right
[01:40] here this one so this is a free package
[01:41] that comes with everything that you
[01:42] pretty much need whether it's you know
[01:44] overlays different scenes they're also
[01:46] animated too or not animated depending
[01:48] on if your computer can handle animated
[01:50] or not so you get both of them which is
[01:52] going to be pretty awesome so if you
[01:53] guys want go ahead and download this
[01:54] right now all you have to do is hit add
[01:56] to cart you check out it's name your
[01:57] price you don't have to name any price
[01:59] you can just download it for absolutely
[02:01] free now that we got our overlays go
[02:02] ahead and over to OBS and start
[02:04] installing it all right so this is what
[02:06] the bare naked OBS looks like by the way
[02:09] before we go any further if you guys
[02:10] don't have this downloaded make sure you
[02:11] guys go download OBS also we have a full
[02:13] tutorial on the best settings for OBS so
[02:16] in case you haven't followed that guide
[02:17] please make sure you guys go check it
[02:18] out should be right up above me and then
[02:20] once you guys complete that come back
[02:21] here and we'll continue the how-to video
[02:23] on how to add your overlays now if
[02:25] you've already done that Kudos and if
[02:26] you actually watch our video double
[02:27] kudos to you for doing that we
[02:29] appreciate it so without further Ado
[02:30] let's go ahead and create all the scenes
[02:32] that we need so we're going to go over
[02:33] to our scenes right here and we're going
[02:34] to click on just chatting
[02:37] we want a starting soon screen
[02:42] gameplay scene and then maybe
[02:45] intermission and ending
[02:48] soon alright so let's go ahead and go to
[02:51] our gameplay scene and we're going to
[02:52] start setting this one up first you'll
[02:54] see why afterwards so what we want to do
[02:56] is we want to add a webcam so let's go
[02:58] ahead down to video capture device we'll
[03:00] hit Elgato Basecamp and perfect there we
[03:04] go we have our ghetto FaceCam added I'm
[03:06] actually still really surprised by how
[03:07] good this actually looks so now we have
[03:09] the Elgato face cam so let's go and add
[03:11] our border to this so go down to where
[03:12] it says sources hit the plus button
[03:14] again now this is where it gets tricky
[03:16] if you found a static overlink which by
[03:18] the way static overlay does use less
[03:20] resources so if you're doing a single PC
[03:22] stream or if your computer is a bit
[03:23] older I recommend doing static because
[03:25] it's not going to take up as much
[03:26] resources as an animated package would
[03:29] if you're doing a static overlay you're
[03:31] going to want to go ahead and add image
[03:33] and that's going to be what it is is
[03:35] that they're all just basically images
[03:36] because they're not moving and they're
[03:37] not movies or anything like that now if
[03:39] you have an animated overlay like the
[03:41] one we just downloaded the luxury one
[03:42] you want to go ahead and do a media
[03:46] source as that's exactly what that is so
[03:48] we're going to add media Source do
[03:50] webcam overlay and then we're going to
[03:52] click OK browse now one thing I didn't
[03:55] actually mention to you guys make sure
[03:56] you know where this is actually at so
[03:59] personally as a recommendation I have a
[04:01] whole folder says assets so usually I
[04:04] have like a stream folder in here that
[04:05] has all the stream assets I have
[04:06] transitions in here text music clients
[04:09] that I'm working with all the assets
[04:10] that they use it's really really helpful
[04:12] to have this organized that way you can
[04:13] go ahead and know exactly where it's at
[04:15] in case there's any issues with it you
[04:16] need to re-add it or anything of that
[04:18] nature or if you remove OBS and
[04:20] reinstall OBS it's very very helpful
[04:22] knowing exactly where it's at so let's
[04:23] go ahead and drill down into where we
[04:25] put it I just put this one in the actual
[04:26] project folder since this is what I'm
[04:28] working on probably bundles luxury
[04:31] perfect so now we're going to go to
[04:33] overlays animated and there we are now
[04:36] we have our webcam overlay right here
[04:38] we'll click ok now if you guys are doing
[04:40] an animated overlay you want to make
[04:42] sure that you do a loop I'm going to
[04:44] show you guys why because technically
[04:45] this is a video file that plays for so
[04:47] many seconds if you don't choose use it
[04:49] to Loop it will basically just play for
[04:50] the first time and then it will
[04:51] disappear so make sure you guys hit Loop
[04:52] if you're doing an animated package if
[04:54] you're doing a regular package or a
[04:56] static looking image you won't have to
[04:57] worry about this I'll go back through
[04:59] and I'll show you how to do this static
[05:00] one as well but just in case you want to
[05:01] add animated since they're so cheap
[05:03] nowadays and very easily accessible
[05:04] we're doing it this way and click OK and
[05:07] there we are and now we have the two
[05:10] things now we just gotta basically line
[05:11] it up and make sure everything looks
[05:13] good on our webcam so we'll go ahead and
[05:16] do that we can just use our arrow keys
[05:19] to make sure it's lined up perfectly and
[05:21] there we go now we have our animated
[05:22] webcam overlay already and then also
[05:25] what's really cool from here is if you
[05:26] guys want you can actually select this
[05:28] hit shift and select this other one when
[05:31] you right click it you can then also
[05:33] group these together we can just call
[05:34] this
[05:35] webcam so now what's really cool is we
[05:38] can lock so we can now move this as a
[05:41] group so that way if we resize it it's
[05:43] going to resize the whole thing and it's
[05:45] not going to change the size of the
[05:46] webcam or the overlay so we can go ahead
[05:48] and move this to wherever we want to so
[05:50] in case you want it over here or you
[05:51] want it over here it makes it super easy
[05:53] so that you can just move them together
[05:55] without worrying about you know moving
[05:57] one versus the other and then messing up
[05:58] how they're actually overlaid there we
[06:00] go that is how to add the animated
[06:02] webcam to your webcam overlay now as I
[06:05] said before I do want to show you guys
[06:06] how to add the static one as well so
[06:08] what we're going to do is we're
[06:08] literally just going to go down here to
[06:10] this plus symbol again we're going to go
[06:11] to add image this time and we're going
[06:13] to do webcam overlay static now we're
[06:17] going to go to browse overlay static
[06:19] click webcam so now because if you
[06:21] notice when we're looking for the
[06:23] animated it didn't show it because
[06:25] that's not an image now we go to static
[06:27] and there we go that is it which is
[06:29] perfect click OK and that's it and then
[06:32] all you have to do is just line this up
[06:34] the same way we did before all right
[06:36] let's just say that's good technically
[06:38] you can just take this and drag that
[06:40] down and boom there you go now you have
[06:41] one that's static that's not moving so
[06:43] less resources being used or you have
[06:45] one that is animated that's gonna be the
[06:48] only difference while we're going
[06:48] through this is that if it's not
[06:50] animated it's just an image if it's
[06:51] animated that is a media source all
[06:54] right let's move on to the next all
[06:56] right so let's go to our starting soon
[06:57] so we're gonna again just click on the
[06:59] starting soon scene and then we're gonna
[07:01] go down here to the plus button
[07:02] underneath sources
[07:03] and then we're going to add media Source
[07:06] we're gonna do starting soon screen all
[07:10] right now we're gonna go to browse all
[07:11] right so from here you want to go to
[07:13] screens animated and then you're going
[07:15] to want to do the starting soon screen
[07:17] and again you want to make sure you Loop
[07:18] this click OK and there we go luckily
[07:21] this package also comes with text that
[07:23] are already pre-made for us so we can
[07:24] just go ahead and hit this plus button
[07:25] we're gonna add images and we're gonna
[07:28] do starting
[07:30] soon text browse and we'll do starting
[07:34] soon there's stream starting and there
[07:37] we go so we can literally just leave it
[07:39] like this and we'll just let this play
[07:40] until we actually want to start our
[07:42] stream and then once we do we can just
[07:43] hit our gameplay or we can do our just
[07:44] chatting all right so for the next scene
[07:46] let's go ahead and set up our
[07:48] intermission so once we go to
[07:49] intermission now we can hit this plus
[07:50] button right here and what we're gonna
[07:52] do is we're going to add a media source
[07:53] and we'll hit intermission screen browse
[07:58] screens animated
[08:01] I will do intermission then boom there
[08:04] we go now the cool thing is is once
[08:06] you're trying to add an asset that
[08:07] you've already added in as a source you
[08:09] can just hit this plus button so for
[08:11] instance our webcam which should be
[08:12] right in the middle there go ahead we'll
[08:13] hit oh
[08:15] wait you see that I made a mistake I
[08:17] didn't press Loop and that's what
[08:19] happens when you don't Loop it it turns
[08:20] off so if you notice now it's going to
[08:21] continue playing once this timer
[08:23] actually hits seven
[08:25] [Music]
[08:30] there restarts now if I took Loop off of
[08:33] this and it gets to the end
[08:36] turns off don't be like me and don't
[08:38] forget to turn on the looping effect
[08:40] okay so now we need to add our webcam
[08:42] since we have a big Blank Space right in
[08:44] the middle so go ahead and hit add
[08:45] Source go to video capture device now if
[08:47] you notice there's an existing right so
[08:49] this already exists we've already made
[08:51] this source so click OK and there we are
[08:54] now one thing that's weird about this is
[08:55] that our webcam is actually laying on
[08:58] top of this so in case you didn't know
[09:00] this the order in which you have things
[09:02] down here does make a difference so what
[09:04] you want to do is you want to take this
[09:05] and drag this down so that way we have
[09:07] our webcam underneath our actual overlay
[09:10] now it looks kind of weird because it's
[09:12] just my face and it's got some weird
[09:14] moving screen right so we want to go
[09:15] ahead and add the words intermission to
[09:17] this which luckily this package has that
[09:19] so go ahead and hit the plus button and
[09:21] then we're going to add an actual image
[09:23] and we're going to say intermission text
[09:26] all right we'll hit browse and we'll go
[09:28] to oh no screens text
[09:33] intermission there we go now we know
[09:35] it's an intermission screen so in case
[09:36] you wanted to sit there you want to chat
[09:38] with people this is a great way to do it
[09:39] intermission hey we're just taking a
[09:41] break whatever you know get up P move
[09:43] around you know get some water drink
[09:45] some more coffee and now we have an
[09:47] intermission screen so next up we're
[09:49] gonna go ahead and do the VR we'll do a
[09:51] BRB actually I totally forgot about that
[09:53] let's do BRB be right back so we just
[09:56] created the new scene so again come to
[09:57] this plus button underneath sources go
[09:59] ahead and add media Source we'll do B
[10:02] BRB screen
[10:05] click OK browse greens animated be right
[10:09] back Loop go and now we want to make
[10:12] sure that we add the text to it as well
[10:14] so it's an image because it's a PNG vrb
[10:17] text browse sorry I know I'm going a
[10:20] little bit fast but again we just gotta
[10:22] go through the folders be right back
[10:24] find out where they're at and then there
[10:26] you go be right back so that way you can
[10:29] go ahead and change it to where if you
[10:31] need to get up and go use the bathroom
[10:32] or something like that or you just want
[10:33] to let people know they're going to be
[10:34] right back you can go and do that boom
[10:36] there we go BRB and then we'll go and do
[10:37] the stream ending since that is the last
[10:39] scene we need to make so let's go ahead
[10:40] and click on stream ending hit plus and
[10:43] then we'll go to the media Source
[10:47] extreme ending well browse screens
[10:51] animated
[10:54] stream ending Loop
[10:59] Loop it
[11:00] then we'll add the text so again we'll
[11:02] come down that plus button we'll go to
[11:04] image stream ending oh
[11:09] text all right stream ending there you
[11:12] go
[11:13] so technically right now we have
[11:16] everything we need set up
[11:18] so we can literally just sit here and if
[11:20] we want to do starting soon we have our
[11:22] starting soon screen we have our
[11:24] gameplay screen we have intermission
[11:26] screen ending and also be right back
[11:28] screen as well now one more thing I'm
[11:30] going to show you guys how to do since
[11:31] it is including the package is the
[11:33] transition transitions are kind of cool
[11:35] they just add a little bit more of like
[11:36] flair to your stream when you're
[11:37] changing from scene to scene then we're
[11:39] going to go ahead and do a stinger so
[11:42] we're gonna hit yes to the Stinger now
[11:43] once we have this singer added we're
[11:45] going to want to go ahead and change the
[11:47] transition point to about 2 000
[11:49] milliseconds what this means that
[11:51] there's going to be a delay between when
[11:52] the actual scene changes and when it's
[11:54] going to the next one the reason why is
[11:55] because when it's used like this notice
[11:57] how it says a we do preview transition
[11:59] this closes and comes back and now it's
[12:02] B and that's what we want we want to
[12:03] make sure that the transition fully
[12:05] closes and then it goes to B so now that
[12:07] we have that properly set up where it's
[12:08] at 2000 milliseconds if we go to change
[12:10] our gameplay screen to our starting soon
[12:12] it should look like this
[12:17] bam and there we are and there we go
[12:19] adding overlays and sourcing them has
[12:21] been that easy hopefully you guys
[12:22] thought so too if you guys thought this
[12:23] was an easy awesome tutorial go ahead
[12:25] and give it a thumbs up if you guys like
[12:26] this kind of content make sure you guys
[12:27] get subscribed for more how-to content
[12:29] and until next time my name is Ivy Paula
[12:32] I'll see you in the next one
⚡ Saved you time reading this? Transcribe any YouTube video for free — no signup needed.