
From Blurry to Crystal Clear Streams
47sImmediately addresses a common pain point for streamers with a promise of quick improvement.
▶ Play Clip"Title promises a complete guide for 2026, but the content is a solid, practical walkthrough of core settings."
This video provides a quick guide to improving live stream video quality using OBS Studio, covering settings for canvas resolution, capture devices, and encoder configuration to achieve crystal-clear output.
The video aims to fix blurry, blotchy, and choppy live streams using OBS Studio best practices.
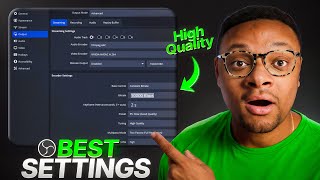
In Settings > Video, set base and output canvas to 1920x1080 (1080p) and FPS to 60 for standard quality on YouTube/Twitch.
Add a Video Capture Device source, select your capture card (e.g., AverMedia Live Gamer 4K 2.1), set resolution/FPS type to custom, choose 4K or 1080p, FPS 60, color range full.
In Settings > Output, switch to Advanced mode. Select video encoder: x264 (CPU) or NVENC H.264 (Nvidia GPU) or Apple VT (M1/M2/M3/M4 Mac).
Rate control: CBR. Bitrate: 6000 for Twitch, 10000 for YouTube. Keyframe interval: 2. Multipass mode: full resolution. Profile: high. Check look ahead, adaptive quantization, B frames.
If network issues occur, reduce bitrate by 500 intervals. Run an internet speed test to adjust precisely.
By applying these OBS settings—1080p 60fps, proper encoder selection, and optimal bitrate—you can significantly enhance your live stream's visual quality for viewers.
What is the standard resolution and FPS for streaming on YouTube and Twitch?
1080p at 60 fps.
0:28
What bitrate should you use for Twitch streaming?
6000 kilobits per second.
3:27
What bitrate is recommended for YouTube streaming?
10000 kilobits per second.
3:36
What encoder should you select if you have an Nvidia GPU?
Nvidia NVENC H.264.
3:04
What encoder should Mac users with M1/M2/M3/M4 chips select?
Apple VT hardware encoder.
3:14
What is the recommended keyframe interval for better playback?
2 seconds.
3:44
What rate control mode should be used for streaming?
CBR (Constant Bit Rate).
3:21
What should you do if you experience network issues during streaming?
Reduce the bitrate by intervals of 500 until the issue is resolved.
4:17
Standard Quality: 1080p 60fps
Establishes the baseline for high-quality streaming on major platforms.
0:28Encoder Selection Matters
Choosing the right encoder (CPU vs GPU) can significantly impact performance and quality.
2:40Bitrate Recommendations by Platform
Twitch caps bitrate at 6000, while YouTube allows higher (10000) for better quality.
3:27Network Troubleshooting Tip
Practical advice to reduce bitrate incrementally and use speed tests to diagnose issues.
4:15[00:00] Today I'm going to be quickly showing
[00:01] you guys how you can take the video
[00:02] quality of your live streams from
[00:04] looking blurry, blotchy, and choppy to
[00:07] crystal clear, thus improving the
[00:09] viewing experience for your audience.
[00:11] And to do this, we're going to be using
[00:12] OBS Studio to implement these best
[00:15] practice settings. So, the first thing
[00:16] we're going to want to do is head over
[00:17] to the right hand side and access our
[00:19] settings. Go to the video tab. And
[00:22] within here, you're going to want to set
[00:24] the base and output canvas resolutions.
[00:26] The standard quality that you'll
[00:28] typically see on platforms such as
[00:29] YouTube and Twitch is going to be 1080p
[00:32] 60. So, right now, my base canvas is
[00:34] 1920x 1080, but our output is at 720p,
[00:38] and we want to adjust this to be at
[00:39] 1080p quality. As for the common FPS
[00:42] value, the standard is 60 fps. So, we're
[00:45] going to want to change that from 30 to
[00:47] 60. Once that's good to go, let's select
[00:50] apply and okay. And then the next thing
[00:52] we're going to want to do is add our
[00:53] gameplay source. So I'm going to do that
[00:55] within my sources by going to the plus
[00:57] button here, then adding a video capture
[00:59] device source. I'm just going to call it
[01:01] capture card. Select okay. And within
[01:04] here, we're going to select the device
[01:05] dropdown and choose the capture card
[01:07] connected to our computer. For me, I'm
[01:09] using the Aver Media Live Gamer 4K 2.1.
[01:12] Since I have everything connected
[01:14] correctly, it just popped right up. And
[01:15] then the next thing we're going to want
[01:16] to do is head over down here to the
[01:18] resolution FPS type. Let's select this
[01:21] dropdown and instead of using the device
[01:23] default, let's change that to custom.
[01:25] And then under that you're going to see
[01:26] the resolution dropdown. So we're going
[01:28] to choose that as well. Now if you
[01:30] happen to be playing your game in 4K
[01:32] quality and you are passing that through
[01:34] your capture card, I would go ahead and
[01:36] select the 4K option here. And the
[01:39] reason for this is because you'll get a
[01:40] better image quality if you set it to 4K
[01:43] rather than 1080p. But let's say your
[01:45] computer can't handle processing 4K,
[01:48] then instead I would just knock it down
[01:50] to 1920 by 1080, which will still look
[01:52] great. After that, you're going to want
[01:54] to set your FPS value to 60. OBS, why is
[01:58] this showing up over here? What?
[01:59] Whatever. Video format, you can keep at
[02:02] any color space, you can do Rex 709. And
[02:06] then color range, you want to have that
[02:08] to be full. Once that's done, go ahead
[02:10] and select okay. And now the next thing
[02:12] we're going to want to do is modify our
[02:14] actual stream settings. So to do that,
[02:16] we're going to want to go back over to
[02:17] our settings, then go to the output tab.
[02:21] And from here, instead of being in the
[02:22] simple output mode, we're going to want
[02:24] to select that drop down and choose the
[02:26] advanced option. Now, staying within the
[02:30] streaming tab here, audio track, you can
[02:32] keep that as is. Audio encoder is fine.
[02:35] VOD track is fine. The video encoder is
[02:38] one of the most important parts you're
[02:40] going to want to pay attention to. So,
[02:41] right now, mine is set to x264, which
[02:44] means it's leveraging the CPU or also
[02:47] known as the processor on my computer.
[02:50] You'll want to keep this option selected
[02:52] if you don't have a dedicated graphics
[02:54] card such as one from Nvidia or AMD. In
[02:57] my case, I do have an Nvidia RTX 5070
[03:01] series graphics card. So, in my case,
[03:04] I'm going to want to select the Nvidia
[03:05] Invect H.264 for my video encoder. For
[03:09] those of you guys that are using an M1,
[03:11] M2, M3, M4 silicon base chip Mac, then
[03:14] you're going to want to select the Apple
[03:16] VT hardware encoder. From there, we can
[03:18] head over down to our encoder settings.
[03:21] The rate control, we're going to want to
[03:22] have that at CBR or constant bit rate.
[03:25] The bit rate itself, you're going to
[03:27] want to set that to 6,000 if you're on
[03:29] Twitch. But if you're streaming to a
[03:31] platform like YouTube that doesn't have
[03:33] a cap on how much bit rate you can push
[03:36] out, then I would put this up to 10,000
[03:38] kilobits per second as your video
[03:40] quality will look much nicer compared to
[03:42] using a lower bit rate. As for the key
[03:44] frame interval, you're going to want to
[03:45] set this to two so that your viewers
[03:46] have a better playback experience.
[03:48] Presets, you can keep those as is with
[03:51] the exception of the multipass mode drop
[03:53] down. I would set that to full
[03:55] resolution. Profile can remain high.
[03:58] Look ahead and adaptive quantization
[04:00] should be checked off and B frame should
[04:02] be too. Once you have that complete, go
[04:04] ahead and select apply and okay. Go
[04:07] ahead and launch your stream with your
[04:09] new updated settings and let me know in
[04:11] the comment section below how your
[04:12] quality is looking. Now, as a bonus tip,
[04:15] if you are running to any network issues
[04:17] with your stream, then go back to your
[04:18] bit rate setting and keep reducing it by
[04:21] intervals of 500 until your issue is
[04:24] gone. It would even help to do a
[04:26] internet speed test to see where you're
[04:28] coming in at that will help you to
[04:29] adjust this number more precisely. All
[04:31] right, that's it. Told you it was going
[04:33] to be a quick one. Peace.
⚡ Saved you 0h 04m reading this? Transcribe any YouTube video for free — no signup needed.