Kimchi Is The Ultimate Fermented Food
33sExplains why homemade kimchi is superior and versatile, appealing to foodies and fermentation enthusiasts.
▶ Play ClipKimchi is a trendy fermented food, but making it at home is easy and much better than store-bought. This video demonstrates a simple, step-by-step recipe using napa cabbage, daikon, carrots, and a flavorful paste.
Slice napa cabbage into 1-inch wide strips, season heavily with kosher salt, squeeze and toss, then let sit for at least 30 minutes (ideally 1.5 hours) to release water.
Cut green onions into half-inch segments, julienne carrots, and cut daikon into baton-sized pieces.
Blend 2-inch ginger, 1 Asian pear (peeled and cubed), 6 cloves garlic, and 1/4 cup fish sauce into a smooth paste. Then mix with 1/4 cup Korean red pepper flakes (gochugaru).
Rinse the salted cabbage thoroughly, squeeze out excess water, then combine with other vegetables and the paste. Mix evenly.
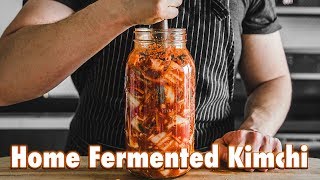
Pack the mixture into a glass jar, press down to remove air bubbles, and cap loosely. Ferment at room temperature for 4–7 days, tasting daily. Then refrigerate.
"Title accurately describes a simple, step-by-step kimchi recipe; video delivers exactly that."
Is kimchi a fermented food?
Yes, it's a fermented food made with vegetables like napa cabbage, daikon radish, and green onion.
0:32
Why is it important to heavily salt the cabbage before fermenting?
To pull out excess water from the cabbage so it ferments properly.
1:37
How long should the salted cabbage sit before rinsing?
At least 30 minutes, ideally about an hour and a half.
1:49
What four ingredients are blended together to make the kimchi paste?
Ginger, Asian pear, garlic, and fish sauce.
3:12
What type of pepper flakes are mixed into the paste?
Korean red pepper flakes (gochugaru).
3:43
How long should kimchi ferment at room temperature?
4 to 7 days, at room temperature.
5:15
What happens to kimchi the longer it ferments?
It becomes more acidic and tastes more fermented as it goes longer.
5:21
Salting and squeezing cabbage
Explains the crucial step of pulling out water for proper fermentation.
1:25Making the paste
Details the flavor base of kimchi using ginger, pear, garlic, and fish sauce.
3:09Loose cap for gas release
Important safety tip: don't seal the jar tight during fermentation to avoid pressure buildup.
5:09Fermentation time and taste
Advises tasting at day 4 and adjusting for desired ripeness.
5:15[00:00] yeah so kimchi is very trendy people are
[00:03] putting on their fries and which I'm
[00:05] here for but you can't understand Kim
[00:07] she's full potential until you've made
[00:10] it yourself and it's really easy so uh
[00:12] there's no excuses
[00:20] [Music]
[00:30] hands down kimchi is one like very
[00:32] favorite OG fermented foods fermentation
[00:36] gang typically made with various veggies
[00:38] like
[00:38] napa cabbage daikon radish green onion
[00:41] and in my case carrots its flavor is
[00:43] totally one-of-a-kind get extremely
[00:45] versatile you know hence the whole
[00:46] kimchi fries and kimchi omelette and
[00:48] kimchi fried rice there's there's all
[00:51] sorts of ways that this thing can be
[00:52] used if you've had kissed you before and
[00:54] you like kimchi then you need to know
[00:56] that it's incredibly simple to make and
[00:58] so much better when you do it at home
[01:00] like many things so without further ado
[01:03] let's do this now this recipes pretty
[01:05] simple so this should go by pretty
[01:07] quickly gonna start with one large napa
[01:09] cabbage head which is about two pounds
[01:11] in two ounces or 980 grams and you're
[01:14] gonna slice that in half lengthwise then
[01:17] you're gonna cut each of those halves in
[01:19] half sort of getting quarters and you're
[01:21] gonna cut each of those quarters into
[01:22] 1-inch wide strips now gonna take all
[01:25] that cabbage and place it into a large
[01:27] bowl and season it heavily with kosher
[01:30] salt and when I say heavily I mean I
[01:31] want you to over season that bad boy it
[01:34] is okay you're gonna rinse off the water
[01:36] and you're gonna wring out that
[01:37] saltiness but you needed it in order to
[01:39] pull out the excess water so that it
[01:40] ferments properly now you're just gonna
[01:42] squeeze and toss the cabbage in the salt
[01:44] make sure that you're squeezing the
[01:45] cabbage real hard it's okay you want to
[01:47] bruise it up and you're gonna let it sit
[01:49] for at least 30 minutes but ideally
[01:51] about an hour and a half while it's
[01:52] sitting you'll notice that it releases a
[01:54] ton of water which is a good thing
[01:56] now while the cabbage is sitting we're
[01:57] gonna cut the rest our vegetables so
[01:59] you're gonna start with one bunch of
[02:00] green onion cut the root bottoms off and
[02:03] then cut the green onion into half inch
[02:05] segments then you're gonna roughly
[02:07] julienne your care
[02:08] now if you don't want to do that I'll
[02:10] give you a brief little tutorial all you
[02:11] got to do is cut the carrot into the
[02:13] desired length of the segment so I chose
[02:15] about an inch and a half maybe two
[02:17] inches and you're gonna cut that segment
[02:19] into little planks and those planks are
[02:22] gonna be probably about an eighth of an
[02:24] inch thick once you have your planks
[02:26] you're then going to cut the planks
[02:27] lengthwise with the same width so that
[02:29] you sort of end up with a long skinny
[02:32] rectangle now they don't really have to
[02:33] be perfect you can see that mine or not
[02:35] in my opinion it's it's kimchee you know
[02:37] it's supposed to be like a rough chop
[02:38] just throw it together don't worry about
[02:40] it too much and also you can always just
[02:42] buy a mandolin that has a julienne
[02:44] attachment if you don't want to do this
[02:46] which I will put a link below in the
[02:48] description oh and by the way this
[02:49] portion is gonna be 2 carats worth of
[02:51] julienne carrot just heads up and you're
[02:53] gonna peel a medium-sized daikon you're
[02:55] gonna cut that into sort of the same
[02:57] thing as the carrots but much thicker
[02:59] into sort of like batons sized pieces
[03:02] now you can also do a julienne with this
[03:04] as well I prefer a little variance in
[03:07] texture so that's up to you
[03:09] now we're gonna make our paste you're
[03:10] gonna start by slicing it a two-inch
[03:12] segment or 82 grams of peeled ginger
[03:14] have that to food processor along with 1
[03:17] large Asian pear peeled and cubed which
[03:20] will be about 250 grams 6 cloves are 20
[03:23] grams of peeled garlic and a quarter cup
[03:26] or 60 milliliters of fish sauce my
[03:28] personal favorite brand you'd be red
[03:30] boat I'll put a link in description for
[03:32] the one that I use and then you're gonna
[03:33] blend that until it's as smooth as you
[03:35] can get it'll hit a certain point where
[03:36] it won't really get much more smooth and
[03:37] that's okay transfer that pace to a
[03:39] medium-sized bowl and mix that paste
[03:41] together with a quarter cup or 52 grams
[03:43] of Korean red pepper flakes you can use
[03:46] a little more if you like I actually
[03:47] ended up using about a third cup in 65
[03:50] grams but my red pepper flakes weren't
[03:53] too spicy so just be careful because it
[03:55] will get super spicy
[03:56] what's the cabbages sat in the salt
[03:58] you're gonna drain it through a colander
[03:59] and then rinse it with water while
[04:01] squeezing at the same time rinse toss
[04:03] and squeeze until you've washed off the
[04:05] majority of the salt that's on the
[04:06] cabbages okay if it's still a little bit
[04:08] salted but you don't want it to be
[04:09] overwhelmingly salty if your batch ends
[04:12] up too salty it is because you did not
[04:14] wash the cabbage enough so beware of
[04:16] that drain the water that you rinse the
[04:17] cabbage with and then add all the
[04:19] vegetables that you cut to the cabbage
[04:21] in a large
[04:21] from there you're gonna add all of the
[04:23] pace that you just made to the
[04:25] vegetables and they're gonna toss too
[04:26] thoroughly and evenly coat with the
[04:28] chili paste now you can use your hands
[04:30] with this I use my bare hands not
[04:32] advisable very spicy you'll get a
[04:34] burning sensation in your hands and if
[04:36] you have a problem with that maybe wear
[04:37] gloves or just use a rubber or wooden
[04:39] utensil once the mixture is thoroughly
[04:41] and evenly coated you're gonna pack that
[04:42] into a half gallon glass jar or some
[04:46] sort of container that is large enough
[04:48] to fit them just make sure that it's
[04:49] glass the problem with metal is that it
[04:51] reacts with the acidity that this is
[04:53] going to develop later on that's no good
[04:54] so you want something that's nonreactive
[04:56] then using a spoon or a wooden muddler
[04:59] you're gonna press down all that
[05:00] vegetables so it's just packed together
[05:02] as possible you don't want any air
[05:04] bubbles in there and if there's any
[05:05] juice in there to get it to cover the
[05:08] vegetables and then you're gonna loosely
[05:09] cap it off make sure that you don't
[05:11] tighten it all the way down cause it's
[05:12] gonna release some gas we don't want to
[05:13] turn this into a bomb and you're gonna
[05:15] let it ferment for four to seven days
[05:17] now I want you to taste it at day four
[05:19] and see if you want it to go longer the
[05:21] longer it goes the more acidic and the
[05:23] more sort of fermenting it's gonna taste
[05:25] so just depends on how ripe you like it
[05:27] the longer the more ripe I let mine go
[05:30] for six days now you might notice along
[05:32] your little journey that there are
[05:34] little air bubbles becoming present or
[05:36] may start to bubble that is totally
[05:37] normal that is just the lactobacillus
[05:39] and various other good bacteria that are
[05:41] releasing carbon dioxide in there and
[05:42] that's totally normal just keep pressing
[05:44] it down to keep that juice compact once
[05:46] your kimchi has reached the desired
[05:48] flavor point you can then tighten the
[05:49] cap all the way and store it in the
[05:51] refrigerator and then at this point it's
[05:53] good and ready to eat it'll stay good in
[05:56] the fridge for a long time I've had
[05:58] stuff to stay in there for like three
[05:59] months I mean it's not gonna probably
[06:02] you're gonna eat it all before it goes
[06:04] bad all right guys and that is it this
[06:06] recipe turned out perfectly and it was
[06:09] so wonderfully hands off like I really
[06:11] didn't have to do anything I just let it
[06:12] sit there Kim she was really high up on
[06:14] requests from all you guys so thank you
[06:16] for that I really appreciate you telling
[06:18] me what you like to see you know and
[06:19] luckily there are things that I like to
[06:21] make so it works out it's a symbiotic
[06:23] relationship that right symbiotic
[06:25] they're gonna they would destroy me in
[06:27] the comments if I got that wrong
[06:30] it's okay I'm just gonna seize nails I
[06:33] scratch your back you scratch mine okay
[06:38] well then I just won't say anything with
[06:40] all that said if you enjoyed this video
[06:42] or you learned something leave a like
[06:44] subscribe and I will see you next week
[06:47] [Music]
⚡ Saved you 0h 07m reading this? Transcribe any YouTube video for free — no signup needed.