Why you should never start rolling at the edge
45sReveals a common mistake beginners make, offering a clear 'why' that saves time and frustration.
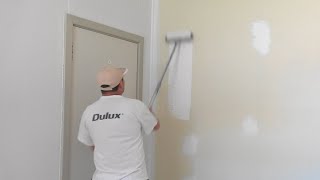
▶ Play ClipThis video demonstrates the proper technique for rolling a wall, focusing on achieving a smooth, professional finish. The presenter covers cutting in, loading the roller, rolling patterns, and handling obstacles like power points. The key is to avoid paint buildup at edges and to perform a final lay-off pass for a uniform look.
Always cut in the edges (paint a border around ceiling, corners, and trim) before rolling to ensure clean lines.
Start rolling about 6 inches away from the edge to avoid a thick buildup of paint in the corner.
On the first pass, stop a few inches short of the top and bottom to prevent paint ridges at the edges.
On the second pass, extend the roller all the way to the top and bottom, back-rolling over the previous section to blend.
Cut around power points and light switches with a brush just before rolling that section for a neat finish.
Perform a final lay-off pass by rolling the entire wall from bottom to top in one continuous motion to smooth the finish.
Always overlap strokes by about 50% when laying off to avoid visible lines.
"The title accurately describes the content—a demo on how to roll a wall using a roller, with the best technique explained step by step."
What is the first step before rolling a wall?
Cut in the edges (paint a border around ceiling, corners, and trim) before rolling.
0:24
Why should you start rolling away from the edge?
To avoid a thick buildup of paint in the corner that is hard to smooth out.
1:26
Why should you not roll all the way to the top and bottom on the first pass?
Stop a few inches short of the top and bottom on the first pass to prevent paint buildup at the edges.
1:56
How should you handle power points or light switches when rolling?
Cut around it with a brush just before rolling that section.
5:02
What is the purpose of the final 'lay-off' pass?
To smooth the finish and eliminate roller marks, giving a uniform look.
7:36
What must you do when rolling off (laying off) the wall?
You must overlap your strokes to avoid visible lines.
8:18
Start Rolling Away from the Edge
Prevents thick paint buildup in corners, a common beginner mistake.
1:26Avoid Rolling to Top/Bottom on First Pass
Prevents paint ridges at the edges, ensuring a smoother finish.
1:56Cut Around Power Points Before Rolling
Saves time and gives a cleaner result than taping.
5:02Final Lay-Off for Smooth Finish
The key step to eliminate roller marks and achieve a professional look.
7:36[00:00] [Music]
[00:09] now today i'm just going to do a demo on
[00:11] how to roll a wall
[00:13] now these walls are basically in pretty
[00:16] poor condition
[00:17] basically i'm just going through and
[00:19] re-coating it because it's a rental
[00:20] house
[00:21] now when you're doing a wall
[00:24] the first thing you'll need to do is go
[00:26] through and cut it in
[00:27] now as i said this is a pretty bad
[00:29] condition and actually when they painted
[00:30] the green last time they took the green
[00:33] onto the under edge of the actual
[00:34] cornice so i've actually gone around and
[00:36] just painted that green as well just so
[00:39] when the walls finished it looks nice
[00:41] and neat
[00:43] so the first thing you'll need to do is
[00:44] go through and cut it all in
[00:46] and then start rolling
[00:48] now generally when rolling make sure you
[00:50] have your roller tray close by
[00:53] um you don't want it on the other side
[00:54] of the room i've seen people sort of
[00:56] walk around a room and leave the roller
[00:58] tray in one position you need to
[01:00] actually have the roller tray close by
[01:02] at the end of the job it saves quite a
[01:04] bit of time
[01:06] so first thing to do
[01:07] is to give the roller a good dip
[01:10] now normally i use 14 inch rollers but i
[01:13] know a lot of people out there only use
[01:14] um like 11 inch so
[01:16] i'll do this with an 11 inch roller
[01:19] so you know what you're doing
[01:21] now when you start
[01:23] always start away from the edge
[01:26] if you start right in the edge you'll
[01:28] end up with a big thick lot of paint
[01:30] right in the corner and you won't be
[01:32] able to actually work that paint out so
[01:34] stay away from the corner go up
[01:37] go down
[01:38] now that's taken a fair bit of paint off
[01:40] the roller i'll go into the edge
[01:43] and then come back down
[01:47] then i'll just work to the sides
[01:50] now when i feel the roller getting dry
[01:54] i'll stop
[01:56] now at this point i haven't gone all the
[01:58] way to the bottom or all the way to the
[02:00] top
[02:01] because every time you roll you when you
[02:03] stop
[02:04] you'll leave a little bit of a build up
[02:06] of paint
[02:07] and you don't want that build up right
[02:10] on the top
[02:11] so when you're rolling
[02:13] don't roll all the way to the top all
[02:14] the way the bottom straight away
[02:17] once that's done i'll go back
[02:20] through and this time i'll take it all
[02:23] the way to the top
[02:25] and all the way to the bottom
[02:28] now while i'm doing this i'm basically
[02:33] back rolling the paint
[02:38] so there you go i've taken that to the
[02:39] top i'll roll over that again in a
[02:42] minute but i'll do another dip
[02:47] so once again i'll start away from where
[02:50] i just rolled
[02:52] i'll work some paint out this way first
[02:56] and then i'll work in
[02:58] back into
[03:00] what i've just rolled
[03:06] and once again
[03:08] i'm not going to the top nor to the
[03:09] bottom
[03:12] now that i feel this sufficient paint
[03:14] off the roller
[03:15] i'll back roll over this again now when
[03:18] i say that there's still
[03:20] lots of paint in there
[03:23] if i want to force it all out
[03:25] but you don't
[03:26] force all the paint out the roller
[03:29] so starting from the bottom
[03:31] again i'll go up the top
[03:34] come back down
[03:35] from the bottom again
[03:38] up to the top
[03:39] back down
[03:44] same again i've swapped sides you might
[03:46] have to see a little bit better
[03:57] so once again i'll repeat the same
[03:59] process
[04:00] plenty of paint on the roller
[04:05] start away from where i'll finished
[04:08] spread the paint out
[04:16] roll back into what i've just done
[04:21] keep spreading it
[04:26] so now i'll start back here again
[04:28] if i go the other way you might see
[04:30] better
[04:31] from the bottom to the top and back down
[04:36] bottom
[04:37] to top
[04:38] back down
[04:42] same again
[04:50] now
[04:53] i've done that i'm still going to go
[04:54] back over the whole wall in a minute
[04:56] now when you have power points or light
[04:59] switches in the middle of the room or
[05:00] middle of the wall
[05:02] i find sometimes it's better
[05:05] to actually cut around it just before
[05:07] you roll
[05:10] so silly me
[05:12] left the paint on the other side of the
[05:13] room
[05:16] so what i'll do
[05:18] is i'll quickly cut around this
[05:27] now you can tape the whole thing but i
[05:28] generally just cut around it
[05:31] lay it off lightly
[05:33] and now i'll roll that
[05:37] now once again i'll load the roller
[05:41] but there's not quite as much wall to
[05:42] roll so i'll put a little bit less on
[05:44] the roller
[05:47] and hopefully i'll have enough
[05:50] so once again
[05:53] spread the paint
[05:57] lucky me the roller goes between the
[05:59] power point and the wall
[06:05] oops this time i went to the top which i
[06:08] should move but i did
[06:10] this
[06:11] roll of dip hasn't got as much paint on
[06:13] it
[06:14] as a previous one because i don't want
[06:16] to have too much paint there
[06:18] now around power points
[06:22] i would suggest you roll as close as you
[06:24] can
[06:26] to leave it nice and neat
[06:29] so once again
[06:31] i'll go from the top
[06:33] bottom sorry to the top
[06:36] now here's the awkward one sometimes
[06:39] when you're doing around power points
[06:41] etc
[06:43] you bring the roller down and then it's
[06:45] best to actually
[06:47] paint again
[06:48] either side
[06:50] so the rolling
[06:52] when you're rolling it you don't leave
[06:54] with a stop mark with a roller just
[06:55] there
[06:57] like if i come up the wall
[06:59] and stop
[07:00] there'd be slight mark there
[07:02] so
[07:04] what you should do
[07:06] is do that first
[07:08] that first
[07:10] and then go either side
[07:13] whoops
[07:14] either side if you don't hit it like i
[07:16] just did
[07:18] either side of the light switch or power
[07:20] point
[07:25] okay
[07:31] so now that's done i'm just going to go
[07:33] quickly go back and lay the whole wall
[07:35] off
[07:36] now depending on whether
[07:39] on a hot day
[07:41] you want to do this probably
[07:43] roll half a wall then lay it off being a
[07:46] little bit cooler
[07:47] this should be fine now i'll start from
[07:50] the bottom once again
[07:52] go up
[07:53] and come down
[07:55] and what this will do
[07:57] is it will smooth
[08:00] the finish off slightly
[08:05] now every time i stop i take the roller
[08:08] off the wall slightly
[08:12] from the bottom it's taken off up top
[08:15] back down
[08:16] take the roller off
[08:18] and each time
[08:20] i'm still overlapping
[08:22] you must overlap when you're rolling off
[08:32] and as you see i'm doing this reasonably
[08:34] quick
[08:39] i actually have a thoughts appointment
[08:41] in about five minutes so i better hurry
[08:44] so
[08:50] that's how you lay the wall off
[08:54] so what you'll find is weather
[08:55] conditions etc will vary when it comes
[08:58] to laying it off
[09:00] but if you look at the wall now it's got
[09:02] a more solid finish to it
[09:05] so hopefully um
[09:08] that will help next time you're rolling
[09:10] a wall
[09:11] now also down there if you're a bit
[09:13] unsure you haven't gone low enough
[09:16] you can also
[09:18] get the roller
[09:19] and go sideways like so but if you do
[09:22] that you do it before you lay the wall
[09:25] off
[09:28] so in this case i'm just going to blend
[09:30] that back in
[09:31] this is only first coat so it's not
[09:33] going to matter so
[09:34] much so there you go
[09:37] that's just been a bit of a demo on how
[09:39] to roll a wall
[09:41] [Music]
[09:54] you
⚡ Saved you 0h 09m reading this? Transcribe any YouTube video for free — no signup needed.