
Window Stuck in Rain? DIY Fix Saves $450
45sRelatable car emergency with a massive cost-saving hook grabs immediate attention.
▶ Play Clip"Delivers exactly what the title promises: a thorough DIY guide to replacing a window regulator motor, with useful diagnostic tips."
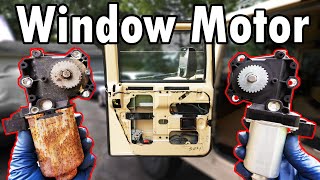
This video provides a comprehensive DIY guide to replacing a window regulator motor in a Hummer, emphasizing cost savings by replacing only the motor instead of the entire regulator. The host walks through diagnosing common window issues, removing the door panel, drilling out rivets, and installing a new motor, with practical tips for avoiding common pitfalls.
The window is stuck halfway down and made a groaning noise for a month before failing on a rainy day. This prompts the DIY replacement.
Replacing a window regulator motor is similar across vehicles; the main difference is removing the interior door panel, which varies by make and model.
Grinding noise, slow or weak operation, getting stuck, or not moving at all are signs you may need a new motor, but other causes should be checked first.
Before replacing the motor, check the power window fuse. A blown fuse can be the culprit. Replace with same size fuse; if it blows again, there's a short.
If the fuse is fine, test the window switch by swapping with a known-working switch (e.g., from passenger side). If the window works with the swapped switch, the original switch is bad.
Wires in the door jam can get pinched or damaged. Test by moving the wire loom while pressing the switch; if the window responds, there's a broken wire.
The entire regulator can fail, especially in certain models like Dodge Viper (plastic tube fails) or Hummer (expensive $450 regulator). Replacing just the motor is cheaper.
Tools include a drill and bits to remove rivets, common hand tools, bungee cord to hold door open, dry lubricant, and a new window regulator motor.
Remove screws (5 on side, 2 in armrest, 6 for handle/switches), disconnect switches, and lift panel off. Use a razor blade to cut butyl tape if needed.
Drill out three rivets holding the motor to the regulator. May need to remove support beam and bolts for access. Use correct drill bit size (larger than rivet inner diameter).
Tapping the motor with a screwdriver made it briefly work, confirming it's failing. Disconnect harness and remove old motor.
Compare old and new motors; transfer metal plate from old to new using nuts and bolts with threadlocker. Apply silicone paste to prevent corrosion.
Connect harness, position motor, and secure with bolts. Check clearance with window glass; may need to shorten bolts or reverse direction to avoid interference.
After installation, test window operation. Reinstall support beam, zip ties, moisture barrier, and door panel. If window binds, apply dry lubricant to tracks.
Replacing a window regulator motor is a cost-effective DIY repair that can save hundreds of dollars. By following systematic diagnosis and careful installation, you can restore window function and avoid expensive full regulator replacement.
What are common symptoms of a failing window regulator motor?
Grinding noise, slow or weak operation, getting stuck, or not moving at all.
01:13
What is the first thing to check if a power window doesn't work?
The power window fuse.
01:27
What should you do if the fuse blows immediately after replacement?
There is likely a short circuit; check wiring and connections.
02:48
How can you test if the window switch is faulty?
Swap with a known-working switch (e.g., from passenger side) and see if the window works.
03:31
What is a quick way to test for broken wires in the door jam loom?
Move the wire loom while pressing the window switch; if the window responds, there's a broken wire.
05:00
Why is replacing just the motor cheaper than replacing the entire regulator?
Motors are often interchangeable and cost around $50, while regulators can be $450-$500.
06:33
What tool is used to remove the rivets holding the motor?
A drill with a bit larger than the rivet's inner diameter.
10:24
Why is it important to check clearance with the window glass after installing the new motor?
Bolts may protrude and hit the glass, causing interference; may need to shorten or reverse bolts.
13:34
What lubricant is recommended for window tracks and why?
Dry lubricant, because silicone attracts dirt and dust, causing wear.
18:08
Check Fuse First
Emphasizes diagnosing before replacing parts, saving money and time.
01:27Switch Swapping Test
A practical, low-cost diagnostic technique using a known-working part.
03:31Wire Loom Test
Simple method to detect broken wires without specialized tools.
05:00Cost Savings
Replacing motor instead of regulator saves $400, a significant incentive for DIY.
06:33Clearance Check
Highlights a common installation pitfall and a creative solution (shortening bolts).
13:34[00:02] going to show you how to replace a window regulator motor in your vehicle Hummer and as you can see the window is stuck halfway down and I should have was making a groaning noise out of
[00:16] the period of a month and then finally in the worst possible day when it's raining it finally quit and gave out and the window is stuck halfway open but opportunity to show you guys how to replace a window regular motor and you
[00:31] it's going to be on a Hummer well the good thing is replacing a window regulator motor is basically the same in any vehicle the major difference is going to be how to remove the interior door panel now every manufacturer every
[00:44] single make and model has a different method of securing the door panel to the door some use screws some use little plastic clips that you need to pop out as you can figure out how to remove your door panel that way we could access the
[00:57] right around here then you'll be able to follow along and replace your bad window regulator motor and save yourself a ton of money now real quick here's how you when you roll your window up and down it makes a grinding noise or a loud whining
[01:13] down slowly or it seems weak and gets stuck or maybe it won't roll up or down symptoms you probably need a new window isn't going up or down don't jump to conclusions it's not necessarily a bad
[01:27] window motor there could be other things causing it to not work and I'm going to those cuz I hate throwing parts of the car and I rather diagnose the problem first and probably easiest thing to
[01:40] check is your power window fuse go check out your owner's manual look for a page like this where all the fuses are listed and look for the power window fuse you can see right there our fuse is located in the top left corner and then if we go
[01:53] down to the fuse box remove the fuse box door pop off the fuse box cover and motor that we need to check and taking a look at our fuse you can see the middle part there is not burnt out it's one complete connection so our fuse is
[02:08] perfectly fine and to give you an idea of what a bad fuse looks like I have pop so keep an eye on it and that's what a PO fuse looks like if the motor is overworked like if your window gets stuck or if there's corrosion from water
[02:21] get too much current going through it and it'll pop just like that to protect the circuit so now let's reinstall our good fuse making sure it's pushed in all the way reinstall the cover for the fuses and reinstall the fuse box door
[02:35] but let's just say you pull the fuse and you see it's blown what do you do next well I'd replace it with the same exact size fuse don't go any larger so if you have a 5 amp fuse use another 5 amp fuse that way you don't damage anything and
[02:48] go test out the windows roll your window down roll it up see if that fuse blows right away or if the windows work if the fuse blows right away there's a good bad or you have a bad connection in the switch or even a bad connection at the
[03:01] something that's helpful if it doesn't blow again it could have just been the was a high load on it so it blew to protect the circuit and just use it that takes it might not blow again or it could blow again in a week a month who
[03:16] off of so if your fuse blows you know exactly what you need to do now in this would do is I would test the actual window button now if the window switch itself is blown out and not working when you press up or down it's not going to
[03:31] work so that could be your problem and the easiest way to test that is to grab side most of the time they're identical they're the same exact switch so you side one works perfectly fine the window rolls up and down so let's carefully pop
[03:45] the window switch out good then we could remove the switch and inspect the don't see any burn marks on the prongs and this looks good and check on the harness side as well and this also looks good so now we can test out the
[03:57] passenger side switch so let's plug it in and let's give it a try okay so I'm pressing the switch and the window isn't moving at all so now we know for sure it's not our switch that is the problem because we knew this
[04:09] switch worked on the passenger side so our fuse is fine the window switch is fine the next common problem is where the wires go from the door into the car there's this little piece of plastic here now the Hummer is a bad example cuz
[04:21] through is solid it isn't rubber it doesn't bend the door actually slides along that plastic so there's no chance that the wires in here can get pinched but this isn't how it is in most cars so
[04:33] real quick let's go check out the Jag which has the more typical rubber wire protector inside the door jam which you could see right there and sometimes what happens here the wires in this Loom get pinched because when the door opens and
[04:47] closes those wires are constantly moving and over time there's some wear and tear in here the wire could get damaged and then you lose connection to your power windows now a real quick and easy way to test for a broken or damaged wire in
[05:00] this wire loom is to press down on the window switch with the bad window and move that wire loom around with your hand if it makes a connection your window will start to roll down like that and if you move it some more it'll stop
[05:13] and if you get it back into the same spot it'll roll down some more so brake in there and then you'll have to take the door off and repair that brake that's just a really quick and easy way to test for that it's not perfect
[05:27] sometimes the wires are so broken and connected you won't make that connection and you'll just have to test for 12 VTS at the actual window regulator motor in the door but in this case you just move it around and it makes the connection
[05:39] and you can see the window will go up and down no problem and finally the last common reason your window won't roll up or down is because the entire window regulator has failed that's this right here this mounts inside the door and
[05:52] then the glass mounts here and here and then when you roll your windows up it it goes down this guide and this this specific regulator is for a Dodge Viper very common problem on those cars you could see right here it uses a worm gear
[06:06] and that's how it moves the window up and down that goes into a plastic tube plastic tube is what fails I don't know why they don't use metal they don't make a new one with metal and like I said all the Gen 3 to Gen 5 vipers all have this
[06:20] failure point and these are expensive they're $500 each same thing with the regulator inside the Hummer that is a $450 regulator they're not cheap which instead of installing a brand new regulator we're installing the regulator
[06:33] motor which is 50 bucks for the Hummer because a lot of these motors are interchangeable for example this one is for a 91 to 96 Jeep Cherokee i' rather spend 50 bucks than $500 this is also a lot easier to replace so let me show you
[06:47] show you guys in another video how to do an entire window regulator replacement but for this video we're focusing on saving a ton of money and just installing a window regulator motor and to do that here are all the tools and
[07:00] to keep things nice and simple we have a drill and drill bits to drill out the three rivets holding the old motor to the regulator otherwise we're using common hand tools we have a bungee cord to hold the door open so it doesn't
[07:13] swing in the wind we have dry lubricant I'll show you where to use that we have interior panel that way we don't lose any and then we can't put it back our window regulator motor it is that simple I'll be sure to include a link to
[07:27] description so you could easily find them now let's get started so the first door from closing on us as we work on it so I like to use a bungee cord to hold the door open so with the door secured now we can begin by removing the door
[07:42] a little bit different for each vehicle out there with this panel there are five screws on this side that hold the panel in so remove all five of them and keep them and then there's two more screws in the armrest that need to be loosened but
[07:55] stay in the door handle so with all the screws removed on this side including on this side of the panel and we'll start with the top Corner screw here then we can unscrew the door strap bolt and remove the door strap and then let's
[08:10] remove the bottom right corner screw and finally there are six screws holding the handle and door switches in so remove the two door switch bezel screws then we can remove the four screws that hold the handle in and now we can disconnect the
[08:22] switches and then slide the door handle through the door panel so we can remove the panel now all that's holding in the panel is some velcro at the top top so it should lift right out like that beautiful so now most cars will
[08:35] that's this piece of plastic it prevents the moisture from the outside getting want to rip this so removing it's pretty simple but I have a couple quick tips to you're going to just try to remove it just like you would anything else you
[08:49] can see all this Beal rubber tape that is coming off that is fine try to keep help you seal it back up and that's actually coming off really easy but easily so let's pretend this is really stuck on there and it's ripping the
[09:04] you're going to do is you're going to grab a straight edge razor blade like that and you're going to cut that be rubber as you peel this off just like that so you're not damaging the plastic and at the same time that but rubber is
[09:18] staying in place that way you could push this plastic back on when you're done so without ripping it and this blade is working great to help do that beautiful just hang there we don't need to remove it all the way because we have the
[09:32] access we need to our window regulator motor which is right here also another it won't touch the ground you don't want to get any of this but rubber dirty cuz if it gets dirty it doesn't adhere properly when we try to put the moisture
[09:44] down when we try to reinstall the door panel so we're good to go next let's remove the window motor so if we take a look at our brand new window regulator here that we're going to have to drill out and those are the three rivets now
[09:58] get to that one so we're going to have to remove this metal support beam so let's clip the zip tie holding the wiring harness in then remove this t27 bolt that holds in the regulator and finally we can remove the two Philips
[10:10] head bolts on either side and actually with this one loose we could just leave way so now we have access to all three rivets which we could drill out so grab correct size drill bit I'll show you how to tell which is the correct size so
[10:24] out your rivet you want to make sure you find a drill bit that is big bigger than the inside diameter of your rivet this drill bit is way too small and fits on do anything this will just drill through the rivet if not going to drill the
[10:37] rivet out instead a drill bit this size is perfect the diameter is bigger than you can see when it drills it out it's going to drill a little bit on that out and breaks it off so we can pop it out so drill into the rivet deep enough
[10:52] so the shoulder braks like that and you can see the follow the same process for the other two rivets drill it out into the head of the rivet brakes good and to give you an idea what we're doing here's the rivet
[11:06] head isn't holding it in anymore so now we have one last rivet to drill we have one last rivet to drill out and perfect now the motor is free so let's pull it out and real quick I want to try something if I press the window
[11:19] switch now nothing happens but let's give it a few whacks with the back of a screwdriver there you go the motor is barely working but it is moving now and that's why sometimes when you slam your door you hit the door panel the window
[11:32] and then dies again like that so no matter what this definitely has to be replaced so disconnect the wiring harness from the motor and now the motor is free to be removed so out with the old and in with the new now I always
[11:46] like to compare parts to make sure they look identical and right away I could see a difference this has a metal plate that's still riveted to the back of our motor and this one does not so we need to take this metal plate off and
[11:58] transfer it to to here so we have to finish drilling out this rivet another sprockets I want to make sure both of these sprockets are identical and if you take a look at that they are the same size have the same pitch all of that
[12:11] orientation good and then finally we want to make sure that both of the One's actually in good shape always check for corrosion cuz sometimes water causes this to short out but both of these look good otherwise so let's
[12:27] transfer this plate over to this new motor so drill out this last rivet good and then let's take our metal plate and transfer it to the new motor like so and now instead of using rivets here what we're going to do to make it
[12:40] simple we're going to use nuts and bolts so our bolt will fit right through here laying around then let's add a little bit of medium strength red Locker so the vibrations don't loosen up the nut and bolt now we could hand tighten that nut
[12:53] on all the way and then we could snug it up using our wrenches good so now we put thing we need to do and that is get a little bit of silicone paste and pack it this will do this will prevent any moisture from getting in here and
[13:07] causing corrosion so we're corrosion free we have our plate on here our gear is in the right spot let's install this so first let's connect the wiring harness to the motor then we need to get this motor in place on the window
[13:20] in there and I'm just going to tighten down one nut to this top bolt right here and gear so it doesn't move as we test it out and this will also let us test out
[13:34] how far this bolt sticks out cuz the glass might hit it right here and this is important to do because originally they used a rivet and the rivet didn't stick out very far the rivet stuck out just a little bit like that meanwhile
[13:46] have a feeling this bolt is going to cause a clearance issue with the glass coming down so let's try it out all right moment of truth the window goes all the way up which is good but let's see if we hit that bolt going down
[13:59] have this problem you can see the window frame is hitting the bolt but I have an idea on how to solve this so let's unscrew the bolt all the way and remove around like this so the threaded part sticks out the other way and there's no
[14:13] there's enough clearance I'm going to remove this washer which does push the bolt head out just a little bit even if it's just an extra millimeter so snip both sides of the washer using a side Cutters and that breaks the washer right
[14:26] install all three bolts facing the solve the clearance problem so now let's get that motor back in place on the regulator and push the bolts all the way through and while one clearance issue
[14:39] one right here this Bolt's sticking way too far out so let's mark this bolt where it needs to be cut remove the bolt and you can see right there is where we a vise with our green cutting Mark near the edge and make sure you tighten the
[14:52] going to use that way we don't damage the threads that we will be using to tighten that nut and bolt so now line up the saw and saw the bolt until it's cut all the way through you could use power tools here but I like to show you guys
[15:04] this could get done with is a plain old handsaw okay so we're coming to an end here and make sure you saw all the way through and just like that we have our shortened bolt so now let's get this in place and I'm using a magnet to hold the
[15:16] get in there and once that's in let's get some medium strength rad Locker on vibration don't loosen them up then we need to get a nut onto each of the three bolts and snug them down to sandwich that motor to the regulator so these two
[15:31] tighten up but for the bottom one I'm using a crows foot wrench just because it's so tight to get back there and that'll hold the head of the bolt as we tighten down this last nut good so now let's go test the window out okay so
[15:43] let's see what we got here perfect what we did here worked and check this out we have the clearance we need that way our window isn't hitting the bolt anymore putting the door back together starting with tightening down this support beam
[15:57] and don't forget that middle support but holding the regulator and motor in place then we need to add a zip tie up here to hold that harness in so cinch that down end of the zip tie for a nice clean install next let's get the moisture
[16:10] barrier in place so get the door handle through the barrier as well as the door locks and then we can fit it to the top of the door where that black be rubber outline is and then firmly press against the moisture barrier along the
[16:23] whole entire Edge to seal it to the door now if for whatever reason your moisture barrier isn't sticking Maybe maybe the but rubber got dirty maybe it's just old and it's not sticking you could always buy more be rubber it's inexpensive I'll
[16:35] really simple you cut a piece off like that and then all you do is stretch it out so it's nice and thin and then you could place it wherever you need it and you're good to go okay so finally let's install our door panel onto the door
[16:49] starting with passing the door handle through the panel and then the wires in the five screws on the left side of the door panel to hold it in place then screw and the two screws under the armrest good that's nice and tight now
[17:02] let's connect the wires to the switches get that window switch connected and the lock switch connected as well good and now let's get the panel lined up onto the door and tighten down both screws to hold it in then we can tighten down the
[17:14] that in a crisscross pattern so that the handle seats evenly good next let's get the door limiting strap bolted in and snug that up perfect and now all that's
[17:26] left is the bottom right hand corner screw and the top rightand Corner screw good so with our door panel reinstalled we are good to go the last thing we need to do is test the window make sure it's not binding up make sure it works
[17:40] perfectly so let's try her out all right we're going to send the window down oh man look at how fast and quiet that is and send it back up and that is beautiful so that is a job well done now just in case you do that and your window
[17:55] here and starts slowing down you can hear the the motor struggling on a brand new motor now in that situation what I'd use is some dry lubricant you can use silicone but silicone is going to attract dirt and dust and hold it into
[18:08] to wear out dry lubricant is going to go in wet but then it'll evaporate and attract dirt or dust and will'll keep it this cuz I don't need to if you don't need to don't touch it but what you
[18:21] would do is you just go in the track you'd squirt some down in there and then same thing on the other side and see if it's still binds up so that is everything you need to know on how to replace a window regulator motor and it
[18:34] is starting to pour perfect timing our windows rolled up and we are good to go we saved ourselves a ton of money $450 just by replacing the motor and not needed the window works fine and I hope this video was helpful if it was
[18:48] remember to give it a thumbs up if you're not a subscriber consider hitting that subscribe button and as always all the tools and products are linked in the the tools and products are linked in the description of the video
⚡ Saved you 0h 18m reading this? Transcribe any YouTube video for free — no signup needed.