
My Driveway is Crumbling!
40sChrisFix's relatable frustration and the visual of a cracked driveway hook viewers immediately.
▶ Play Clip"Delivers exactly what the title promises: a complete, detailed tear-out and repave process with cost breakdown."
ChrisFix documents the complete process of replacing his crumbling driveway, from tearing out the old asphalt to paving a new one. He covers the machinery used, the importance of a proper sub-base, and the final cost breakdown.
ChrisFix's driveway is his 'office' where he films car repair videos. It's crumbling, unsafe for jack stands, and has a problematic lip at the garage entrance.
A skid steer with a tooth bucket is used to pry up the old asphalt. The old driveway was only 1 inch thick in places, a shortcut that led to cracking and failure.
About 25 tons (22,000 kg) of old asphalt is hauled to a plant where it's recycled into millings for new driveways.
The team uses a rope with chalk to imprint straight lines along the driveway edges, then cuts along them with a mattock or shovel.
Quarry processed (QP) stone is spread to level the sub-base. Typically 4-6 inches is recommended, but only 1-2 inches is needed here because the existing sub-base is dense.
The asphalt paver is backed over the stone to level it extra flat and compress it, a trick that works well because the paver will lay the asphalt next.
A concrete slab near the garage was too high. They cut it with a diamond-blade saw and removed the excess to ensure proper drainage away from the garage.
A tandem roller compacts the stone and dirt. Water is sprayed to help compaction, and the roller's vibration shakes particles closer together.
The paver lays I-5 hot asphalt mix at about 300°F (150°C). The driveway requires two passes. Workers manually spread asphalt near the garage for proper grade.
Tandem rollers and a plate compactor smooth and compress the hot asphalt. Water is used to prevent sticking and the steam helps iron out imperfections.
The entire job cost $6,000, which is $5.45 per square foot. This includes tear-out, hauling, QP stone base, grading, compacting, and 3.5 inches of commercial-grade asphalt.
The new driveway is smooth and functional. It takes 6-12 months to fully cure. Avoid driving on it for at least a week, and use wood under jack stands to prevent imprints.
Replacing a driveway is a major project, but with the right equipment and process, it can be done efficiently. The new driveway is not only aesthetically pleasing but also safe and functional for ChrisFix's work.
What is the recommended thickness for a new asphalt driveway?
At least 2 inches.
02:47
What is the purpose of using QP stone?
To level the sub-base and prevent sinkholes.
04:39
Why is water sprayed on the sub-base during compaction?
Because dry stone and dirt don't compact well; wet material holds together better.
07:13
What is the temperature of hot asphalt mix when laid?
Around 300°F (150°C).
08:34
How long should you wait before driving on a new asphalt driveway?
At least a week.
12:49
What is the cost per square foot for this driveway replacement?
$5.45 per square foot.
11:56
Why is it recommended to use wood under jack stands on new asphalt?
To distribute the load and prevent imprints, as the driveway takes 6-12 months to fully harden.
14:02
Thin Asphalt Shortcut
Reveals a common contractor shortcut that leads to premature failure.
02:47Paver Trick for Leveling
Using the paver to level stone is an efficient technique that also compacts the base.
05:32Water Aids Compaction
Explains the principle behind wet compaction, similar to wet sand.
07:13Total Cost Breakdown
Provides a concrete cost estimate for driveway replacement.
11:31Thermal Imaging of Fresh Asphalt
Visual demonstration of heat distribution and cooling process.
12:23[00:00] Hey guys ChrisFix here and today I'm going to show you how to dig up your entire driveway and redo it to make it look amazing! Now I thought this would be an interesting video, it's not what I normally do, but the driveway is a pretty important place for me because this is
[00:14] where I do all my work, this is where I make all the videos to teach you guys how to fix your car, and this is basically like my office and it's seen better days look at this... This is all just crumbling apart and it's just not good... It's not safe to work
[00:28] on anymore and it's difficult to work on. Even something as simple as the transition disrepair along the whole length of the garage. When I move the toolbox in and out of the garage,
[00:40] the driveway meets the garage. And this toolbox is very heavy so getting it over this ledge is difficult, so fixing this is going to be a big deal for me! Another major problem with the driveway is when I go to use jack stands.
[00:54] You can see how the unleveled driveway causes the jack stand to wobble which seen better days it just constantly keeps lifting up and it's not good, it needs to get redone, there's no doubt in my mind, and it's hard because
[01:09] like I said this is my office this is where I work and this is where I make my videos. So how do I redo a driveway and not work on it for a couple days? Well I figured let me show you the entire process. Now unfortunately a driveway this bad cannot be
[01:24] easily repaired with common hand tools like we're used to we're gonna have to bring out the heavy machinery but don't worry I'm going to show you the entire process from start to finish including: Grading and leveling it... Bringing a compactor in...
[01:39] And then putting down the new asphalt driveway so we could get amazing results. So let's take one last look at this old tired driveway. She's treated us well with 10 years of repair videos that garnered over 1.5 billion views,
[01:53] So let's fix this driveway up! Okay so first we need to dig and to do that we're using a skid steer with a tooth bucket.
[02:05] The team starts at the beginning of the driveway over by the sidewalk and the goal is to pry up the asphalt without damaging the sidewall. You also don't want to dig into the ground too deep which could loosen up that dirt and rock underneath the driveway.
[02:18] We want that dirt and rock to be as hard as possible, this is known as the sub-base and it's nice and hard and compacted after 30 years of this driveway being on top of it, that layer of asphalt, the rest of the driveway peels up pretty easily. I mean just watch this...
[02:34] Check out how the asphalt just comes right up and goes right into the bucket. And now once that bucket is filled, the skid steer dumps the old pieces of driveway into the dump truck and the process repeats. Now if you look closely you can see my
[02:47] the contractor took a shortcut and put down only one inch of asphalt to try to save money. A driveway should at least be two inches thick, but since it was so thin, the driveway started to crack, and the owner of the house at the time complained.
[03:02] And instead of digging up the driveway and repairing it properly, all they did was put down another layer of asphalt right on top of it which ultimately caused this to fail. garage doors and the concrete slab. You can see the spotter helping the
[03:16] worker in the skid steer break up that last piece of asphalt next to the garage, and now that that's broken up, the team could get in there and manually pick up the last few pieces of asphalt and throw it into the bucket. That way there's no risk at damaging the garage.
[03:28] And that includes this last giant piece of asphalt! Now with the driveway completely cleared out, the last of the asphalt is dumped into the dump truck and now there's about 25 tons (22,000kg) of asphalt in this truck
[03:41] and this will be taken to the asphalt plant where they cut it up into little one-inch pieces called millings and then that'll be recycled and used in new driveways. the next thing to do is make sure the new driveway will be straight.
[03:57] the other. Then they walk down the rope and mark the edge with paint . Once one side's done the process is repeated on the other side of the driveway as well. Now with these lines put down, a tool called a mattock is used to cut a straight edge along the
[04:14] another method of getting that straight line is to use just a basic shovel and work your way down the line to create a nice and straight edge. (more dirt digging noises)
[04:26] Okay so the edges are straight and all the old asphalt is removed so we're down to this bare dirt, and the old driveway really compacted this dirt so it's very hard and that's good. This is a great sub base for the new driveway to go over, but the problem is, it's not level...
[04:39] So the solution is to use quarry processed stone, also known as QP stone, to level this sub base. You're gonna want 4-6in (10cm-15cm) of this quarry process stone put down.
[04:53] But since we have a nice dense sub-base, they're only adding an inch or two of stone, to grade and level the surface, that way the new driveway won't have any sinkholes, and it'll slope slightly towards the street to allow the rain to run off.
[05:05] So the skid steer driver is putting down about one to two inches of QP stone as evenly as possible over the entire driveway. And once the stone covers the whole driveway, you can see he's using the bucket to level out any high or low spots, like so.
[05:17] Finally the team uses rakes to manually level out the driveway, Now these guys are doing great work and getting the driveway pretty level, but the owner of the company said he has a trick up his sleeve to get this driveway extra level...
[05:32] And that trick is to get the asphalt paver, back it all the way up the driveway, You can see the screed which is that flat piece of metal at the back of the paver, leveling out
[05:45] the extra gravel on the surface. And using the paver for this actually makes a lot of sense because this is what's going to be laying down and leveling out the asphalt in the next step... And not only are they making it extra level but the weight of the paver compresses the stone,
[05:58] and you can really see how well this trick works to flatten out that stone. Now while they were leveling the driveway, I noticed the concrete Luckily I caught it and this is a pretty easy fix at this stage.
[06:13] And to do that they're using a rope with some chalk on it to imprint the line onto the concrete. Next they use a gas powered concrete saw with a diamond blade to follow that line, anytime you cut concrete it creates a lot of dust.
[06:29] So the trick to keep the dust down is to spray the area with water as you cut. the concrete pieces could be removed and then they're just going to fill this area in with stone and compact it and level it with the rest of the driveway.
[06:42] this would have been a lot more difficult to fix. So now the guys are finishing off leveling the rest of the driveway with the paver, But first the team took a quick lunch break and apparently one of the guys
[06:57] I thought that was pretty cool! (ChrisFix noises) compact the sub-base even more, so we won't have any sinkholes. with water is because dry stone and dirt doesn't compact very well...
[07:13] But if you use wet sand, it holds together, so the same principle applies here. 4,000 pounds (1800kg) as much as a large car, and all this weight is pushing on the ground
[07:27] through these two rollers which really compresses the stone and dirt together. And if you listen not only is it rolling over the stone with all the weight, but it also has a vibration feature, and those vibrations shake the particles of
[07:39] dust and dirt and stone together, so they fit closer, and you could compact it even more. So the tandem roller is worked up and down the driveway multiple times,
[07:51] overlapping its path to make sure the entire sub base is rock solid. And once they're done with this, we are ready for the final step: laying down the asphalt! Now something I noticed that I was pretty impressed by was after each step these guys clean
[08:03] their machines immediately, which is how they look so good even though they're used every day. Alright and for the last main step, the asphalt paver is brought onto the driveway to warm up. driveway is wide enough where there has to be two passes with the paver,
[08:19] truck is back from the asphalt plant with 25 tons of I-5 hot asphalt mix, With the conveyor on, some of the hot mix asphalt is dumped into the
[08:34] paver and if you can't tell this is very very hot around 300°F (150°C). So with a full load, the paver is backed up as close as it could get to the garage door, and they dump a bunch of hot asphalt for the workers to manually spread.
[08:46] they spread it by hand, and they check the asphalt to make sure that there's house so rainwater runs down the driveway and not into the garage.
[08:59] Now with the correct grade and thickness, the paper backs up on onto the fresh asphalt. And finally the screed is lowered which pushes down the fresh asphalt to compress and level it.
[09:11] Now the asphalt starts pouring out, and you can see the extensions keeping the asphalt off the grass giving it a nice straight edge as the paver moves down the driveway. And while you can see the asphalt comes out as a bunch of small pieces in the front,
[09:23] if we go over to the back, the asphalt gets leveled and slightly compressed by the screed, and that creates a nice smooth level driveway. I mean just take Finally at the end of the driveway, the last bit of hot mix is poured out,
[09:38] there and level and grade where the driveway meets the sidewalk. the rain water could run off into the street and not puddle on the end of the driveway.
[09:51] With half the driveway laid down, now it's time to do the other half. and the paver makes quick work at laying the other side of the driveway down. You can see the extension overlap slightly on the part that was just paved,
[10:06] and what that does is adjust the thickness of the asphalt going down. thickness on both the right and left side of the driveway.
[10:18] All right, so with the entire driveway paved, now the tandem rollers used one last time to compress the hot asphalt to make it as smooth and dense as possible. And just watch it have a tandem roller compresses and Smooths out this rough asphalt at the surface
[10:31] it's just so satisfying seeing that rough surface get turned into a nice smooth driveway. And finally with one last pass the driveway is completely smooth now as the roller continues
[10:47] to go up and down the driveway to compress it even more it can't get to every single spot like right here next to the garage so a smaller plate compactor is used to get into these areas that the roller can't then once the roller is done for the final step the plate compactor makes its way
[11:01] around the driveway touching every square inch to smooth out the finish and if you're wondering the reason why they use water is to prevent the hot asphalt from sticking to the Machinery but it's also used to help smooth out the Finish because water turns to steam when it hits that hot asphalt
[11:16] and that steam helps iron out the imperfections in the driveway and it makes it look a lot more uniform and smooth so with one last pass with the plate compactor and our driveway is officially done now this took a little over four hours to complete and I think the results speak for
[11:31] themselves these guys did an amazing job all right now that the guys are heading out let me show you the breakdown of how much this cost foreign so for digging up that old driveway and Hauling
[11:44] that asphalt away putting down the QP Stone base and then grading and leveling and compacting that stone base and finally adding three and a half inches of commercial grade I5 hot asphalt and
[11:56] then rolling that all of this cost me six thousand dollars and so you have an idea that came out to $5.45 a square foot so now you could do the math to get a rough estimate to give you an idea of
[12:08] how much it would cost to get your driveway redone all right and check out the driveway this looks so good man I should have done this a long time ago it's just hard because I always have to have cars on here I always have to make videos and I have to keep working to keep going with YouTube so but
[12:23] I got a nice little spot here that I was able to do it and man it came out awesome holy smokes you could actually feel the heat radiating off this thing well I know this is going to be really cool check this out so this is my thermal camera and the purple color is about 140°F (60°C) and the
[12:37] yellow is about 180°F (82°C). you can see the side closer to us is cooler because that's what they laid down first first compared to the other side which is still pretty hot now it's important that you don't walk on this until it cools down which takes about a day or two and they told me to keep
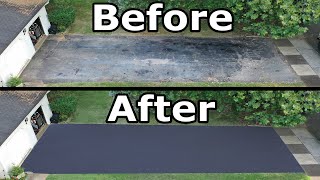
[12:49] the cars off of this for at least a week that way the asphalt has time to cure and Harden so there you go out with the old and in with the new and I'm glad I finally pulled the trigger and got this done because look at the difference here's a before and after we used to have giant potholes
[13:06] like this and now it's nice and smooth the edge of the driveway was crumbling into pieces and now it's straight and solid so I know they said I had to wait a week before driving on it but I wanted to keep the cars off as long as I could so here we are two weeks later and I'm able to
[13:22] Park part of my fleet on this beautiful driveway and not only does this driveway look absolutely amazing but it's completely functional it's nice and flat there's no more bumps and over here where I had that issue where the old driveway sunk down and created that giant lip look nice and flat
[13:38] now so I could get my toolbox in and out of the garage without having to lift it up nice and easy also if you remember with the old driveway the jack stand was wobbly and moved around which was
[13:50] very dangerous well now check it out it doesn't wobble at all no matter which direction you put it it is nice and sturdy now these jack stands have very sharp edges here and if you put the
[14:02] weight of the vehicle on here it will dig into this driveway this driveway does take about six to 12 months to fully Harden and cure it's fine for cars but not good for jack stands so an easy solution is just use a piece of wood underneath the jack stands and now it won't imprint onto the
[14:16] driveway because we have a nice large surface area that we distributed the load over and one messed up due to oil stains and that's pretty simple with these oil mats they work really well
[14:29] the top of the mat here is an absorbent material and the bottom of the mat is a plastic material so it won't absorb through and then get on the driveway so I'll link it in the description if that I thought about I just put this brand new beautiful driveway I don't want to mess it up
[14:46] and get stains on it so that's how I'm going to prevent any oil stains so that's the process on how to replace your driveway it came out awesome and now I can get back to making my videos and stay tuned because we have a bunch of awesome ones coming out soon hopefully this video helps anybody
[15:00] looking to get a new driveway now you know what to expect and if you have any questions feel free to comment below as always remember to give the video a thumbs up and if you aren't a subscriber consider hitting that subscribe button for more Automotive how-to videos! Thank you.
⚡ Saved you 0h 15m reading this? Transcribe any YouTube video for free — no signup needed.