Woodworking Under $1500? Here's How
44sDirectly addresses the pain point of expensive tools, offering a budget-friendly solution that promises to build real furniture, which is highly relatable and engaging for beginners.
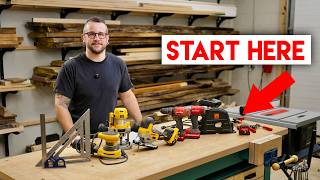
▶ Play ClipThis video presents a complete woodworking tool setup for under $1,500, focusing on value rather than the cheapest options. It covers power tools, accessories, measuring/marking/clamping tools, and safety equipment, enabling beginners to build real furniture.
A complete woodworking tool setup under $1,500 can build real furniture, not just birdhouses.
Cheap tools are frustrating and dangerous; aim for tools with excellent value that can grow with you.
Recommend a track saw over a circular saw for better accuracy, dust collection, and safety, at a similar price.
Choose based on battery platform; most drills work for woodworking, no need for extreme torque.
Start with a trim router; it's versatile for edge profiles and dados with multiple passes. Consider a plunge base.
Fills gaps for curves and tight areas; look for a solid base and good blades.
Invest in a quality sander with good vibration dampening and dust collection.
The workhorse; look for a good fence, sturdy base, and riving knife for safety.
Brad point bits for precision; a good impact bit set is essential.
Start with chamfer, roundover, flush trim, and straight/template bits; buy quality, not cheap sets.
Invest in good sandpaper like 3M extract; net-style works with any sander.
Upgrade to higher tooth count blades for circular/track saws and jigsaws to reduce tear-out.
Use a 12-foot tape measure, combination square, and speed square for accuracy.
F-style clamps are essential; pipe or parallel clamps for larger glue-ups.
Always wear safety glasses, hearing protection, and a respirator; noise-canceling headphones don't count as hearing protection.
A good shop vac with a smaller diameter hose and dust separator is key for dust collection.
Replace the stock push stick with a better design like the Big Horn for safety.
A dado stack enables various joinery options like dados, rabbets, and mortise and tenon.
Allows hidden fasteners for cleaner furniture builds.
Keeps shop vac filter clean and reduces dust bin emptying.
Simplifies workholding; can find cheap used ones.
With under $1,500, you can assemble a versatile woodworking shop that handles real projects. Focus on value tools, invest in safety, and add accessories gradually.
"The title accurately promises a complete woodworking setup under $1,500, and the video delivers exactly that."
Track Saw (Wind brand)
tool
DeWalt Table Saw
tool
DeWalt Random Orbit Sander
tool
Bosch Sanders
tool
Milwaukee Impact Driver Bits
tool
3M Sandpaper (Extract)
tool
Stanley PowerLock Tape Measure (12-foot)
tool
Irwin Combination Square
tool
Big Horn Push Stick
tool
3M Respirator
tool
Rigid Shop Vac
tool
Rockler Bench Vice
tool
Element (Electrolyte Drink Mix)
service
John Maleky (Shop Shades)
person
What is the recommended budget for a complete woodworking tool setup according to the video?
Under $1,500.
00:14
Why does the video recommend a track saw over a circular saw?
Better accuracy, dust collection, and safety; can do plunge cuts and straight line rips.
01:06
What should you base your choice of drill and impact driver on?
The battery platform you want to invest in.
02:35
What type of router is recommended for beginners?
A trim router.
03:32
What is the main safety feature to look for in a table saw?
A riving knife or splitter to prevent kickback.
09:06
What type of drill bit is recommended for precise holes in woodworking?
Brad point bits.
09:58
Why should you avoid buying cheap router bit sets from Amazon?
You'll likely never use half the bits, and they are poor quality, making routing difficult.
11:38
What is the recommended tape measure length for woodworking?
12-foot.
14:22
Do noise-canceling headphones count as hearing protection?
No.
17:40
What is the purpose of a dust separator for a shop vac?
To separate dust so it collects in a separate bin, keeping the shop vac filter clean.
21:49
Discouragement from expensive shops
Relatable opening that acknowledges the frustration of seeing expensive tools in YouTube videos.
Track saw recommendation over circular saw
Surprising shift from traditional advice, backed by personal testing and strong reasoning.
01:06Kickback danger warning
Vivid description of kickback risk and the speed at which it happens, emphasizing safety.
09:06[00:00] So I know it can be discouraging when you're trying to get into woodworking and you're watching how-to videos on YouTube and it seems like every creator is in a massive workshop with a $7,000 cabinet saw or a $5,000 planer and can you imagine what that creator's thinking? I mean that's just
[00:14] crazy. So instead of spending as much as the cost of my first car on a single tool, today we're going to talk about a complete woodworking tool setup that costs less than $1,500. And I'm not talking about a setup that can only build birdhouses or charcuterie boards. These tools can build real
[00:29] furniture projects, cabinetry, and pretty much anything a beginner or intermediate woodworker would want to build. And one thing I should mention before we get started is this is not about finding the cheapest possible tool. Cheap tools are only going to frustrate you and can be
[00:41] potentially dangerous. Instead, we're going for that sweet spot. Tools that offer an excellent value, tools that can grow with you over the years, and tools that won't break the bank. So let's jump into section number one on my build without breaking the bank tool list,
[00:54] power tools. So starting with number one on the list, I have either a circular saw or track saw, and up until recently, I would have just recommended the circular saw because I didn't
[01:06] think there were any track saws that were kind of within the realm of a beginner's budget, but I did an entire video testing this wind track saw, and to be quite honest, I was really impressed, and I personally don't love circular saws. They have very, very bad dust collection. I have a hard time
[01:23] getting really accurate cuts with them. Obviously, they're great for construction and all that kind of stuff, and you can obviously add accessories to them to make them work more like a track saw, but in my opinion, I don't know why you would even bother with a circular saw if you just want to get
[01:37] into woodworking when you could buy a track saw for about the same price, because track saws are incredibly, incredibly powerful. In case you don't know what a track saw is, it is essentially a circular saw with a special base that interfaces with a track, hence the name, and that track
[01:54] helps keep the saw running perfectly straight while you're cutting. Tracklaws also have way better dust collection because the blade is enclosed. You can do plunge cuts much more, I think, easily and safely than you can with a circular saw. If you have a longer track,
[02:09] you can do things like straight line rip boards, which is great if you don't have a jointer, which I'm assuming you're not going to. So in my opinion, I would probably just skip the circular saw and grab a track saw because they are super, super powerful.
[02:22] And I should mention that all of these tools are linked in the Build Without Breaking the Bank PDF. So if you guys want to purchase the exact tools I'm talking about, you can check those out. Next on the list is going to be a good drill and impact driver set.
[02:35] And obviously, there are a million different options out there. I have probably half a dozen brands of impact drivers and drills here in my shop. And honestly, I would pick your drill and impact driver based on what battery platform you want to invest in.
[02:49] Because one of the most expensive things when you're getting into buying cordless tools are the batteries themselves. So as you can see, I use a lot of DeWalt tools. I also have a lot of Milwaukee tools. And if you have multiple sets of batteries, that can really start to add up.
[03:04] I think most drills and impact drivers are going to work for the kind of stuff we're going to be doing in woodworking. We're not framing houses here. We're not sinking 8-inch lag bolts into concrete or steel. We're driving screws into wood or maybe drilling small holes.
[03:19] So you certainly don't need the torquiest or most powerful drill and impact driver to do the kind of work that we do. Next on the list is a tool that you're going to want to get familiar with because it's used all the time in woodworking,
[03:32] and that is the router. And so, again, there are a lot of options out there in the world of routers. The router I link to is a basic trim router. I would probably recommend a trim router as your first router
[03:45] because you can do a lot of different things with them. They're light enough to make it very easy when you're adding things like edge profiles, like champers and roundovers, but they also have enough power to do things like cut dados and routing
[03:58] as long as you take a few passes and don't overload the motor. I would also recommend picking up some sort of plunge base for whatever router you get, because that's going to make things like cutting joinery a lot easier.
[04:10] If you don't have a way to plunge your router, it's going to limit the amount of things you can do with it. Also, routers haven't really changed a whole lot in the last, like, 40 years, so you can find really good deals on used routers. So I would check Facebook Marketplace or Craigslist, even eBay.
[04:25] There are cordless options for routers out there now, especially in the trim router world, but I'm not sure I would recommend that if you're just getting started out and you don't have a ton of batteries on hand because routers can definitely burn through batteries depending on the type of operations you're doing with them.
[04:41] Next on the list is a jigsaw, and jigsaws kind of fill in the gaps left by things like criculous saws and track saws in that they allow you to cut in kind of tighter areas, and they also allow you to cut curves. And so obviously this is a cordless jigsaw. I think the one I linked to is corded.
[04:56] Honestly, it doesn't matter that much, and again, if you don't have a ton of batteries, I would definitely recommend going with a corded model. I think one of the most important things when using a jigsaw is to buy a good set of blades, which I'll talk about a little bit later. But essentially, just look for a jigsaw with a good, solid base,
[05:10] because you do not want this thing wiggling around while you're cutting and getting out of square. A built-in light is another good thing to look for, because when that sawdust starts to build up, it can be kind of hard to see the line you're cutting to.
[05:22] But otherwise, I would probably just buy one if you're going cordless that matches the rest of your cordless platform. Otherwise, just buy something that is on sale and within your budget. Next on the list is a tool you're going to be getting real familiar with, and that is the random orbit sander.
[05:39] So the majority of your sanding work is going to be done with a random orbit sander So my recommendation would be if you have the budget to definitely push up to the next level of sander I think this one from DeWalt is around
[05:52] This is as cheap as I would go, but honestly, if you're sanding for, you know, an hour or two or longer, you're going to feel it in your hands because this does not have the kind of vibration dampening that some of the nicer sanders have built in.
[06:05] So even if you could push that budget up to, I think, like $150 around there, You can start looking at things like Bosch's sanders, which I think are a big step up from the DeWalt. The other thing you might want to consider is what kind of dust collection connection your sander has.
[06:23] Those little bags that come with your sanders are kind of a joke when it comes to dust collection, so you're going to want to make sure you get good dust collection while you're sanding. Let's take a second to talk about the sponsor of this week's video, Element.
[06:35] In case you haven't heard of it, Element is a super tasty electrolyte drink mix with everything you need and nothing you don't. Element contains a science-backed electrolyte ratio of 1,000 milligrams of sodium, 200 milligrams of potassium,
[06:49] and 60 milligrams of magnesium with no sugar, no artificial ingredients, and no BS. Basically, it's got everything you need to stay hydrated and nothing you don't. I've personally been drinking Element multiple times a week for the past few years,
[07:02] and it makes me feel great any time I'm working up a sweat. So good. Whether that's mountain biking, working in the yard, or working here in the shop. Basically, if I know I'm going to be sweating a lot, I'm bringing some Element. So right now, Element is offering you guys, my viewers, a free eight-count sample pack
[07:17] of their most popular drink mix flavors with any order. And this is a great way to try more of their awesome flavors or share some Element with a friend. So to get your free sample pack, go to drinklnp.com to grab your free sample pack.
[07:30] And this deal is only available through my link, so make sure to check it out in the video description below. Thanks again to Element for sponsoring this week's video, and let's get back to work. And then last, but certainly not least, is the table saw.
[07:42] And this is definitely the workhorse of any woodworking shop. There are obviously a ton of different price points and sizes and features out there. This is not one I have linked on the list. That particular DeWalt table saw was my first table saw, and so I can vouch for the fact that it is an excellent choice for beginners.
[08:00] It has a really good fence system. It's got this rack and pinion system that keeps the fence locked in place. It's big enough to do most of the work you're going to want to do. It's powerful enough, at least for starting out.
[08:12] And then from there, you can upgrade to a cabinet saw or something like that if you decide you want to invest a little bit more in your woodworking. Some features you're going to want to look for in case you're buying used or something like that are, number one, a good fence.
[08:24] Because table saw is useless if you don't have a solid fence. And so the Sawsoft has a very good fin system. It moves pretty easily, and it stays locked in place. The other thing I would probably look for would be a good, sturdy base,
[08:37] because if you buy some of the smaller job site saws, it's not going to be really high enough to work off of. So then you're probably going to have to build some sort of platform for your table saw, and a lot of times it's just not going to have the weight to not want to tip over
[08:50] if you're ripping longer material. So I would recommend something like this. The DeWalt is very similar. the base folds up and then you can roll the saw out of the way so if you're working in some place like your garage you can easily tuck the saw up against the wall when you're not using it and still
[09:06] get your car in there. Another very important feature in my opinion is the arriving knife or splitter and this is going to help to prevent kickback when you're working on the table saw. Obviously kickback is one of the most dangerous things that can happen on the table saw because
[09:19] not only can it shoot the piece that you're working on out at you at a really high speed There's also the tendency for your hand to be pulled into the blade during that kickback, and it happens in a split second, so no matter how quick your reflexes are,
[09:32] you are not going to be able to pull your hand back before it happens. So I would highly recommend a saw with a good writhing knife or splitter just for safety. And we'll talk a little bit more about dust collection later in the video, but I would definitely look for a saw with decent dust collection as well,
[09:46] just because it's going to keep your space clean and it's going to keep your lungs healthier. So now that we've covered power tools, let's talk about some power tool accessories that you're probably going to want to add just so you get the most out of the tools that you
[09:58] just purchased. So first on the list is a good drill bit set. I'm a big fan of brad point bits in woodworking because that sharp point on the bit makes it really easy to drill very precise holes. But really almost any drill bit set will work.
[10:11] One thing we're going to have to add probably later on down the line are some larger bits like forster bits or hole saws. For now, just a basic drill bit set will be a good start. Next on the list is a good set of impact driver bits.
[10:23] I'm a big fan of these Milwaukee bit sets. You can catch them on sale pretty regularly, and they come with almost every bit you'd ever want. Two other things that aren't on my list that I think are also extremely handy, and I get a lot of questions about them, are first, this magnetic bit holder that can strap onto your impact driver.
[10:40] This is on pretty much every one of my impact drivers. It's incredibly handy for holding various bits, but also whatever screws you might be working with. And the other thing I would probably recommend would be a good bit holder.
[10:52] It both magnetizes the bit, but also allows you to very quickly change the bit, and adds a little bit of extension, which can be nice if you're working way back in a cabinet or something like that. Those are two other bonuses that I would also include.
[11:06] Next on the list is a router bit set, and really, this doesn't have to necessarily be a set, but I do have a few router bits that I would recommend when you're just getting started out. A few edge profile bits, including a chamfer and a roundover.
[11:19] The roundover can be kind of whatever radius you want. I think an eighth inch radius is a good all-round size. And then I also recommend picking up a flux trim bit as well as a either straight bit or a template bit And if you buy a template bit it can kind of pull double duty as a straight bit and a template bit or a pattern bit as they sometimes called
[11:38] I wouldn't recommend buying a dirt cheap set of random router bits off of Amazon because most likely you're never going to use half of those bits or more, and they're going to be really bad quality, which is going to make working with your router a lot more difficult.
[11:52] So I would recommend investing in good quality bits, and you can really just buy them project by project, and that's how I've built up my router bit collection over the years. And I still have some of the router bits I bought when I was first getting started years ago.
[12:05] Next on the list is some good quality sandpaper. And if there's anything I think that is worth investing in, it is sandpaper. Because the difference between crappy Harbor Freight sandpaper and something like this 3M extract sandpaper is just huge.
[12:20] This is going to not only remove material a lot more quickly, but it's going to leave you with a much better surface finish. So I would highly, highly recommend picking up some good sandpaper. I like this net-style sandpaper because it'll work with any sander with any hole pattern,
[12:35] and so that's nice if you end up swapping sanders later on. You're not going to be stuck with a bunch of sandpaper. That's useless like happened to me because I switched from that DeWalt sander, and now I have a bunch of 5-inch discs that I basically can't use on any of my other sanders
[12:49] because they don't fit. And then last on the list is going to be some good quality saw blades. And so if you bought a circular saw or track saw, you're going to want to look at most likely a higher tooth count blade for those, especially with a circular saw because most of those come with a more kind of construction-oriented blade that's going to have a lower tooth count.
[13:07] It's going to cut the material very quickly, but it's going to leave you with a bunch of tear-outs. So I would definitely recommend upgrading to a higher tooth count blade, whether that's a circular saw or a track saw. And then the other blade that you're going to want to pick up is for your jigsaw because just like with the circular saw or track saw,
[13:22] usually the stock blades aren't the greatest quality, and they're not going to be oriented towards doing finer woodworking. The kind of narrower blades are great for cutting tighter curves, and then the wider blades are great for cutting more straight lines or wider curves.
[13:38] That wider blade is just going to help your saw track a little bit straighter if you're making those longer cuts. So next on the list is another super important category, and that is measuring, marking, and clamping. And I think these tools are really what kind of set us apart as woodworkers.
[13:53] These are the kind of tools that you're going to add a lot more of to your collection over the years. But I'm going to recommend some specifics that I think will be great for getting started. And they're tools that you'll continue to use a decade on into your woodworking journey.
[14:06] So let's start with measuring and marking. And obviously one of the most important, I guess, tools is the tape measure. And you would think that, well, it's a tape measure. Just buy whatever you want. And that's kind of true. But in the world of woodworking, especially in building kind of furniture projects,
[14:22] you don't necessarily need that massive 25 or 30-foot long tape measure that you see on a lot of job sites. My favorite tape measure kind of all around is this Stanley PowerLock, the 12-foot. As you can see, it's nice and compact.
[14:36] It's inexpensive. You can get it at pretty much any hardware store. I like using the same tape measure because then I don't make the mistake of mismeasuring. you know, if I'm reading the tape upside down or something like that, I know this tape really,
[14:49] really well. You could get a 16-foot tape measure, but as you can see, the tape measure gets a lot more bulky a lot more quickly because this tape is a lot wider. This is clearly designed more for
[15:02] your kind of construction work, so you can get very long reach, which we don't really need as much in woodworking. Next in measuring and marking is going to be a combination square, And this is going to be another tool you use constantly.
[15:17] It's going to be how you check the square, but also it's very handy for setting a dimension and then pulling that across the edge of a piece and marking. This is a cheap one. This is made by Irwin. This is just kind of like a home center version.
[15:30] You can get nicer ones, especially on Amazon. There's this eye gauging brand that's kind of in between something like this and something like a Steret, which is going to be like over $100. bucks. Just make sure when you buy it, check it in the store and make sure it's got a good
[15:44] tight lockup because the last thing you want is to set your measurement and then have it slip on you and not notice until later in your project after you've already drilled holes in the wrong place or whatever. So in addition to a combination square, I would also recommend getting a larger
[15:59] speed square or even something like a drywall T-square because that's going to be great for marking a square line on wider pieces. Next is going to be your clamps, and there's a few different types of clamps I would recommend. The number one is the classic F-style clamps. These are
[16:16] incredibly handy. You cannot have too many of these, and you can get these in all different price points. I know Harbor Freight makes some pretty cheap ones. This smaller kind of six or 1-inch F-style clamp is super handy for clamping things to your workbench or clamping small pieces
[16:30] together, and then you can pick up some longer F-style clamps for clamping longer pieces, obviously. Now, if you're going to be gluing up tabletops and things like that, you're going to want to probably bump up to something like a pipe clamp or a parallel clamp.
[16:44] Those are obviously a little bit more extensive, but they will be very handy later on in your woodworking journey. So last, but certainly not least, is dust collection and shop safety. And obviously, you want to be safe when you're woodworking.
[16:57] You do not want your hobby to end up negatively impacting your life in any way. And thankfully, if you get in the habit of using PPE, it's very easy to stay safe in the woodshop. So if you watch any of my videos, you'll notice I'm pretty much always wearing safety glasses.
[17:13] I wear prescription glasses so I use either the Stoggles or my buddy John Maleky also makes his shop shades and they are now available in prescription So if you want to check those out I have a link to those as well But in addition to safety glasses, I am always wearing hearing protection.
[17:28] I listen to music pretty much around the clock, but obviously that's going to be a lot more expensive than just some basic earplugs. But you can probably get away with using whatever in-ear earbuds you have
[17:40] combined with over-ear earmuffs, and then you can kind of get the best of both worlds having music and hearing protection. One thing I should mention is that noise-canceling headphones, as far as I'm aware, do not count as hearing protection. So wearing AirPods or whatever headphones with noise-canceling built in
[17:55] is not going to properly protect your ears. Another thing that's not on my list that you probably want to consider is some kind of respirator or basic dust mask. I also have a shop air filter that I've built, and you can check out that video.
[18:07] So that would be another great beginner project to add to your garage to keep dust from settling everywhere after you do your work. But a good respirator will definitely serve you well. This one from 3M is one of my favorites.
[18:20] The nice thing about these 3M masks is that they make different cartridges for different works. So you can use the round pink N100 filters when you're just working with dust. And then if you're doing something like spraying finishes with solvents or even water-based finishes,
[18:34] This dust is all going to have fumes, and so to keep you from breathing in those fumes, you want to get some cartridges that work with organic vapors as well. And then last on the list, the source of your dust collection is going to be a good shop vac.
[18:46] And so there's obviously a huge world of options out there. I would just recommend finding one that's on sale. I picked up this rigid shop vac for, I think, about $100 from Home Depot during a Father's Day sale, and it works great.
[18:58] It's a little on the loud side, and they do actually sell a muffler that clamps onto the exhaust of the shop vac. if you want to quiet it down a little bit. I'd also recommend investing in a smaller diameter hose because if you try to drag around one of those 2.5-inch diameter hoses
[19:12] when you're working with your sanders and your track saws, it's going to be a pain. And so I would find a smaller diameter hose that's going to work with your shop vac as well. One safety accessory you're going to want to add to your table saw
[19:24] is a good push stick. And you can definitely DIY one of these, but the little push sticks that come with your table saw, like this, are pretty much junk. I would recommend tossing this thing because they don't work very well.
[19:37] They don't hold the work piece very effectively. And I don't know who designed these, but they're not a good design. So I've been using this push stick. It's called the Big Horn for years and years now.
[19:49] It's thin enough to where I can still use it when I'm making narrower rip cuts. I think it's only about three-quarters of an inch wide. It has this nice grippy section on the bottom here. And this whole section is replaceable in case you end up cutting into it.
[20:01] It also has this little retractable hook on the back edge that hooks onto whatever piece you're pushing through and just gives you even better control on that workpiece. You can certainly DIY something like this out of a piece of plywood, but it's only about $30.
[20:15] It comes with extra grippy sections, so definitely a worthwhile investment considering I've been using this thing for probably eight years at this point. And then what's a good list without a few bonus options? These are some kind of nice-to-have upgrades if you've got a little bit left in your budget at the end of all this.
[20:31] Maybe you bought a bunch of used gear for cheap, but these are a few things that I think will definitely come in handy as you progress in your woodworking. So number one is going to be a dado stack and the corresponding throat plate to go with your table saw.
[20:44] And the dado stack is a super versatile add-on to your table saw. It's going to allow you to cut a lot of different joinery options, obviously dados and rabbits, but it's also going to open up things like mortise and tenon joinery
[20:56] if you combine a dado stack on the table saw with a router. And a good dado stack will last you for years and years. This is actually the first dado stack I bought back like eight or nine years ago. It's still going strong as long as you don't hit a piece of metal or something.
[21:11] These saw blades last a long, long time. Just keep them clean. You can send them off to get sharpened or whatever. But a dado stack is super handy to have. Another joinery add-on would be a pocket hole jig.
[21:23] This is kind of a fancier newer model, but even the cheapest pocket hole jig is going to come in handy. You can usually add pocket holes to projects in areas that are going to be hidden. And so by adding pocket holes to your repertoire, it's going to allow you to move on from building furniture
[21:37] with a bunch of visible screws in the finished piece, which is obviously not quite as nice as a piece where all of those fasteners are hidden. Next on the list is down there on the ground in front of me, and it is a dust separator for your shop vac.
[21:49] And so if you're going to be using a shop vac as your main dust collection, I would at the very least add a bag to your shop vac because otherwise your filter in the shop vac is going to get completely caked with dust. But another option in addition to adding a filter bag
[22:02] is to add a dust separator. And basically all these do is separate the dust as it's being pulled into the shop vac so that most of the dust is going to be pulled down into a separate bin, in this case a small bucket.
[22:15] and that way it's going to keep your shop back from filling up. And then last but certainly not least is a bench vice. And so obviously it's not a requirement to have a vice on your workbench, but they can make workholding a lot simpler.
[22:27] If you need to work on the edge of a piece, having a vice so you can clamp that piece vertically is just going to make things so much easier. This particular vice is from Rockler, but there are tons of other budget options out there.
[22:39] And obviously vices have been being made for the last, you know, 100 plus years, So you can definitely find used vices that maybe need a little bit of PLC. You can knock down the rust, maybe refinish it, and then you can have a vice that's going to last you your entire woodworking career for super, super cheap.
[22:55] So again, if you want to grab a copy of my Build Without Breaking the Bank tool list, I'll have the link down below. If it's your first time here, go ahead and get subscribed. And until next week, I've been building.
⚡ Saved you 0h 23m reading this? Transcribe any YouTube video for free — no signup needed.