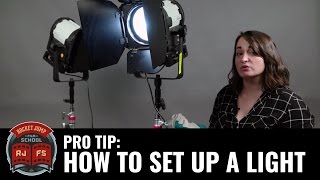

How to Set Up a Light Stand SAFELY
45sBeginners often make the mistake of raising the stand at an unsafe angle; this clear warning is a valuable and relatable tip.
▶ Play Clip"Delivers exactly what the title promises—a straightforward, safe 101 guide with no fluff."
This video is a beginner-friendly tutorial on basic light setup for film sets, presented by Lauren, the Dean of Rocket Jump Film School. It covers essential safety practices, stand assembly, power management, and crew communication, providing a solid foundation for anyone new to lighting equipment.
Always wear protective gloves when handling grip equipment or lights to protect hands and because lights can get extremely hot.
Combo stands should be stored packed up. Loosen the middle knob to extend legs. Position the stand horizontal or at an angle, never straight up, as that's the least secure.
Tighten knobs finger tight or hand tight, not wrench tight, to make loosening easier later.
Place the light on the stand using the knuckle, hand-tighten, and add a sandbag to one of the legs for stability.
Run power cables neatly, keep them against walls, and tape down or cover with rubber mats if they must cross a set to prevent tripping.
Call out 'striking' or 'watch your eyes' before turning on a light to warn people not to look at it.
Use an orange gel to warm up an LED light and diffusion to soften it. Use C47s (clothespins) to pin gels to barn doors.
Learn the terminology: tilt (up/down), pan (left/right), and stick (up/down on the stand). Always start with the top riser, keep a hand on it, and loosen before adjusting.
When raising the stand, start with the top riser, hand-tighten, and only move to the second riser if needed. Always keep a hand on the riser before loosening to bring it down.
Call out 'saving' before turning off a light so people know it's intentional. Let lights cool down before breaking down, especially HMIs and tungstens.
When breaking down, coil cables neatly, close barn doors carefully (they heat up fast), and store everything properly.
This video provides a solid, safety-focused introduction to basic light setup, covering stand assembly, power management, and crew communication. It's a practical starting point for anyone new to film set lighting.
Stable Stand Positioning
Emphasizes the critical safety rule of never positioning a stand vertically, which is a common beginner mistake.
00:25Hand-Tighten Only
Teaches the practical principle of using hand strength to avoid over-tightening, saving time and preventing damage.
00:42Verbal Safety Cues
Introduces the essential crew communication of 'striking' and 'saving' to prevent accidents and confusion.
01:42Color Temperature Correction
Explains how gels adjust color temperature, a fundamental concept for achieving the desired look.
01:54Riser Adjustment Safety
Highlights the importance of keeping a hand on the riser before loosening, a key safety practice.
02:34[00:00] Hey guys, it's Lauren, Dean of the Rocket Jump Film School, and today I'm going to show you basic light setup 101. First things first, if you're going to be handling grip equipment or lights, you're going to need protective gloves.
[00:13] You're going to want to use gloves, one, to just protect your hands, and two, lights can get really extremely hot. So, a combo stand, you store them like this, they're all packed up. The first knob you want to look at is this one right here on the middle.
[00:25] And I'll loosen that up. This loosens the legs. I'm going to strap these out. and you want to bring this up horizontal here. You always want to have it either horizontal or like this. You don't want to come up this way. This is the least secure way to have your stand.
[00:42] When you're tightening your knobs, you want to make sure it's just finger tight or hand tight, so you don't want to wrench it tight because you're going to have a hard time wrenching it back. So the strength of your hand should be good. So now we're actually going to place our light. I'm going to put this on a stand. This comes with a knuckle here. Again, you only want it hand tight
[00:58] or finger tight. So once you have your light on your stand, you're going to want to add a sandbag for more stability You want to put this right on the middle here on one of the legs And this should be fine for our purposes The next step is to run power to your light And when you running cables
[01:17] you wanna make sure everything is neat and out of the way. And anything that's being run to a plug needs to be against a wall, or if it does have to go through set, put a rubber mat over it or tape it down so people aren't tripping over it on set.
[01:29] Goodness, help. You were flirting with Dave. What's this wire doing here? It's dangerous. So now that we're all plugged in, we're going to turn on our light. We're going to call out striking or watch your eyes, anything to tell people that a
[01:42] light is coming on and to not look at it. So here we go, striking. This is an LED, so it runs a little bit blue. So our DP wants us to make it more warm, tungsten colored, tungsten balanced.
[01:54] We're going to put an orange gel on it and some diffusion to soften it. And another thing you're going to have to get used to is C47s or clothespins. So these are actually going to be used to pin both of our gels to our barn doors.
[02:08] When talking to your key grip, gaffer, or DP, a couple things to keep in mind when you're talking about moving the light is terminology So there are three ways this light can move We can tilt up and down We going to tilt down here We can pan left to right like this or we can stick up or stick down So always start with your top riser Have a hand on it and loosen
[02:34] Bring this up. About there. Up here. Tighten. Again, you don't need to wrench it. Just use the strength of your hand. Tighten as much as you can. If you do need to go higher, that's when you move on to your second riser.
[02:50] Put a hand on this riser here. Loosen here. Bring up. Hand tighten again. And you're good. If you need to bring it back down, always have one hand on the riser before you loosen anything.
[03:05] So I'm going to hold the weight. Loosen here. Slowly bring down. Tighten again. Hand on the riser, loosen, bring down, tighten again.
[03:22] When you're ready to break down your light, call out saving before you turn it off. This lets everybody know that a light is going to turn off so they don think the power went out or are surprised by it and people are ready This light an LED It doesn heat up a lot but usually HMIs and tungstens and other kinds of lights like that will get very hot very quickly So let this cool down for a little bit before you start breaking
[03:44] it down. When you're breaking down your light, you want to make sure all the cables are coiled up nicely. This one actually unplugs. You want to close your barn doors. These heat up really fast, so be very careful.
[03:59] It's attached, there we go. So we're gonna get more into things like shaping your light or changing your light with gels and diffusion and scrims and how to use the barn doors and all of that stuff in another video. We also can go into the different kinds of lights
[04:12] like Kinos and HMIs and things that use ballasts and other special equipment as well. But today was just a basic 101, how to set up a light safely. So stay safe, be aware, don't burn yourselves,
[04:24] Please don't blind anyone and have fun. Yay, we did it.

⚡ Saved you 0h 04m reading this? Transcribe any YouTube video for free — no signup needed.