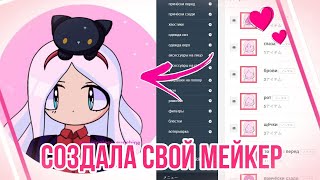

I Made a Picrew Maker: The Struggles
49sRelatable creator struggles and a unique behind-the-scenes look at making a popular avatar maker.
▶ Play Clip"Title promises a maker creation guide, but it's more of a personal vlog with some tips; still delivers on the core topic."
The video is a personal walkthrough of creating a Picrew avatar maker, detailing the challenges faced, the process of drawing and uploading parts, and the importance of protecting the creator's watermark. The creator shares tips for others, such as using a browser with a built-in translator and disabling the delete button to prevent unauthorized use.
The creator introduces the video as a follow-up to a previous one about PNGtubers, explaining that this video will detail how they made their Picrew maker.
The first problem was drawing in the wrong format; Picrew requires images strictly 500x500 pixels, and the creator advises not to test this.
The second issue was using a browser without a built-in translator, so the creator recommends using a browser like Google Chrome that has one.
The maker consists of parts like eyes, body, and eyebrows that can be changed. These parts are uploaded and sorted by display order in the maker.
The order of layers matters: if the background is higher than the body, the irises won't be visible; accessories behind the body will only be seen from behind.
The creator had to draw many icons and T-shirt parts, including multiple eye colors and cheek options, but found it very difficult and had to abandon some details.
A unique feature of the maker is placing animals on the character's head, which the creator finds very cute.
Creators should leave a mark and make it non-removable in settings to prevent others from using a green picture without crediting the author.
The maker took about a week of vacation to complete.
To add items, click 'add', choose how many options (e.g., eye colors), and configure colors in settings; items are then displayed in the list.
The bulk load function is helpful; save parts under numbers (1, 2, 3) to use it effectively.
The creator spent about an hour exploring and getting familiar with the program.
The creator enjoyed the process and is proud of the result, noting it's not a tutorial but a sharing of impressions.
The video is a personal account of creating a Picrew maker, emphasizing the importance of preparation, layer management, and protecting one's work. The creator encourages viewers to try making their own and to credit authors.
What is the required image size for Picrew parts?
500x500 pixels
00:20
Why is it important to use a browser with a built-in translator?
Because Picrew is a picky site and requires precise settings, and a translator helps navigate the interface.
00:32
What happens if the background layer is higher than the body layer?
The irises will not be visible.
01:25
What is the distinctive feature of the creator's maker?
You can put animals on the character's head.
02:09
Why should you disable the delete button in the maker settings?
To prevent others from removing your mark and using the maker without crediting you.
02:23
How long did it take to create the maker?
About a week of vacation.
02:51
What is the benefit of saving parts under numbers?
It helps the bulk load function work correctly.
03:31
Protect Your Mark
Emphasizes the importance of watermarking and disabling deletion to prevent unauthorized use, a key concern for creators.
02:23Bulk Loading Tip
Practical tip for efficiently uploading many parts, saving time and effort.
03:31Layer Order Matters
Explains a fundamental concept in Picrew creation that affects visibility of parts.
01:25[00:06] will tell you how I made my avatar maker in spite of me already talking about this video about png tuber off but today we will talk about how exactly I created my maker which you now see on the screen after a long time a lot of
[00:20] difficulties arose and the first difficulty is that I drew in the wrong format loop a very picky site and require pictures strictly 500 by 500, I think I
[00:32] better not to check and the second problem was that I started making this maker in a browser where there is no built-in translator so before I start creating I closed make sure that your browser has a built-in translator
[00:46] now I use the Google Chrome browser I downloaded it specifically just for this video, you can say I cut it off for my My Kira I had to first cut off all the parts of your maker what are these parts this is what
[01:00] your maker consists of parts of the picture that can be changed for example separately eyes separately body separately eyebrows here you upload part to work with them here in Here in this small window you upload the parts here you
[01:13] can sort them by how they will be displayed in your maker in what order and in the window the parts are already distributed by which should be on top which below and they will explain and with a simple example if in
[01:25] the layers the background is higher than the body then we will not see the irises for example xyz wala on the head will be behind the body then we will not see these accessories we will see them only from behind so here I will leave all the links to myself but for now I still but
[01:40] this is already before before I post the video in general I had to draw a lot for the maker and these are these small icons and the parts of the T-shirt themselves there are several options for eye colors several options then the cheeks are different I
[01:55] diverse as possible but in the end only then I realized that in fact it is very very difficult I had to abandon many details already in the process the distinctive feature of my maker is that here you can put animals on the
[02:09] character's head this was my idea I don't know why this is but it looks very very cute also a little tip for those Who is going to make their own mine or came across my videos, this is what you must leave in this mark and make it in the
[02:23] settings and make it so that it cannot be removed, this was taken into account, someone will want to run a green picture in your maker without specifying the author, I repeat, this is very, very bad, the authors of the makers must be specified, so disable the ability
[02:37] to edit the item, you can go to the details here, create information in the maker here, here you can upload an icon here, here you can and here you turn off the delete button, this is very, very important
[02:51] because otherwise, no one will leave your mark, rest assured, in general, this maker took me about a week of vacation, let's look at the functions, how to load, to add an item, you need to click on add, you need to click on the button to
[03:04] add an item, here you are added, here you choose how many items you need, that is, how many different options for eyes you have, and for colors, you need to go to the settings detail in the same place where we configure the delete button. Here
[03:17] additional things and here you have colors, here you add as many colors as you need and only then here in the list of items they will be displayed and you can Paint either one by one or use the
[03:31] load in bulk function, it made my life really, really, really easy, so when you draw, save the maker parts under numbers, that is, 1 2 3, because that's how this function will be oriented. 1 hour was spent in a loop.
[03:45] I spent the survey poking around everywhere and getting acquainted with the program, and I think I did it successfully, then I also drew these icons separately. We decided as the creator of the maker, it was really, really fun to
[03:59] hang out in it and do something because this is my style, this is what I created, and this is something. It works very, very well and honestly, and I'm proud of my
[04:11] work. So yes, this video was not a tutorial, but in any case, in any case, I shared my impressions. Mia shared her maker and you can come in, then she said, that's all with you, Amanika, thank you very much,
[04:26] write comments, and that's all for everyone, thank you very much, everyone, bye-bye and that's all for everyone, thank you very much, everyone, bye-bye -bye-bye [music]

⚡ Saved you 0h 04m reading this? Transcribe any YouTube video for free — no signup needed.