Start Rolling Paint Like a Pro
45sShows a quick, satisfying technique for applying paint that viewers want to learn in seconds.
▶ Play ClipThis tutorial demonstrates a step-by-step technique for rolling paint onto a wall, focusing on achieving even coverage and a smooth finish. The method involves loading the roller, applying paint in a specific pattern, and finishing with a light 'lay off' pass.
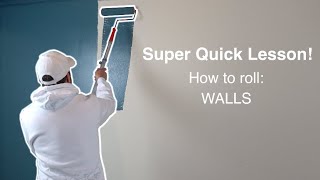
Place the roller three-quarters up the wall near the cut-in edge. Push up firmly to dump the outer paint layer, then roll back down with a slight lean.
Continue rolling up and down, staying away from ceiling and skirting, until the roller is exhausted of paint.
Use the paint already on the wall to roll back up with less pressure, wiggling at the top for coverage. Roll to the left edge carefully.
With very light pressure, roll from top to bottom in one controlled movement to smooth out edges and create a light texture.
Reload the roller and repeat the process across the wall. Practice improves speed and control.
With this method, you can achieve a beautifully rolled wall with even coverage and minimal mess. Practice will make the process faster and more precise.
"The title accurately describes a quick lesson on rolling a wall with paint; the transcript delivers exactly that."
Where should you initially place the roller on the wall?
Three-quarters up the wall, next to where you have cut in.
00:12
What should you do when rolling back down the wall after the initial push?
Roll with a slight lean to the right, applying more pressure as you go down.
00:24
How do you ensure good coverage at the top near the cutting end?
Give the roller a little wiggle at the top.
01:15
What is the purpose of the 'lay off' step?
To pick up accidental fat edges and leave a beautiful light texture.
02:21
Roller Placement Technique
Describes the precise starting position and pressure to dump paint effectively.
00:12Lay Off Method
Critical final step to achieve a smooth finish without roller marks.
01:56Practice for Speed
Emphasizes that skill improves with repetition, encouraging patience.
02:34[00:00] Screw on the roller pole, roll on some paint and let's get this done.
[00:12] Start by placing the roller three quarters up the wall next to where you have cut it. With firm pressure, push the roller up and stop just below the cutting end. This will dump the outer layer of paint from the roller.
[00:24] Now roll your roller back down the wall in a straight line with a slight lean to the right. As you roll to the bottom edge, you'll be able to apply more pressure as you go down, releasing more paint from the roller.
[00:37] Once you reach near the bottom cutting end, stop rolling. Continue back up the wall with a slight lean, still with good pressure and control on the roller. Once back at the top again, the roller will be semi full of paint.
[00:49] Safe to meet the cutting end, but be sure to still well away from the ceiling. Roll back down using the same method as before, when the bottom of the wall has been reached. Keep the cutting end again, staying well away from the scourting.
[01:01] The roller will most likely be exhausted of paint by now. Time to color in and stay between the lines. Using the thick, lumpy paint you have just dumped down on your wall, roll back up in a straight line to the top, this time with less pressure.
[01:15] This allows the roller to pick up some of that paint again off the wall. Given the roller a little wiggle at the top, helps ensure a good coverage to the cutting end. Carefully, roll back over to the left wall edge this time.
[01:27] Rolling top to bottom, picking up paint with the roller as you go. Make sure you get good coverage over the bare areas that have not been painted yet. When you reach the left wall edge, make sure you have a good grip on the roller pole.
[01:40] Roll slow with control as close as you can to the wall edge, without crushing. The roller will likely nearly be out of paint, so don't be shy to wiggle the roller up and down a few times to get coverage. Now that the section of wall is all colored in and the roller is empty of paint, it's time
[01:56] to lay off, with very light pressure on the roller, still with good control. From the top, roll straight back down the wall edge in one long controlled movement.
[02:08] Slow down when you reach the skirtings and ceilings. Roll as close to the edge as you feel comfortable with our crushing, you don't want that. Move back across the wall, continuing with the lightest of pressure, rolling top to bottom.
[02:21] Using this, the roller will pick up any accidental fat edges, slips, slides of paint, leaving behind a beautiful light texture on the wall. Continue rolling just past this section, to feather out your edge.
[02:34] This will help blend in with the next section of rolling. Reload the roller back up with paint and repeat the process until you reach the other side. With time and practice, you will gain speed and control with the roller, so take your time.
[02:47] And there you have it, the wall is beautifully rolled in, it couldn't be easier.
⚡ Saved you 0h 02m reading this? Transcribe any YouTube video for free — no signup needed.