
Why I Left a Gap Behind My Desk
33sA simple, game-changing tip that viewers can immediately apply, with a relatable personal touch about back pain.
▶ Play Clip"Delivers solid cable management advice with free files, though the 'ultimate' claim is a bit strong for a niche topic."
This video is a comprehensive guide to cable management for desks, presented by a creator who has iterated on his own setup multiple times. He shares six rules for effective cable management, along with free 3D printable files and tool recommendations to achieve a clean, functional desk setup.
The creator introduces the video by explaining his need for a comfortable and efficient desk setup with multiple computers, emphasizing the importance of accessible ports and a clean workspace.
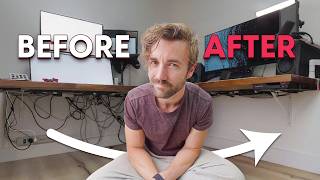
Leave an inch gap between the desk and the wall to make cable routing easier and allow for clamping accessories like camera mounts.
Have multiple unused ports across different areas of the desk to keep the top clean and allow plugging in devices anywhere, using hubs and mounted female ports.
Use cable management tools that can be reused and adjusted, as setups change regularly. Recommends a grid system that screws into the desk and allows snap-on pieces.
For the grid system, only two types of parts are needed: hooks for guiding cables and spools for wrapping/shortening them. Custom parts are unnecessary for most setups.
For ambitious users, custom parts can be designed to house power supplies or hubs, using a long piece to create slots and secure them to the grid.
Accept that setups change; the goal is to hide cables, not to make perfect runs. Make it good enough and adjust later.
The video provides practical, actionable advice for cable management, emphasizing simplicity, reusability, and the use of 3D-printed components. The creator encourages viewers to prioritize functionality over perfection and offers free files to get started.
What is the first rule of cable management?
Leave an inch gap between the desk and the wall.
01:05
Why should you have multiple accessible ports?
To keep the top of the desk clean and allow plugging in devices anywhere.
01:47
What are the two essential parts for the grid system?
Hooks for guiding cables and spools for wrapping/shortening them.
04:28
What material is recommended for the connector pieces?
Hard TPU (flexible but not bendy).
06:42
What is the final rule of cable management?
Don't try to make it perfect; focus on hiding cables.
06:56
Desk Gap Trick
Simple yet effective tip that improves cable routing and enables clamping accessories.
01:05Simplicity in Parts
Shows that only two types of parts are needed for most cable management, saving time and money.
04:28Perfection is Overrated
Encourages a practical mindset, reducing the pressure to achieve a flawless setup.
06:56[00:01] management and I don't have to tell you why. You clicked on this video, you probably do too. But I'm on my third iteration of this massive desk that has three computers on it and my desk needs to be a place where I can work
[00:13] comfortably and efficiently. Like I don't feel like I'm over asking. I want to like sitting here. I sit here a lot. But it's also nice to like have ports anywhere I might need to use them. So if I'm shooting a video with multiple
[00:25] desk or plugging in capture cards. Like I'm 37 with a lower back injury. God said no to that a long time ago. I feel like this just got dark again.
[00:38] source today. So not only have I learned the skills and the tools to perfect this craft of convenience that impresses everybody except my wife, but I will be sharing the tools and also giving you 3D printable files for free so you can do
[00:51] with a 3D printer. I have one friend. He has a 3D printer. So statistically, 100% easily make your desk look like mine. Better than mine, actually, because mine's like 80% done. Let's go. I got six rules for you for cable management.
[01:05] Rule number one's not really a rule. It's just like a suggestion that was a kind of a game changer for me. But if you have a desk against a wall, leave like an inch gap between the desk and the wall. Not only will this make cable
[01:18] routing so much easier, but also you can now clamp clamps for cameras and which you can't do if your desk is up against the wall. When I used the channel on the back of it for the cables to go into. I used the wrong stain of
[01:32] children and their children. But functionality-wise, that was generational wealth in desk form. Rule number two, excess accessible ports. Part of the reason you're organizing the bottom of your desk is to keep the top
[01:47] of your desk clean. Having multiple used on ports. Used on ports? Have multiple unused ports across different areas of the desk. You might not always use them, but you will get
[02:00] have them. This Mac Mini is my main workstation. It only has three like the whole thing, and I'm only using two. One connects both monitors, both of Thunderbolt hub on the opposite side of the desk where I have mounted female
[02:15] ports to the side of the desk. I can still plug in anything anywhere, and I just show you this 3D printed thing that I made that connects to my pod capture card, and so I don't have to Remember the back thing? I can plug my cameras
[02:29] them at the same time. I'm looking at my notes, and rule number three feels like thank the sponsor real quick. own.pro, you guys know own.pro, the place where for your live stream, and set them up in minutes. Some of them are even totally
[02:44] You can pay for overlays, but if you are someone who likes to update their subscription that gives you tons of access, including the ability to create prompts. You want to create a sub goal widget on the fly? Type it in. You
[02:58] decided to have a countdown timer in the middle of your stream? Just describe it. including special overlay packs for new game releases. So, thank you own.pro for below if you're looking for some designs
[03:11] supports the channel. So, thank you. Let's move on to rule number four, I guess. Let's get into the cable management tools. Like, what do you manage the cables with? There's a lot of stuff out there, but I would recommend
[03:23] using tools that you can use over and over again, because you will change your cables and your screens and your setup regularly. And if you do something that is predefined for what your setup looks like now, when you try to change it,
[03:36] using multiple cable management systems, the one I can't recommend more is called you screw into the bottom of your desk, and then you snap on little pieces that and then you snap on little pieces that can easily be removed and removed
[03:50] The first thing you print is the grid, and I will leave a link to the grid system down below. But, you fill out the grid system based on how many grids you need or what's the largest size your printer can print is. It will give you
[04:03] measurements. I had some recommendations, too. Use the full board style. It grips onto the connector pieces a little bit better. Put mounting corners, otherwise you're going to try remaking holes right next to ones you
[04:15] of these tiny little connector pieces. My 4-year-old calls them penis. These your grids together. Rule number five, we've gotten to the point now where you're actually putting the things into the grid that manage your cables. Which
[04:28] ones do you pick? My suggestion and what this rule is, keep it simple. If you search Open Grid, you will find millions of very specific custom parts. It turns out you can get 99% of it done with just two. The hook pieces are for guiding
[04:42] long stretches and the spools are for wrapping and shortening the cables. Now, I have made variations of each for different sizes based on how many cables and spools. It's all you need. And the spools are cool because they split in
[04:55] half. So, if you got a really long cable, you just mount them really far is with these little connector pieces. So, okay, there are like three pieces and then the two different styles. I stand by the number two. I feel like
[05:08] the connector piece into the grid and then it gives you this little like, what's it called, a dovetail shape thing that you slide into your two pieces. The connector piece that I've included snaps in great and really most of the time
[05:21] holding something heavy. But, if it is holding something heavy, you can twist it and it locks into place. Just use a coin. You know, everybody's got coins coin. You know, everybody's got coins laying around in 2026. Remember coins?
[05:33] down below with an STL file. If your friend has a 3D printer, they know what these parts included. If you're wondering what this chungus is, that is something I made for creating custom parts, which they are for the ambitious.
[05:47] but if you can do it, it's pretty great sometimes. Just design like a housing piece of plastic to go around things like power supplies or hubs or your ethernet switch. Take the design you made, line it up on the grid, and slice
[06:00] out the connector holes. Then you line up this long piece with the hole that you just made in order to make it a long slot. And now, you put it under your pieces, and it stays there forever. Or not forever, until you want to move it,
[06:14] off. I used to make custom mounts and screw them into the bottom of my desk, and then I'd be like, "Ah, I wish it was 2 in that way." Bummer. What a time to tips. With the actual like hooks and spools and stuff, print them on their
[06:27] it'll make the whole thing better. Also, for all pieces except for the grids, I recommend using TPU for AMS or whatever the equivalent for non-Bambu Lab stuff is. It's TPU, but really hard shore, so it's flexible, but not like bendy. Makes
[06:42] it easier for connectors to push in but still be a tight fit. It makes it easier for you to fit larger cables in and bend things without breaking them eventually. rubber. Get the hard stuff. Don't get the soft TPU. Final rule, don't try to
[06:56] make it perfect. You will change things. This is not the final form of your desk. The main goal here is to make it so you can't see any of your cables. Just do you're going to make every cable run perfect, eventually you're going to get
[07:09] It's going to become daunting. So, make it good. Don't worry about making it that's it for me. I hope you like this as much as I do. This is like the price per effectiveness of the cable management system. This is like leagues
[07:24] ahead of anything that anyone else has come out with. Don't buy like expensive cable management stuff, unless you want to. I don't care. Do your thing. Send me desks after you do this. Have a good one. Peace. Happy streaming, you guys.
⚡ Saved you 0h 07m reading this? Transcribe any YouTube video for free — no signup needed.