The Best French Fry Dish is from Canada?
45sChallenges common assumptions about French fries, sparking curiosity and debate.
▶ Play ClipThis video teaches how to make authentic poutine from scratch, starting a day in advance by fortifying chicken stock with oxtail to create a rich gravy. The process includes hand-cutting fries for consistency, a double-fry method for maximum crispiness, and incorporating fresh cheese curds to capture the iconic textures and flavors of the Montreal dish.
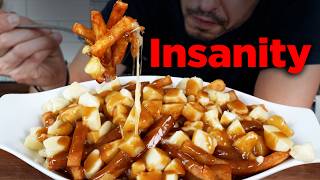
Poutine is a Canadian dish of dark, crispy french fries topped with cheese curds and drowned in rich, flavorful gravy.
To make authentic poutine, start the gravy a day in advance. Fortify store-bought chicken stock by cooking it with oxtail and aromatics to extract gelatin and collagen, creating a deep, flavorful base.
Sear the seasoned oxtail on medium-low heat until deeply browned to create caramelization on the pan, adding depth of flavor to the stock.
After searing oxtail, add whole garlic cloves, carrots, celery, and onion, searing them until caramelized. Deglaze the pan with chicken stock, add water to cover, and simmer for 4-5 hours until the meat is tender.
For consistently crispy fries, cut potatoes into uniform pieces, roughly half a fingernail thick. Soak cut fries in cold water, then rinse until the water runs clear.
Blanch the fries in boiling salted and vinegared water for 5-8 minutes until floppy but still holding together. Drain and spread on a towel-lined tray, then refrigerate overnight to dry and gel the starches.
Use a ratio of 1 tablespoon butter and 1 tablespoon flour per cup of stock to make a roux. For 2 cups of fortified stock, use 2 tablespoons each of butter and flour. Whisk until smooth, simmer, and adjust consistency with a beurre manié (room-temp butter kneaded with flour) if needed.
Fry the chilled fries in batches at 300°F (150°C) for 3-5 minutes to draw out moisture. They should stiffen but not color much. Drain on a wire rack, then return to the tray and refrigerate or freeze.
Fry the fries a second time at 370-375°F (185-190°C) until deeply golden and crispy. Compensate for cold fries by starting the oil around 185°F/85°C higher. Fry in batches, avoiding overcrowding.
Place hot fries in a bowl, add a generous handful of fresh cheddar cheese curds (squeaky and cool on top, melted inside), and ladle the hot gravy over the top. Optionally, top with pulled oxtail meat for extra richness.
Authentic poutine requires three essential components: deeply flavored gelatinous gravy, uniformly cut fries that are double-fried to a dark crisp, and fresh squeaky cheese curds. Starting the gravy a day ahead and using a two-day fry process guarantees the best texture and taste.
"The title is slightly hyperbolic ('Greatest Ever'), but the video delivers a thorough, authentic recipe for high-quality poutine, which is indeed an iconic french fry dish from Canada."
What is poutine?
A Canadian dish of dark, crispy french fries topped with cheese curds and rich gravy.
What is the first step to make authentic poutine gravy?
Fortify store-bought chicken stock by cooking it with oxtail and aromatics to extract gelatin and collagen.
00:42
What is the ratio of butter to flour per cup of stock for thickening gravy?
1 tablespoon butter and 1 tablespoon flour per cup of stock.
11:09
Why do you blanch the fries before frying?
To cook them through and gel the starches, creating a fluffy interior before the final fry.
05:57
What temperature is used for the first fry and how long does it take?
300°F (150°C) for 3-5 minutes.
12:26
What temperature is used for the second fry?
370-375°F (185-190°C).
15:47
What is the most vital part of poutine besides fries and gravy?
Fresh cheese curds, which should be squeaky.
17:37
How do you thicken gravy without adding more roux?
Make a beurre manié by kneading room-temperature butter with flour and whisking it into the simmering gravy.
15:01
Definition of Poutine
Establishes the core subject of the video with a clear, appetizing description.
Two-Day Process for Best Results
Highlights the importance of time investment for authenticity and flavor depth.
00:42Secret to Hand-Cut Fries
Explains the critical technique of uniform cutting for even crispiness.
04:15Gravy Thickening Ratio
Provides a simple, repeatable ratio (1 tbsp butter + 1 tbsp flour per cup stock) that viewers can memorize.
11:09Cheese Curds Are Non-Negotiable
Reinforces the essential ingredient that defines authentic poutine, separating it from loaded fries.
17:37[00:00] Now, if you were to tell me that the greatest french fry dish ever created was from Canada, I'd probably tell you, you got some balls, my friend. These are not just french fries, we're talking about poutine, dark crispy french fries topped
[00:14] with cheese curds and drowned in a rich flavorful gravy. And I'm fresh off a trip to Montreal, led by my friend and Montreal native, Josh Elkin, who showed us all the iconic spots to eat the city's
[00:28] most famous dish, poutine. And after thorough investigating, I'm importing those secrets straight to you. This is how to make authentic kebekwa poutine. But to us poutine experts, we refer to it as
[00:42] poutine. And to make a great poutine, we're going to get this started a day prior. And the first step before we get into the fries, we need to work on the gravy. And what I'm going to show you today is how to take your average supermarket stock. In this case, we're going to start with a chicken broth
[00:59] or a chicken stock. And we're going to fortify it. We're going to turn this liquid into really gelatinous sort of high quality stock. And we're going to blend that chicken with ox tails with some beef.
[01:13] We're going to get all that marrow, that collagen into the stock. And that's going to be the base for this incredibly flavorful gravy that goes on top of the poutine. And it starts with the stock,
[01:25] the beef, and some mirrored prawn and garlic. Got some carrot and celery spears right here. You can just roughly dice them up. And then the onion, keep the skin on and just slice it. Bay leaf
[01:37] as well. Now one thing is important to note that while this can all be done in a day, I am taking my time with it, splitting it into two days. And that's going to really guarantee the best result. But
[01:49] start this early in the morning, you can get it done. Let's get this fortified stock cooking. First step is we need to preheat the pan, get it nice and high. Once we've given it a few minutes on high heat, we're going to lower it down to about medium, get some oil in, swirl it around, get
[02:04] it coating on the pan, and then give it about 20 seconds to heat up. While heating, we're going to generously season the ox tail all the way around, get it into the pan. I'm going to find the biggest side of each ox tail and that's the first side I'm going to place down in the oil,
[02:20] try and get as much surface area brown as possible. Now with that heat on medium low, we can see the oil sizzling. I know it's hot enough and it's not overheated or too hot and we just be patient. Allow the oil and the heat to do its thing until that first side is super deeply
[02:38] seared. We want to create some caramelization on the bottom of the pan. That's going to add that depth of flavor that we're looking for in our stock. You see that color? That's what we're looking for. Then you just want to flip them brown the rest of the sides of that ox tail.
[02:55] Once we're about like 98 percent done searing the meat, I'm going to toss in the whole garlic clove. We're going to sort of like sear them, try and get some caramelization around the exterior since they're whole cloves, they can take a little bit more of intense heat than if they were
[03:11] sliced or minced. I'm looking for sort of like that blistered exterior on them. Bump the heat up just a little bit. I'm going to add in our carrots, celery, season that a little bit. And again, we're just trying to kind of like sear those vegetables. Bring out a little bit of those complex,
[03:28] caramelized flavors in the vegetable. You don't want them steaming. If you're steaming the heat it's too low. If you want, you can take out the meat, make room for those onions. Start building that flavor into the pan. Once all those vegetables are nicely browned, we can return the meat back to
[03:48] the pan. We can deglaze with our chicken stock. Now to make sure this cooks nice, we're just going to add enough water to cover the meat or to mostly cover the meat. That's fun. Add the bay leaf,
[04:00] bring it up to a boil, then drop it down to a simmer. I'm going to cook this until that meat starts falling apart like butter, probably four or five hours. We're going to set that off to the side. Then we're going to bring a big pot of water up to a boil. That's what we're going to use for
[04:15] the first stage of our french fries. Now while that water comes up to boil, we can deal with our potatoes. First step, we're going to take this bowl, fill it up with cold water. Now the secret to hand cut fries is the more consistently sized you cut each fry, the better and crispier they're going to get.
[04:32] If you've got a bunch that are like the same size and then some that are slightly bigger, those slightly bigger ones might not get as crispy and if you're wondering why it's kind of like too many different sizes for them to all cook evenly or the same. We've got long potatoes here, we've got squat potatoes
[04:48] here. You kind of want to look for some nice shaped ones, but we can make, you know, any size work. First thing I want to do, I'm going to take the ends off, just helps us make them a little bit more even and then again, I'm going to just trim the sides, stand it up again, shave a little edge. Then
[05:05] we're just going to slice it roughly half a fingernail thick. Try and get them as even as possible. Then you can just cut them into fries into the water. We don't want them too thin, we like them almost a
[05:18] little bit on the thicker side. Their ones get kind of these shorter ones, which I actually found were sort of the length of most of the fries in the proutines that we had.
[05:31] And you may question why to trim so much, it's all for the sake of trying to create consistently crispy fries. Now all this water has become cloudy and starchy, just going to rinse this under water
[05:45] until that water runs clear. Just like cleaning rice, nice and clear, nice fries. These are ready for the first stage of cooking, which is a blanch. So our water is almost up to a boil. To that water,
[05:57] we're just going to add a little bit of vinegar and salt. And I've got a large sheet tray that can fit in my refrigerator lined with a towel. And this first stage is to kind of cook them through and then to get them into the fridge and get them nice and dry. Get all those starches to sort of gel,
[06:12] create that fluffiness inside and then tomorrow we'll work on the exterior crispiness. Once it's boiling, we're going to drop our potatoes gently, get the water back up to a boil. We're going to cook them for about five, maybe eight minutes. We're basically trying to get them as far
[06:28] cooked as we can before they start being difficult to work with. Once they're nice and floppy and barely holding together, then we can carefully strain them out of the water and arrange them on our
[06:41] sheet tray to dry. So here we've got a fries. Some of them have broken, right? That's great. I want different sizes. I mean, even these long ones, right? What you're going to see, if you break it,
[06:53] you get a smaller chip, which is kind of nice. And then you get this frazzled edge that's going to get really craggly and crispy. Just going to spread them out. All that steam you see is moisture evaporating,
[07:05] which is exactly what we're hoping for. We're going to allow that steam to subdue and then we're going to pop them in the fridge overnight. Now, while we wait for our stock to finish up, I need to talk to you about the state of bread in the supermarket. It ain't what it used to be. I
[07:19] tell you that much. Commercialized, processed, mass-produced, sucking all the life out of a staple of our diet. Today, wild grain has a different approach. And with them now, I have high quality,
[07:31] fresh bread, anytime I want. Wild grain is the first baked to frozen subscription box for sourdough breads, artisan pastries, and fresh pastas. They partner with small bakers and pasta makers across
[07:44] the country to keep the tradition of artisanal and nutritious food alive. And unlike many store-bought options, wild grain uses simple ingredients you can pronounce. A slower fermentation that's much easier on the belly and much richer in nutrients and antioxidants, something that's stripped away from
[08:02] modern bread. It's nice to be able to keep it in the freezer, so whenever I need bread, I can just take it out of the freezer, pop it in the oven directly on the rack, around 425, and I fresh bread
[08:14] in minutes. And this sourdough right here is by far my favorite item from wild grain. See these fermentation bubbles? You can't fake that. Good crumb, super moist inside, amazing butter,
[08:26] incredible bread. It's wild. This was frozen 20 minutes ago. They even have gluten-free and vegan options and they've got brand new protein boxes. That's something you're into. And for you guys wild grain has a crazy offer. Click the link in my description and use code NACS and you're going to get $30
[08:43] off your first box plus wait for it, free croissants for life. I mean, how do you make money doing that? That's an offer I take advantage of. Now back into the recipe. Now our stock's been cooking for about
[08:55] four and a half hours. And you can see that piece of meat pulling away from the bone. The meat is just kind of falling apart tender. And what I really love about using an ox tail, it's like using
[09:07] meat and bones at the same time. But it's one of the cuts of meat that has just like the most connected tissue in gelatin. So it adds so much to a broth. And so we can take the meat out,
[09:19] pull it off the bone, you can make pastas with it, you can throw it in like a pita, a wrap, and we can take our broth, run it through a strainer. The broth has been reduced by about half.
[09:32] One last step is we just want to get all that flavor pressed into the broth. Now the benefit of doing this ahead of time is we can allow this to cool down, throw it into the fridge, and then that fat is going to solidify up top. So we can scrape the fat off and hopefully what's left is
[09:50] this beautifully gelatinous cube of flavorful rich stock. That's going to be the basis to the gravy. You do this well, gravy's going to be good. Then you can sort of pick apart the meat. And I mean
[10:02] that's, that's some of the best meat you could eat. It's like the pot roast my grandma used to make. That's got all these little bones. So some of the meat kind of is hard to get at. See the odd shape of the bone, you kind of have to work around that to clear it out. Look how succulent this meat is.
[10:18] Sticky gelatinous, take our broth and cover it. We're going to create a little gap. The steam escape, place these in the fridge. And tomorrow we make poutine. So it's the next day. And one of the
[10:30] benefits of doing this ahead of time is see how stock become jello. And that's going to allow us to scrape that fat off the top without having to use a fat separator like we normally do for a gravy.
[10:42] I'm just going to take a spoon, just try to get the majority of that fat off of it. Flavored beef tallow. So we got our excess fat over here. That's how you know you get the base of a good gravy.
[10:54] To know how much flour and butter we need to use to thicken it, going to add it to a measuring cup. Looks like about two cups of stock we've got. Now for me generally when I'm thinking about like say gravy for Thanksgiving, you've got a big amount of it. How do you know
[11:09] how much to thicken it with? I go with a ratio. Per cup of liquid you use one tablespoon of butter to one tablespoon of flour. So for this, we're going to go with two tablespoons of flour, two
[11:22] tablespoons of butter. And here we've got our chilled fries. Like what I'm telling you about, like see that uneven cut? I know this one's going to be crisp but right around here. It's going to be not as crisp as one that is say like that. Here's a perfect example. These two are uneven. So to meet
[11:40] for me to expect them to like fry up exactly the same is unreasonable. But if you start snap in some of them, especially some of the bigger ones, you're probably going to end up with some better results. And so these fries are getting cooked with a double fry method. The first fry
[11:54] is going to be around 300 degrees, about three to five minutes and we're going to get that set up right now. Now everyone always asks me like what do I do with extra oil? And I've tested this recipe in a couple other fried recipes. And what I did is once they're cooled, I just strain them out,
[12:09] store them and use them again. So we're going to use some of this leftover oil that we used. And for this I am using peanut oil. And to top off those two, I'm going to add a little bit of fresh oil. The blend of used and old, I find creates a better fry. For extra flavor, a little bit of
[12:26] an elevated touch, you can add about like 10 to 20% beef tala. Then we're just going to get the heat on, get that oil up to 300 degrees Fahrenheit. Once the frying oil is up to temperature, I'm going to take
[12:39] about a third of the batch of the french fries, gently lower them into the oil and we're going to cook them, try and maintain 300 degrees and cook them for about three to five minutes. This stage is
[12:53] essentially to draw out any remaining moisture left in the french fries before the final fry gives it its final crisp. So after about three to five minutes, there should be a little stiff. And once you start
[13:06] to see any sort of like color forming around the edges, we're going to get them out of the oil, drain them on a wire rack and then we're going to get another batch of those in and we're just going to fry these in batches, ensuring we never overcrowd the oil so that we always have control over the
[13:21] temperature of the oil. If it's ever too hot or it's too low, we can actually make an adjustment and have it have an impact, which is much harder when there's more mass in the pot. So now with these look like they look like you know in and out fries right now. Now what we're going to do get them
[13:36] back onto our tray. Now that steam has softened them back up, which is obviously why we want to fry multiple times. The amount of water content that's in there is kind of out of your control. Fry multiple
[13:49] times allows us to control that. Now these can go back into refrigerator, they're going to cool the way back down. If you want to speed it up, you could throw it in the freezer. When you want to take them out, take them out like this and then you will proceed as we will throughout the rest of this video.
[14:04] So here I've got my mini Sausier. This is a two-court guy. Great for sauces. We're going to get that onto medium-high heat. We're going to add two tablespoons of butter. We melt the butter completely,
[14:17] and then we're going to add in our flour. Then we're going to whisk that flour in until it turns a tan, creamy paste. The darker you get it, the less thickening power it's going to have. So now
[14:30] we're going to just slowly start to work in our stock. Brew is made and the stock is added. We simply need to bring it up to a boil and then simmer it and we can assess how thick it has become.
[14:44] Here I've got a little rosemary and thyme bundle. I'm just going to add that in. Then I'm going to remove it in a few minutes and I just want to subtly infuse that herb flavor. I don't want it to be super herbaceous. Suttle hint in the background. Now as you can see from the consistency, it's not quite
[15:01] thickened out. So when that happens, what you could do is we can take a little bit more flour. This is going to be two tablespoons of flour. Add two tablespoons of room temp butter to it. Then just with your hand, knead that flour into the butter. It's thickening as it reduces, which is another way you could thicken it,
[15:17] or we can take a little bit at a time and then slowly whisk it in and see where we're at. Now this is good to go as is. We're just going to add a little bit of Worcestershire sauce. And again, totally optional, but a secret that I've seen. A little squirt of ketchup. It gives it a
[15:33] little bit of gloss and a little bit of like vinegar retang. It goes really nice with the whole dish. That's banging. Just going to start it off to the side and let it reduce even further. Now we can
[15:47] get our oil back on the fire and we're going to get that preheated once again. After about an hour in the freezer, I wouldn't say they're frozen, but they're solid. Now they're ready to be fried. On another note, we're going to make a basic protein here, but I'm going to then add a topping
[16:02] like to take it up a notch as my friend Emerald used to say. Remember the meat we picked yesterday from the Oxtail? All we're going to do, take some of that gravy, get that on the stove, warm that up. And they're gravy. Now the perfect sticky, thick consistency. Now the target temperature for the
[16:20] second fry is going to be 375, 370ish. That's going to get these nice and crisp and they should be perfect fries. Now with the fries so cold and our target temper at around 370, 375, I'm going to
[16:33] shoot to around like 180ish, 185 to compensate for the cold french fries. Now we're just going to monitor the temp. We've got a full blast to maintain the 370 and that drop happened, but we're maintaining
[16:48] now. One thing to remember with the fries in Montreal is that they definitely fry them to a much darker color. So you see them taking on color? We're going to keep going. I'm going to keep my eye out for any
[17:01] that might be, you know, cooking a little faster. Anyone that I might want to kind of pull out a little early, I've got a little bit of that control. Right here, we got a small one, that one's ready to blow out. I want to most of the stuff with that first batch. I'm going to start to jack the heat up to
[17:18] get it prepared for the next batch of fries that are now still cold, but that's looking real nice to me. And you just want to get the fries onto a wire rack to drain off all of that oil and then in with another batch. Again, do not overcrowd them. You want them perfect? You got to be patient.
[17:37] Now while that last batch fries up, we got to talk about cheese curds. The most vital part of this, you can make gravy, you can make fries, but you need cheese curds to make proutine. And these are the real ones. Fresh cheddar curds. If you're in America, why I'm making this is because you used to have to go
[17:54] to Canada to eat this. But now with Amazon, you can order some of this online. You can bring proutine home to you. Now these curds come a little big so I like to kind of chop them up a little bit. We're
[18:07] going to top it and toss it into the fries. The idea being that squeaky cheese up top stays a little cool and squeaky so you get the texture. And then the cheese mixed in should be nice and healthy.
[18:20] You got a nice crisp on them, perfectly cooked. Again, this is super duper crispy. This one with the thicker edge. Still crisp, but you know, just got a little less shatteringly crisp to it. It's just
[18:35] the different sizes. So you're going to get a little variance which actually works out in this recipe. So we're going to get a fries into a bowl, a handful of curds. Salt. You got that crisp. Now the heat
[18:48] from those fries going to start to melt the curds while the fries down. Cheese curds on top. They put a lot on. I mean, they sell cheese curds at a gas station then on top. That beautiful gravy.
[19:05] Trying to get like every curd coated in that gravy. That is a classic K-Bit Kwa routine. Like I said, we're stepping it up a notch. So on top, we're just
[19:18] going to top those little nuggets of ox tail. I mean, are you crazy? It's perfect. You can still hear the crunch. The cheese curds melted a bit better. First time I tried it, I'll even show you in the
[19:36] test footage. The top. Cheese stays squeaky and kind of textured and cool. But inside, all that cheese melts into a stringy, beautiful mess. Kind of like this. It's getting a little bit in
[19:50] there. That's what you're looking for. Far and away, the greatest french fry dish in the world straight from Canada. They do a lot well up there. I'll tell you that much. Now there was a lot to learn
[20:02] this video. Even if you're not making poutine, there's a place for you to know how to make fries, a place for you to know how to make gravy, and how to put it all together to make this. Rustby's going to be down in the description. That's all that I have today. I'll see you next time until I take care of yourself. Go feed yourself.
⚡ Saved you 0h 20m reading this? Transcribe any YouTube video for free — no signup needed.