Why Fermentation Is Taking Over
50sExplains the massive popularity and health benefits of fermented foods in a relatable way.
▶ Play Clip[00:00] So, as most of you know, I have been
[00:02] rather obsessed with fermentation over
[00:04] the last decade of my life. I put out
[00:06] countless videos on the subject, which
[00:08] have racked in over 50 million views.
[00:11] But over the last 6 months specifically,
[00:12] I have taken things to a whole new level
[00:15] because I am deep in the process of
[00:17] writing a fermentation book with the
[00:19] main goal of making what can be a very
[00:21] confusing and overwhelming subject as
[00:24] accessible as possible. And with every
[00:26] single bubbling jar and croc that I've
[00:29] experimented with in this kitchen over
[00:31] the last few months, I've gained a
[00:33] little bit more knowledge and a whole
[00:35] lot of inspiration that I just could not
[00:37] wait to share until the book is
[00:39] released. So, I welcome you to my master
[00:41] class in fermentation. Now, the world of
[00:44] fermentation is extremely vast. It has
[00:46] helped humans survive for thousands of
[00:48] years. So, of course, different cultures
[00:50] have adopted their own specific
[00:52] techniques, their own recipes, and the
[00:54] book covers a much broader range of all
[00:57] of these things, but today I wanted to
[00:59] specifically focus on the simple skill
[01:02] of fermenting vegetables. Because when
[01:04] you're learning any new skill, I think
[01:06] it's best to just start with the basics
[01:08] and then expand your knowledge from that
[01:11] point. which is why I think every single
[01:13] home cook should at least be somewhat
[01:15] comfortable with just simple veggie
[01:18] fermentss. So, this video won't be
[01:19] covering more of the complex recipes
[01:21] like kimchi or kombucha or even koji.
[01:24] Instead, we're going to be sticking to
[01:25] just two ingredient fermentss, just
[01:27] vegetable and salt and water if you
[01:30] consider that an ingredient. And when I
[01:31] say vegetable, that includes every part
[01:34] of the vegetable. The stalks, the pods,
[01:36] the stems, leaves, flowers, fruits, all
[01:39] of which will be demonstrated in this
[01:41] video. And what's really fun is every
[01:42] single ferment that you see in this
[01:44] video has been harvested from my garden
[01:47] over the last few weeks, which really
[01:49] ties into the core of why humans always
[01:51] fermented foods. taking that abundance
[01:53] that's available during the growing
[01:55] season and preserving it to help survive
[01:57] those colder months when fresh
[01:58] ingredients were not available. Now, of
[02:00] course, with modern technology like
[02:02] refrigeration, humans have slowly over
[02:05] time lost this very basic and natural
[02:08] ability to ferment and preserve foods.
[02:10] But even with all the available
[02:12] resources and fresh foods that we can
[02:14] now get year round in this modern world,
[02:16] people are finally starting to wake up
[02:18] about the health benefits of consuming
[02:20] food that is active, that is alive, and
[02:23] thriving with beneficial microbes that
[02:25] help create a healthy balance for our
[02:28] gut biome. Now, the great thing for all
[02:30] of you is since we are just focusing on
[02:32] the basics of fermentation today, we
[02:34] don't need any expensive gadgets or
[02:37] equipment. We just need some very basic
[02:40] supplies and by far the most important
[02:42] piece of equipment of course are your
[02:44] jars. The most classic and I think
[02:46] accessible fermenting vessel being the
[02:48] glass jar. They are reusable and most
[02:50] importantly you can see through them so
[02:53] you can actively watch your fermentss
[02:55] develop over time. These are your
[02:57] classic ball jars. Some are considered
[02:58] widemouth which have a wider opening and
[03:01] some are considered smallmouth which
[03:02] have a smaller opening. I do prefer a
[03:04] wider mouth, which is much easier to
[03:07] funnel things in and out of. Plus, this
[03:09] glass weight can fit perfectly into the
[03:11] mouth of the jar, which do come in
[03:12] different sizes, and I would highly
[03:14] suggest having a bunch of these around.
[03:16] They are a great piece of equipment to
[03:18] keep your veggies submerged safely under
[03:20] the water line, which we're going to
[03:22] need to create a proper anorobic
[03:24] environment. Now, of course, these glass
[03:25] jars come in different sizes. My
[03:27] favorite and what I would say the most
[03:29] allpurpose size is the classic 32
[03:32] ouncez, but I also ferment in these 16
[03:34] ounces and even 8 oz for like a small
[03:36] little jar of peppers or hot sauce. I
[03:39] also want to mention these lay parfait
[03:40] jars which are top of the line when it
[03:42] comes to a pop top style of jar, which
[03:44] are a great option for fermentation
[03:46] specifically because the jars can
[03:48] actually be sealed tight while still
[03:50] being able to release gas out of the top
[03:52] so you don't have to worry as much about
[03:54] an explosion in your kitchen. Although
[03:56] these jars still should be burped from
[03:58] time to time just to be safe. Which
[04:00] brings me right into the next piece of
[04:01] equipment, which are your jar lids. Now,
[04:04] there are many different types of
[04:06] fermentation lids. Different options
[04:08] that are more classic that have always
[04:09] been around, some new options that have
[04:11] hit the market as fermentation has
[04:13] started to get bigger. This is a fun
[04:14] little spring-loaded lid that keeps the
[04:16] veggies safely submerged under the water
[04:18] line without needing a weight. Right
[04:20] here is a one-way air lock lid, which
[04:22] lets that CO2 that's developed in the
[04:24] fermentation process out while keeping
[04:27] the oxygen from coming in. These things
[04:29] are great. I have a bunch of them in my
[04:31] kitchen. I use them all the time. You
[04:33] also have a more classic version that
[04:34] looks like this, which you have to add
[04:36] water to, but you get the same exact
[04:38] effect. And then of course, you just
[04:39] have your standard mason jar lids, which
[04:42] definitely do the trick, but they create
[04:44] a tight seal. So, if you do screw these
[04:46] lids on, they need to be burped from
[04:48] time to time to let out that CO2 so you
[04:51] don't have any type of glass jar
[04:52] explosion. And then outside of that, the
[04:55] only other real piece of equipment that
[04:57] you need for proper fermentation is a
[04:59] good kitchen scale. And any somewhat
[05:02] accurate scale will do the trick. All
[05:04] right, my friends, that brings me into
[05:07] the most important part of this video.
[05:09] See how we have a percentage right here
[05:12] on this jar? that comes from a specific
[05:14] fermentation equation to get the proper
[05:17] salt ratio you need to have a healthy
[05:19] fermented product. And I did a video on
[05:21] this many years back, but for this book,
[05:24] I really wanted to fine-tune this
[05:26] equation. So, it was crystal clear. It
[05:28] was very practical and it was easy to
[05:30] adjust at home. And the only way to do
[05:32] that was to experiment myself, which is
[05:35] what you see all over this kitchen. Now,
[05:37] I first want to briefly cover the basics
[05:39] of fermentation. As simple of a
[05:41] breakdown as possible. Remember, we have
[05:43] three things in this jar to unlock some
[05:47] incredible flavors and health benefits
[05:49] in this hakarai turnup. Vegetable, salt,
[05:52] and water. And when fresh vegetables are
[05:54] submerged in a saltwater solution, also
[05:57] known as a brine, it creates an anorobic
[05:59] environment, meaning no oxygen getting
[06:01] in. And in that specific environment,
[06:03] certain beneficial bacteria like
[06:05] lactobacillus, start to thrive. And
[06:07] these specific bacteria feed on the
[06:09] natural sugars in the vegetables and
[06:11] convert them into lactic acid which
[06:14] gives these fermented vegetables that
[06:15] nice sour flavor.
[06:17] All right, before we get into salt
[06:19] percentages, I just want to let you know
[06:21] that if you really are interested in
[06:23] taking your fermentation game to the
[06:25] next level, the fermentation book and
[06:27] course are coming this fall. So you can
[06:30] sign up for more information. We'll send
[06:32] you updates on the release. Just click
[06:34] the link below in the description. All
[06:35] right. So, I would say this is the most
[06:37] important thing to understand when it
[06:39] comes to vegetable fermentation, which
[06:41] is choosing the proper salt percentage.
[06:44] Now, this is something I struggled with
[06:45] for many years. There is a lot of
[06:48] conflicting information out there. And
[06:51] the reason for that is there's really no
[06:53] onesizefitsall
[06:54] answer. There's a range of salt
[06:56] percentage that's going to work well for
[06:59] fermenting vegetables. And the key is
[07:00] understanding how choosing within this
[07:02] ratio is actually going to affect your
[07:05] final product. And we have found from a
[07:07] lot of rigorous testing that anywhere
[07:09] from 2 to 5% salt of the total weight
[07:12] and vegetables is going to give you a
[07:14] great ferment. So that's the good news.
[07:16] Anywhere on this scale is going to give
[07:17] you something delicious on the other
[07:19] side. But how do you choose? All of
[07:21] these fermentss have a slightly
[07:23] different salt percentage. And there's a
[07:25] reason why. Actually, there's four main
[07:27] things to understand and keep in mind.
[07:28] Number one is timing. Salt, of course,
[07:30] is a preservative. So the higher the
[07:32] salt levels, the more of an inhospitable
[07:34] environment you're going to create for
[07:36] that bad bacteria, which is going to aid
[07:38] in longer fermentation time. So if you
[07:41] plan to ferment something for many
[07:43] months, it's better to go higher on that
[07:45] salt ratio. Whereas on the other end, if
[07:47] you plan to ferment something for a
[07:49] short period of time, a lower salt ratio
[07:51] is actually going to speed up the
[07:53] fermentation time. Number two is
[07:55] texture. Salt over time is going to
[07:57] break down the cell walls of your
[07:58] vegetable. So if you're say fermenting
[08:00] something that's a little softer like a
[08:03] radish, a lower salt percentage might be
[08:05] ideal to preserve the crispiness and
[08:07] snap of the radish. Whereas a beet or a
[08:10] carrot, those are denser, harder
[08:11] vegetables. They can handle a higher
[08:13] salt ratio while still staying crispy.
[08:15] Number three is flavor. A lot of those
[08:17] beneficial bacteria, those
[08:19] lactobacillus, actually prefer a
[08:21] slightly lower saline level. So lower on
[08:23] the salt scale can aid in building more
[08:25] of those delicious fermented flavors.
[08:27] Whereas on the other end of the scale,
[08:29] of course, a higher salt level is going
[08:31] to make your vegetables taste saltier,
[08:32] which some people prefer. But as your
[08:34] vegetables ferment and build more of
[08:36] those sour flavors, that sourness will
[08:39] end up balancing out those higher salt
[08:41] levels. And finally, number four is
[08:43] safety. Again, salt being a
[08:45] preservative, the higher the salt ratio,
[08:47] the more reduced risk you have for
[08:49] spoilage, which is going to ensure a
[08:50] more reliable ferment, which is good for
[08:53] beginners if you're just getting into
[08:55] the game, I would go a little bit higher
[08:57] on the scale and then as you get more
[08:59] comfortable, you can start lowering that
[09:00] percentage and going for more of those
[09:02] unique flavors. All right, so hopefully
[09:04] you're feeling more confident and you
[09:06] have a much better understanding of how
[09:08] fermentation works. Now, it's time to
[09:10] see it in action. And I have been
[09:12] harvesting a bunch of things over the
[09:14] last few weeks. And we're going to start
[09:16] off with carrots and beets. Two things
[09:19] that I love fermenting. I'm going to
[09:20] combine these into one jar because they
[09:22] have a very similar texture and the
[09:24] flavors together are going to be quite
[09:26] nice. Now, for this first ferment, I'm
[09:28] going to go into more detail of the
[09:30] process. And the other ones, I'm just
[09:32] going to kind of go over what I
[09:33] fermented and the salt percentage that I
[09:36] chose. and then Carly and I will do a
[09:37] nice little taste test to see where we
[09:39] ended up with these fermentss at the end
[09:41] of the video. Now, when you're
[09:42] fermenting veggies from the store, I
[09:43] would highly suggest peeling your
[09:45] vegetables because you don't know what
[09:46] they've been treated with and also if
[09:48] they've been in the ground longer, they
[09:50] might have a tougher skin. Since both of
[09:51] these are fairly small and young plants,
[09:54] the skin is very delicate. It's also
[09:56] loaded with nutrition, so it can be
[09:57] fermented. I'm just going to peel off
[09:59] and cut off any blemishes to get things
[10:01] cleaned up. And then I'm just going to
[10:02] chop up my vegetables in what I think
[10:04] will be just a nice little fermented
[10:06] bite.
[10:07] [Music]
[10:09] Now, once I'm done with the chopping,
[10:10] I'll get my scale out. I'll pop on my
[10:13] clean jar. I'll tear everything to zero.
[10:15] Then, I'm going to load in all of the
[10:17] vegetables. I'm going to cover them with
[10:19] water, which will give me the weight
[10:20] that I need to calculate my salt
[10:22] percentage. And since this is a fairly
[10:24] short ferment that I'm going to eat
[10:25] pretty quickly, I'm going to go with a
[10:26] lower percentage at 3.5%. But remember,
[10:29] since these are denser vegetables, if
[10:31] you're fermenting them for a long time,
[10:32] they could take a higher salt
[10:34] percentage. So, I'll multiply my water
[10:36] and vegetable weight times. 035 to give
[10:39] me the amount of salt I need, which I'll
[10:41] weigh out separately. I'll dump that
[10:43] into the jar. And I'm just going to
[10:44] cover it with the lid and give it a
[10:46] shake up. Generally, that's enough to
[10:47] get the dissolving process to start. And
[10:50] over time, all of that salt will just
[10:51] naturally dissolve. Then I'm going to
[10:53] pop on that glass weight to help keep
[10:55] those vegetables submerged under the
[10:57] water line, which is very important,
[10:59] especially in those early days before
[11:00] you've built up that good bacteria to
[11:02] protect things. And this will happen,
[11:04] like you can see here, a floater will
[11:06] pop up. It will break the surface of the
[11:08] water. Now, it's exposed to oxygen, and
[11:10] all of that bad bacteria can come in
[11:12] potentially leading to the growth of
[11:13] mold at the top of your jar. If that
[11:15] does happen, which things happen in the
[11:17] world of fermentation, you want to throw
[11:18] that away, learn from your mistakes, and
[11:20] start over. Now, the final step is
[11:21] popping on your lid. And what I love
[11:24] about these one-way lids is as CO2
[11:26] builds up in your jar, the CO2 will push
[11:28] out the remaining oxygen that was left
[11:31] over in the jar, meaning this empty
[11:32] space over time will have no oxygen,
[11:35] which is a much safer environment in
[11:37] your jar. And when actually fermenting
[11:39] your vegetables, there's just a few
[11:41] things to keep in mind. You want to
[11:42] store them away from sunlight. So,
[11:44] somewhere on a shelf that's not right in
[11:46] front of a window or in a basement with
[11:48] no windows. And when dealing with this
[11:50] specific type of lactic acid
[11:51] fermentation, just like the salt ratio,
[11:53] there's also a range of temperature that
[11:56] will work to properly ferment your
[11:58] vegetables. I find a range from 60° F to
[12:01] 75° F will work, which is great because
[12:04] room temperature falls right in that
[12:05] range. So for me, we've just been
[12:07] fermenting things right here at room
[12:09] temperature, and it's great. But if you
[12:10] ferment, say, in your basement at a
[12:11] lower temperature, you'll get some
[12:13] different flavors. Your vegetables will
[12:14] also ferment slower, which is a little
[12:16] easier to control. Versus at the higher
[12:18] temperature, things are going to ferment
[12:19] faster. It's a little harder to control.
[12:21] Things can kind of get away from you
[12:23] quickly at higher temperatures. Now, for
[12:25] the second thing I fermented, I had some
[12:28] garlic scapes, which emerge from the top
[12:29] of the garlic plant as they flower. But
[12:31] I'm not actually after the flour. I'm
[12:33] after these tender, garlicky, sweet, and
[12:36] delicate stocks, which I just cut into
[12:38] little pieces and fermented those at a
[12:40] 4% salt ratio. For ferment number three,
[12:43] I have my absolute favorite spring
[12:45] vegetable, which are hakarai turnups.
[12:47] These are super juicy. They're sweet.
[12:49] There's almost zero bite like you would
[12:50] get in a radish, which is why I like
[12:52] them better than radishes. And I
[12:54] actually fermented these whole at a 4%
[12:56] salt ratio. For ferment number four,
[12:58] I've been getting a ton of these radish
[13:00] pods, which actually emerged when it got
[13:02] a little hotter and the radishes bolted.
[13:04] They put out flowers at the top and then
[13:06] these pods started to develop and they
[13:08] came in the masses. This is just a few
[13:11] radishes that developed all of these
[13:13] pods. And it's a great example of how
[13:14] much more there is to ferment than just
[13:17] the actual vegetable that you're used
[13:19] to. I cleaned off all the pods, got
[13:20] everything weighed out, and again, I
[13:22] used that nice middle ground of a 4%
[13:24] salt ratio. Now, for ferment number
[13:25] five, luckily, I had some cabbage in my
[13:27] garden to show you how those ratios are
[13:29] slightly different. This cabbage was in
[13:31] the greenhouse, so it was a little hot,
[13:32] so they weren't really nice big heads,
[13:35] but hey, a few of these will turn into a
[13:37] great sauerkraut. So, I chopped up
[13:39] everything fine. I weighed out my
[13:41] sauerkraut. And since I'm relying on the
[13:42] water content in the cabbage, I lower
[13:44] that salt percentage to 2 to 3%. In this
[13:47] case, I'm going to go right in between
[13:49] at 2.5%. I weighed out the salt, dumped
[13:51] it over my cabbage, and you get to
[13:52] decide the texture of your sauerkraut.
[13:54] If you like it more broken down, just
[13:56] really massage in that salt and break
[13:58] down those cell walls. Now, I'll place
[13:59] the cabbage in the jar, and I usually
[14:01] just wait an hour to see how much
[14:02] moisture is drawn out. Now, you can see
[14:04] here, I actually didn't have enough
[14:06] water to cover all of the cabbage. So,
[14:08] I'm going to dump in some clean water,
[14:10] but to account for the ratio, I'm just
[14:12] going to sprinkle in a little bit of
[14:14] salt. And that will even everything out.
[14:15] Now, the last variable to consider is
[14:17] the time of fermentation. And what I
[14:20] would say is the first few days, things
[14:21] aren't going to taste great. If you're
[14:23] trying it, it might even taste a little
[14:25] bit off. And that's because that lactic
[14:28] acid hasn't developed yet. So, the good
[14:30] bacteria, all those health benefits, the
[14:32] sour flavor is not developed. And after
[14:35] about 5 days at room temperature, that's
[14:37] when things will start tasting better
[14:39] and they'll just continue to get better
[14:41] over time. But we're going to talk about
[14:42] the specific timings we like during the
[14:44] taste test.
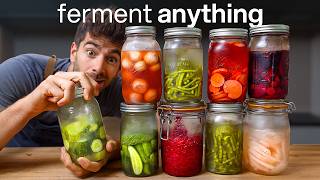
[14:46] >> All right, so we have almost I don't
[14:48] know like 12 fermentss here. All
[14:50] different vegetables, all different salt
[14:52] percentages, different timings.
[14:54] >> Some things I didn't make in this video
[14:56] that have been going for multiple
[14:58] months. We're going to do a taste test.
[14:59] I want to rank them 1 to 10, 10 being
[15:02] the highest. and we'll see how it goes.
[15:05] Let's move these aside. Two hawkai
[15:07] turnups. This is the older one at 4%.
[15:11] >> This is also 4%.
[15:12] >> Okay.
[15:13] >> But this one's probably a week or two
[15:14] weeks older.
[15:15] >> Yeah. Let's try the one first.
[15:18] >> Wow.
[15:18] >> Good. Slightly salty at the 4%, but so
[15:21] good. This has been going for just a
[15:24] month.
[15:24] >> Yeah. It's salty at the beginning, but
[15:26] then it kind of passes and then you get
[15:27] that the sour flavor.
[15:29] >> Yeah. The juiciness of this still holds
[15:32] up.
[15:32] >> These look less fermented almost. Maybe
[15:34] cuz they're whole. Wow.
[15:36] >> Salt has gone down a lot.
[15:37] >> Mhm. That's from 421.
[15:39] >> Oh wow. So that is 3 months old.
[15:41] >> That is so interesting.
[15:42] >> Melloed out a little bit.
[15:43] >> A lot.
[15:44] >> The salt mellows. But it's not like a
[15:47] lot more sour.
[15:48] >> This is definitely better than that one.
[15:49] The extra time.
[15:50] >> 9 and 1/2. 8 and 1/2 for me.
[15:52] >> I would say this is like a nine and this
[15:54] is like a seven.
[15:55] >> Um
[15:56] >> let's go. Cuz we have two beats now.
[15:58] This is a 3%. What's that?
[16:00] >> 3.5%.
[16:00] >> All right. So, that's This is much
[16:02] younger than this one.
[16:03] >> Start with the young one. This one's
[16:04] beets and carrots, I think, though.
[16:06] >> This one's just beets.
[16:06] >> All right. Let's just try be the
[16:08] difference.
[16:09] >> Yeah. Because it's a lower percentage.
[16:10] Not too salty.
[16:11] >> Not too salty.
[16:12] >> Not that sweet.
[16:13] >> It still very much has like raw beet
[16:15] flavor.
[16:16] >> Yeah. I'm interested in in what's
[16:17] happening here.
[16:18] >> This is from May 23rd.
[16:19] >> Oh, wow. That tastes like a roasted
[16:21] beef.
[16:21] >> Completely different. It's amazing like
[16:23] how much the texture changes and it's
[16:25] not like, oh, this is mushy now. It's
[16:26] like, oh, this tastes cooked now. That
[16:28] tastes like a roasted beef and that's a
[16:30] 10 out of 10.
[16:30] >> And it's so sweet.
[16:31] >> Those a 10 out of 10.
[16:32] >> So good. Beets for the win.
[16:34] >> We got garlic scapes at 3% and these
[16:36] have been going for just a month.
[16:42] >> Those will get better. That's an obvious
[16:43] >> to me. That is a perfect salt level.
[16:45] >> 3%. 3%.
[16:47] >> Yeah, the 3% works. And we've been like
[16:48] blending these into salsas and relish.
[16:52] That's another note. It's not like we're
[16:53] just eating these plants. We're adding
[16:55] them to dishes, cooking them into
[16:56] things. We're blending them into things.
[16:58] It's just so good to have this around
[17:00] because you get the additional flavor
[17:02] that's built in. Like you don't need to
[17:04] add acid anymore. It's just like such a
[17:07] punch.
[17:07] >> This is incredibly soft.
[17:08] >> 8.5. Going to get better.
[17:10] >> That's like a 10 out of 10 for me.
[17:12] >> Okay, let's try these little radish pods
[17:15] that are about a month old at 4%. Oh,
[17:18] they're a little stinky. They smell like
[17:20] farts.
[17:20] >> I love that smell
[17:21] >> cuz that's the radish.
[17:22] >> That's the radish fart smell.
[17:25] >> Oh, like some have different texture.
[17:26] They have a bit of a pop.
[17:28] >> Yeah, they're like filled with juice.
[17:29] >> You know, these have gotten better cuz I
[17:30] tasted those about two weeks in. They're
[17:32] getting better. They're kind of fun. I
[17:34] would say an eight.
[17:35] >> Yeah, I'll give them an eight.
[17:36] >> Okay, so now we have four sauerkrauts.
[17:38] Classic. I don't This one doesn't have a
[17:40] date. We'll we'll guess.
[17:41] >> Yeah, we'll guess. That's That's
[17:42] interesting.
[17:44] >> Yeah, the brassica has that funkier
[17:46] farty type. That's why when you open
[17:48] like a sauerkraut, sometimes it smells
[17:50] like farts.
[17:50] >> That's how I know this is still young.
[17:52] This is a young femin that goes away at
[17:55] a certain point. probably a few weeks
[17:57] old. So, this is red cabbage with
[18:01] carowway. Our only spice in all of this
[18:03] at 4% from 2 months ago. Now, this when
[18:06] I was first tasting it, I was like, you
[18:08] got to watch out when you're adding
[18:09] spice. Any type of spice because the
[18:11] fermentation can really intensify the
[18:14] spice.
[18:14] >> Smell that. Smells like rye.
[18:16] >> Wow.
[18:17] >> I think if you didn't like carowway, it
[18:18] would be gross. But on the right
[18:20] sandwich or the right dish, like this
[18:22] would be so good on pastrami.
[18:25] >> Oh my god. or something like that.
[18:26] >> That is such a good point. Nine out of
[18:29] 10 for me.
[18:29] >> That's a nine out of 10 for me, too.
[18:31] Next time I would do less carowway.
[18:33] >> Last one of my favorite condiments of
[18:35] all time.
[18:35] >> Clearly favorite of mine.
[18:37] >> I couldn't I couldn't resist. This is I
[18:38] forgot the term.
[18:39] >> It's called cotito.
[18:40] >> Cito. This is cabbage, carrot, jalapeno.
[18:44] >> Greatest condiment of all time because
[18:45] it works as a salsa. It works as a
[18:48] sauerkraut. It works as a um sloth like
[18:51] >> but it's like a slightly fermented
[18:53] sloth.
[18:53] >> Spicy.
[18:55] M.
[18:56] >> Oh, I made this years ago on the
[18:58] channel.
[18:58] >> So good. The salt level is perfect.
[19:00] >> And then you get the sweetness from the
[19:02] carrot. 10 out of 10. I mean, the only
[19:04] thing is just like it could a continue
[19:05] to age. I would love more.
[19:07] >> Yeah. Well, this will be my next when we
[19:09] get jalapenos in. We have everything
[19:10] else.
[19:11] >> Oh, you're right.
[19:12] >> We're about to get them. They're coming.
[19:13] >> We're about to get a ton of cabbage.
[19:15] >> Oh, we got to do a video on that.
[19:16] >> That'll be a good short.
[19:17] >> We'll end on that.
[19:18] >> Oh, 10 out of 10.
[19:19] >> So fun. Hopefully, you learned a thing
[19:21] or two about
[19:22] >> pickles are good. And you should try
[19:23] making them.
⚡ Saved you 0h 19m reading this? Transcribe any YouTube video for free — no signup needed.