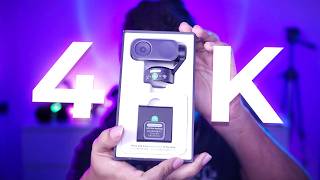

Unboxing the Insta360 Link 2 Pro Webcam!
45sUnboxing videos are highly engaging, and the magnetic mount and gimbal design are visually interesting.
▶ Play Clip"Delivers a thorough, hands-on review of the webcam's features, matching the title's promise of a 4K webcam for streamers."
The video is an unboxing and detailed review of the Insta360 Link 2 Pro 4K webcam, highlighting its design, software features, and performance. The creator demonstrates the camera's gimbal-based tracking, gesture controls, desk view mode, and various software effects, while also noting limitations and pricing.
The webcam is a 4K 30 / 1080P 60 device. The packaging is embossed, and the camera comes with a USB-C to USB-A adapter and cable. The mount is magnetic, allowing the camera to tilt and rotate. The camera is larger than the previous model.
The camera supports gesture-activated tracking. A specific gesture activates tracking, and the speed of tracking can be controlled. The camera can return to a preset position.
Manually twisting the camera down enters privacy mode, which shows a visual indicator. This replaces the need for a physical cover.
Gestures can also control zoom: pulling down zooms out, pulling up zooms in. Pressing a button resets the camera position.
The software has been redesigned to be simpler. Scene presets are available in the top right, recording camera positions and settings. Users can save and switch between presets.
The effects tab includes a lens blur effect (bokeh) that creates a natural camera blur, distinct from the Gaussian blur used by other webcams. The creator prefers keeping it around 30-40%.
The software includes background placement options for meetings, including green screen removal. The creator's favorite is the bokeh effect.
The webcam has HDR to prevent overexposure. Color filters (e.g., vintage) are available and highly customizable, allowing for different looks.
The software can add makeup effects (light to heavy) and beautify features that smooth and brighten the skin.
Users can adjust contrast, sharpness, white balance, ISO, and shutter speed manually. The creator removes white balance due to colored lights.
The camera provides two outputs: a regular plug-and-play camera and a virtual camera that includes effects like green screen and bokeh, useful for apps like Discord.
Turning HDR on or off causes a temporary smooth transition until the camera settles to the desired quality.
The camera has autofocus but allows manual focus. Users can turn off autofocus to avoid focus hunting.
Desk view mode switches the camera to a top-down view, compensating for the angle to look like an overhead camera. It can detect whiteboards and zoom in with a peace sign gesture.
The camera supports group tracking and can frame the subject correctly. The view angle is 85 degrees, and users can override framing.
Tracking can be set to stop at a certain point. Users can select a specific field of view for tracking, limiting the area the camera will track.
The camera can automatically level itself and detect the head for optimal framing, even if the camera is slanted.
The creator demonstrates desk view with natural lighting, showing the camera on the monitor but appearing flat. All options like autofocus and zoom work as if it were an overhead camera.
Desk view is ideal for unboxing videos, showcasing products, or switching between talking to the camera and showing hands. This feature is unique to Insta360 webcams due to the gimbal.
The bokeh effect is not supported at 4K resolution. The price is $249.99. The camera also has a microphone with advanced technology, but the creator does not cover it in detail.
The Insta360 Link 2 Pro is a versatile 4K webcam with advanced gimbal-based features like desk view and gesture tracking, making it a strong choice for streamers and content creators. Despite some limitations like bokeh not working at 4K, its unique capabilities justify its premium price.
What is the maximum resolution and frame rate of the Insta360 Link 2 Pro?
4K at 30fps and 1080P at 60fps.
00:16
How does the privacy mode work on the Insta360 Link 2 Pro?
Manually twisting the camera down enters privacy mode, showing a visual indicator.
02:12
What is the difference between the bokeh effect and Gaussian blur?
Bokeh is a lens blur effect that creates a natural camera blur, while Gaussian blur is a standard blur used by other webcams.
03:33
What is the price of the Insta360 Link 2 Pro?
$249.99.
14:53
What is the view angle of the Insta360 Link 2 Pro?
85 degrees.
10:21
What is the desk view mode and how does it work?
Desk view mode switches the camera to a top-down view, compensating for the angle to look like an overhead camera.
09:01
What limitation does the bokeh effect have?
The bokeh effect is not supported at 4K resolution.
14:39
Desk View Mode
This feature is unique to Insta360 webcams, using the gimbal to create a top-down view that compensates for the angle, which is a standout capability.
09:01Privacy Mode via Manual Twist
A simple and intuitive privacy solution that eliminates the need for a physical cover, enhancing user convenience.
02:12Lens Blur vs Gaussian Blur
The distinction between the natural bokeh effect and standard blur highlights the camera's superior image processing.
03:33Dual Outputs for Versatility
Providing both a regular and virtual camera output allows users to apply effects selectively across different applications.
07:21Bokeh Not Supported at 4K
A notable limitation that users should consider when choosing resolution settings, affecting the overall experience.
14:39[00:00] in this video we'll unbox it. This is not a paid endorsement, but I will have an affiliate the first question you probably have is what does it look like?
[00:16] This is a 4K 30 / 1080P 60 webcam. of what it could look like, because the software gives you and then we'll come back for the features that I want to Packaging is pretty cool.
[00:32] This is actually embossed don't know if you can see Bring this out. We can already see the camera in there in the mount going to remove the mount. So this says keep parallel with the So you got to keep it level.
[00:45] Now we have our USB-C to USB-A adapter in the cable. I'm going to remove this. Beautiful. So the little USB port is behind.
[01:01] because of the gimbals, but you can see it turns like that and like that. I'm guessing they went full magnetic with the mount. Front fold it like that. And you can see this.
[01:18] The connections at the bottom are for some other products that it's compatible And see, the mount doesn't have anything except beautiful. And there you have This is what's going on your monitor.
[01:32] in terms of size, if we were to compare it to the old This is much bigger. It's going to be one of them if you want to showcase
[01:44] And then go back to your face just like We'll go more in depth into the software. So if I move around, nothing happens. But if I do this gesture, I can see it activated tracking.
[01:58] you can actually control the speed of the tracking. I'm going to go back to my previous preset. And you can see it just goes back to There's a privacy
[02:12] If you grab the camera and manually twist it down, it will enter privacy mode. And just like it even shows a visual.
[02:26] So instead of having a physical cover, you can just manually turn it When it comes to gestures, it's not just the tracking, you can also zoom, So if I pull down, it will go back, and if I pull up,
[02:38] This is pretty cool. If I press it, it'll reset. Very practical. They actually redesigned the software to make it more simple to use compared
[02:53] Talking about the old one actually still have it right there. So if we look at top right, we're going to have our scene presets. So this actually records everything and we're going to go tab by tab.
[03:05] So you can control your camera here or incrementally There's also the zoom. And basically what you can do is amongst other things save that preset.
[03:20] And I can go back to preset one. the effects tab. you can have a blur effect, which you can have here.
[03:33] So this is what regular webcams like other webcams or other software tend to do, is a Gaussian type of blur. So this is like a lens blur effect.
[03:47] And this creates like more of a natural camera blur effect if you will, which I definitely appreciate. unless you know you're going for privacy, but you can see that the blur
[04:04] is definitely different than what you would get from those regular blurs. I like to keep it around 30 or 40%, and it makes it seem, of course, if you don't want to show your background at all, they added
[04:19] all of the cool background placement stuff that you can find, mostly for meetings like if you do own a green screen, there is an option to basically remove the green, which is nice, but my favorite definitely the bokeh slightly turned on.
[04:34] so you can have like basically color filters in a way. Now this webcam has HDR, so nothing is too bright,
[04:46] and give you a lot of versatility when it comes to color management. what it's going to look like for you unless you have the same two setup will not look the same, and you can really, really customize the look.
[05:03] Right now we have vintage. but it's to give you an idea that this is really highly customizable. And now we have a look that's completely different from what we had before.
[05:16] So if you save a preset it's going to take that into account to. Let me remove the filter so we can see the next one a little bit So you can add makeup to your face basically as you can see.
[05:32] It can be like light makeup or a lot. Let me boost it up. And then there's Rose. Wow I don't need more than my natural eyeshadow to be fair.
[05:50] So beautify is mostly like the skin in a way. And it gives you extra options to brighten the skin slightly to make it smooth or less smooth.
[06:05] Basically that will make everything just a little punchier if you will like contrast, but in a different right, I'll turn that off. here you'll see that you have a whole lot of options including HDR.
[06:20] I feel like this is one of the times where putting everything In my case, I remove white balance because my lights are all sorts of colors, as a plug and play camera, automatic settings with the Dr.
[06:39] As you can see, I'm not doing anything fancy with the contrast with the sharpness which is kind of impressive.
[06:51] let's say that this result is a little too bright for you. manual access to the ISO and the shutter speed, which is nice. So if I wanted my darks to be darker or and I wanted my highlights
[07:09] You see I can really push it. Something else to consider is that this camera actually gives you two outputs.
[07:21] your discord, you'll have the option to use the regular camera source or to have all the fancy effects like the green screen stuff, the background replacement, the bokeh.
[07:35] So you have that virtual camera on top of the regular plug and play camera. bring exposure back to automatic and you know it does a pretty good job. Brightness does its thing, contrast does its thing So something to warn you
[07:48] For example, if I turn off HDR and I turn it back on. It's very smooth until it settles to the quality it actually wants you to have.
[08:03] In a way, if I turn HDR on, it's going to look very bright Oh, I accidentally turn on tracking, by the way, in the software bottom here is where you would have the tracking.
[08:17] It's faster that way. I can click on a little plus here it creates a new preset. Or if I want to update a preset, I can click on the three dots,
[08:29] it has autofocus but you can have manual focus if you want. or you really don't want to be out of focus at all, You turn off autofocus, and then just try to settle Take something like that
[08:47] and in my case, like it might give me the best results So if I want to show something is going to be out of focus. All right.
[09:01] And that is the desk mode, the desk view at the bottom If you turn on desk view, it's going to switch down
[09:13] and actually compensate for the angle and make it look as if you had a top down camera, which is like which always blows my mind. It's like one of the biggest, coolest things that the 360 can do.
[09:25] you can easily do this by clicking top right here. If you have a whiteboard, it'll actually scan your image and detect the whiteboard.
[09:39] And you can do a peace sign to make it zoom into that whiteboard. I'll click on that it should reframe before we do the desk view, Options such as group tracking, which I cannot really demonstrate.
[09:55] So if I turn that I can kind of choose and tell it, hey, I just want So depending on what you're doing, if you're doing a presentation
[10:07] but if you're just sitting here, you can be like, okay, just ahead, I don't know if I can really show you a good example, but if I turn it on, you can see that, you know, it's not just tracking me
[10:21] when I'm moving around, it is also framing me correctly and. I think it's 85 degrees. The the view angle.
[10:33] So you can basically override it. So it's not just about how you can see it turn on again. So it's not just about tracking you, it's also framing you correctly.
[10:45] but I want to let you know that this is possible. that the tracking will basically stop. Let's say that you have your showcasing a product that's on a mannequin.
[11:00] To basically stop somewhere. And let's just say I want to showcase. I would set that up like that I believe. Wow.
[11:15] So I can click on those to see like the current angle that it's set up as. Look at that and it flips like Or I can just edit them. Right.
[11:29] I'll do this and it sets it up. Actually I want the top to be like that in case I want to stand up show your crotch or your legs or your pants.
[11:44] as it says, the camera will recognize and track a person within the selected area, only applicable in single tracking mode. have is the whole I don't want to show my whole apartment.
[11:59] You see how it stops now. So now you can really select the field of view that it's allowed and you can see it's doing the automatic framing thing,
[12:13] I cannot cover everything in one video and not all of them apply it to me. I fixed the position, but earlier I had my camera kind of slanted
[12:28] And you can make it basically be leveled, which is so cool by turning this on. automatically detects your head and adjust framing for the best angle.
[12:43] If you're someone who's moving around, who actually needs to be moving around and you need to show what's happening with your hands or something on your desk.
[12:56] And I'm actually recording this on a separate day, because I can use the sun to have proper lighting on the desk. And as you can see, the camera is still on my monitor
[13:09] And it's appearing flat. but that's because, well, it is diagonal, right? But you can see that all of the options like autofocus and even the view
[13:24] and moving it around and things like that, if you want to zoom out a little bit. So your camera is 100% functional as if it was an overhead ish camera.
[13:36] I'll put my hand and if I turn it This is without the daylight filter. So if you want to showcase a product or something.
[13:48] But yeah, if you want to showcase a product adjust a little bit so we can see all the details. you can just switch in between talking to the camera.
[14:03] and then boom you can show your hands and whatever you're talking about right. maybe you're doing a video where you unbox stuff
[14:15] to your face talking about the product, kind of like what I'm doing right now. This is one of the best options with Insta360 webcams in general,
[14:27] because I don't see other webcams provide that, and it's all thanks to the gimbal. So the camera can just face down whenever it wants the software flattening it so it doesn't look like it's diagonal
[14:39] Do keep in mind that the bokeh effect, the specific blur is not supported at 4K. now, is supported at 4K, but the bouquet specifically isn't.
[14:53] if you're looking for a very versatile camera that does all of the price tag is 249 .99. behind it in the gimbal and the tracking in the desk view.
[15:09] also has a microphone with some pretty advanced technology. But So I'm not even going to go over that.
[15:21] if you want to learn about those features that I did not feature. if you would like to get one. so you don't miss my content in the future.
⚡ Saved you 0h 15m reading this? Transcribe any YouTube video for free — no signup needed.