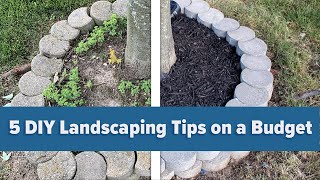
Reviving Old Edging Stones on a Budget
42sSatisfying before-and-after cleaning of old stones makes viewers want to try it themselves.
▶ Play ClipBrad from Project Build Stuff shares five budget-friendly DIY tips to transform a home's curb appeal, from edging and pressure washing to pruning, mulching, and adding plants and lighting.
Brad introduces his project to improve curb appeal on his Indiana home, noting the lack of curb appeal and his plan to share five tips.
He removes old, uneven edging stones, pressure washes them, and re-lays them level using string and spray paint for alignment, adding a second layer for a bolder look.
Pressure washing the vinyl siding and concrete sidewalk reveals a dramatic transformation; he notes it's a high-impact, low-cost tool (rental under $50).
Overgrown trees and shrubs are trimmed to improve visibility of the house and overall neatness, using a sawzall for a berry-dropping tree and shaping front shrubs.
Old mulch and weeds are removed, no-dig edging installed, weed fabric laid down, and 35 cubic feet of mulch ($60) spread in a thick layer.
An ugly thorny bush is removed; hydrangea bushes are planted with a soil mix; landscape lighting is added for nighttime appeal.
With about $300 and a weekend of work, Brad transformed his home's curb appeal using five simple DIY techniques, proving that professional-looking results are achievable on a budget.
"Title accurately promises five budget-friendly DIY landscaping tips, and the video delivers exactly that with clear steps and cost breakdown."
What was the total cost Brad spent on the curb appeal makeover?
About $300.
08:44
How much mulch did Brad use and what was its cost?
35 cubic feet of mulch costing about $60.
06:35
What tool did Brad recommend for cleaning edging stones and concrete?
A pressure washer, which can be rented for under $50.
03:40
What did Brad use to establish a perimeter for his edging stones?
String and marking spray paint to paint perfect circles around each tree.
01:30
What type of plants did Brad plant at the front of the house?
Hydrangea bushes.
07:38
Budget-Friendly Edging Restoration
Shows how to reuse existing stones with cleaning and re-leveling instead of buying new ones.
00:36Pressure Washing Value
Highlights that a rental under $50 can dramatically improve curb appeal with minimal effort.
03:40Weed Fabric and Mulch Strategy
Demonstrates a systematic approach to weed control using fabric and thick mulch for long-lasting results.
05:07Plant Selection and Soil Mix
Nursery advice to mix existing soil with topsoil for better plant success, useful for non-gardeners.
07:38Cost Comparison with Professional Work
Emphasizes that DIY saved thousands of dollars compared to hiring a landscaper.
08:44[00:00] What's up world, this is Brad from Project Build Stuff and today I'm going to show you five ways to completely make over your home's curb appeal. I grew up in California where buying a house for a lot of people is a pipe dream but since
[00:21] moving to Indiana I've been lucky enough to buy my own home that I love but the curb appeal is lacking. So I'm going to show you the five ways I'm going to completely make over the front of the house to really make it pop and stop having the neighbors make me look
[00:36] so bad. Let's start with the hard stuff, hard escaping and edging. Years of root growth and movement had completely demolished all the edging around my planners and trees. It really made my yard just look disheveled so it was time to rip them out and
[00:52] start fresh. All of these edging stones were actually in really great condition, they were just dirty
[01:05] and uneven. So the most budget friendly way I can do this is just to pull them out, give them a good cleaning and put them back in nice and level. I laid out all the stones on the driveway and just gave them a good pressure wash on both
[01:18] sides and it was actually quite incredible how clean they came out. They practically look like new. To establish a perimeter for my edging, I used some string and marking spray paint to paint
[01:30] perfect circles around each tree. This will tell me where all my edging stones need to go back in. Here on the right side of the driveway, the plan is to put in a whole new flower bag. I
[01:44] wanted to perfectly match the one leading up to the front entry, so I'm going to measure it out. I'm going to transfer those measurements over to the ground using some more of that marking spray paint.
[01:59] I don't have a straight edge that's quite long enough for the side of the house, so I just eyeballed it with some string and then ran over that with the spray paint to give me a good line to work from. For the curve, I just eyeballed it and it's close enough.
[02:12] This whole flower bed is going to be lined with edging stones, so we just need to dig out a little bit and get rid of all the grass, so we have a nice clean surface to work with.
[02:25] Laying these edging stones is a simple but long process. The real key is to make sure you have a nice flat surface you're laying them on and a rubber mallet comes in handy to convince them to go in the right place.
[02:45] I just repeated the same process around all the trees and planters, and it took a while, but it looks really great in the end. I ended up putting a second layer everywhere, which really jumps out from the street and allows me to put in way more mulch, which will look
[02:59] really nice. My second tip is going to be pressure washing. Even if you don't think your house needs
[03:14] to be pressure wash, it does. Trust me. I'm lucky enough to have vinyl sighting, so the pressure washer cleans it right up, but where the real transformation comes is in the
[03:27] concrete. This sidewalk didn't even look dirty, but look how much is coming off of it.
[03:40] Pressure washer is one of those big bang for your buck tools. You can rent one from your local home store for less than 50 bucks, and it can make a world of difference on your curb appeal. I spent just a couple hours out here with it, and look at all this gunk that
[03:53] came up. Pressure washing is worth all the time and money.
[04:08] Tip 3 pruning. Overgrown trees and shrubs are just an eye sore, but there's such an easy fix and make a big difference on your curb appeal.
[04:21] This tree in my yard needed a prune in the worst way. It drops berries that grow seedlings all over the base, so I'm going at it with the sawzak and cleaning it up once and for all.
[04:35] So much better. My big tree just needed its yearly trim, so you could actually see the front of the house from the street. I think that's helpful with curb appeal.
[04:50] My front shrubs just needed a little bit of a haircut to give them some shape. They had that quarantine here going on.
[05:07] Tip 4 weed control and mulch. My weeds were out of control, and my mulch hadn't been replaced in years. That needs to get fixed pronto. Next step was to rip out all the old weed control and dig out all this gross mulch. I want
[05:23] to start fresh.
[05:37] I found it easiest to rake all this old mulch and debris into a pile, and then use my quick big bucket dust pan to scoop it all up. In areas like this around the mailbox post where I didn't put in concrete edges, I used
[05:51] no dig edging to contain the mulch. It's super easy to install, and it keeps your mulch separated from the grass, which makes mowing way easier. Around all the trees and the flower beds where I planned to put mulch, I made sure to put
[06:06] a fabric weed block down first. I cut this oversized and staked it down with metal yard stakes to keep it in place. I then went back and trimmed off any of the excess that won't be covered by the mulch with some scissors.
[06:22] I used the same tactic in these long flower beds and just cut around the utility lines to make sure I got full coverage. It's mulch time. I ended up using about 35 cubic feet of mulch
[06:35] which was about 60 bucks, so not too bad. It was really just dump and spread. If I can do it, you can do it.
[06:51] In the harsh Indiana winters, the last mulch blew away and burled down a lot. I'm hoping this will last a little longer, so I've made sure to put a nice thick layer so we'll hold up over time. Something just doesn't seem right about a bunch of organic material coming
[07:06] in plastic bags.
[07:18] Final tip, plants and lighting. Why someone would ever plant this ugly thing is a mystery to me. It even has thorns. It has to go.
[07:38] With that monstrosity dealt with, we're going to plant a couple hydrangea bushes here on the front of the house which will really soften up the landscaping. When I picked these plants up from the nursery, they suggested to mix the existing soil with some top soil in
[07:53] order to give them the best chance of success. I don't have a green thumb so I'm really hoping these work out.
[08:06] The final touch is going to be some landscape lighting because I want the house to look as good at night as it does during the day.
[08:27] And there you have it. Five tips that completely changed the curb appeal of my house. I've already gotten a ton of comments from the neighbors on how good it looks and I couldn't be more happy. In total, I spent about $300 on everything which for landscaping is nothing. If I had
[08:44] a professional come out and do all of this, it would have cost me thousands of dollars. I really love the way the mulch and the light stone goes together. The trees are trimmed up nice so you can really see the front of the house and the driveway is cleaner than I've
[08:59] ever seen it in my life. I couldn't be more happy. I really hope you guys enjoyed this and I would love to see what you guys do to your house so be sure to share those with me over on Instagram at Project Build Stuff because I'd love to see what you do and how you make
[09:14] this your own. And as always, it's your turn. Go Build Stuff.
⚡ Saved you 0h 09m reading this? Transcribe any YouTube video for free — no signup needed.