
I Bought a House & Found My Dream Studio Space
60sThe house reveal and ugly 1960s basement promise a satisfying before-and-after transformation that viewers love to follow.
▶ Play Clip"Delivers exactly what it promises — a step-by-step studio build with a full reveal and honest cost breakdown."
The creator documents the transformation of a dated 1960s basement into a custom YouTube studio, covering demolition, framing, insulation, drywalling, and flooring. The video includes a full studio reveal, detailed equipment explanations, and a transparent cost breakdown that stays under the initial budget.
The creator announces they bought a house and are moving, meaning the old studio backdrop will be replaced. They feel it's an insane but exciting accomplishment.
The basement was outdated, with old doors, paneling, and low ceiling, but the creator saw potential for a future studio.
The studio must look clean, contain noise, and cost under $15,000 to complete.
Contractors stripped away everything, including old flooring, carpet, side paneling, and wood framing, leaving a concrete block.
The room dimensions were kept, and an electrician installed eight recessed lights, five in the studio space.
Safe'n'Sound insulation from Lowe's was placed between studs to absorb sound, applied to ceiling, back wall, and HVAC area.
Purple gypsum board was installed for fire and mold resistance, then sanded and painted.
Brand new vinyl plank floors were installed, waterproof and aesthetically matching the desired vibe.
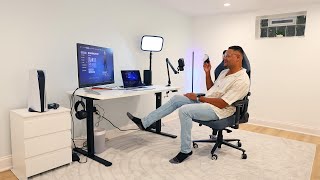
The finished studio is revealed, described as bright and amazing, exceeding expectations.
The setup includes Elgato Wave 3 mic, Elgato 4K X capture card, BenQ EX3210U monitor, MacBook Pro M1 Max, and SteelSeries Arctis Nova Pro headset.
Total build costs: materials $7,100, electrician $1,525, total $13,334, under the $15,000 budget.
The studio build stayed under budget while delivering a clean, functional, and stylish workspace for creating content, with more upgrades planned for the future.
What type of insulation was used in the studio build?
Safe'n'Sound insulation from Lowe's.
03:17
What type of drywall was installed and why?
Purple gypsum board because it is fire and mold resistant.
03:46
What was the total cost of the build?
$13,334.
11:49
How much did the electrician charge?
$1,525.
11:49
How much did materials cost?
$7,100.
11:49
What monitor is used in the studio?
BenQ EX3210U 4K 120Hz monitor.
08:48
What capture card is used for gameplay recording?
Elgato 4K X.
08:35
What is the primary camera for the channel?
Canon R6 Mark II.
10:41
Build stayed under budget
The complete studio build cost $13,334, under the $15,000 target, proving a professional studio can be built affordably.
11:49Sound insulation matters
Using Safe'n'Sound insulation between studs is a simple technique that significantly improves audio quality by absorbing echoes.
03:17Purple drywall for basements
Purple gypsum board offers fire and mold resistance, making it an ideal choice for below-grade spaces.
03:46Waterproof flooring
Vinyl plank flooring is waterproof, an important consideration for basement environments prone to moisture.
04:42[00:03] share I bought a house really freaking insane thing to accomplish I honestly can't believe it myself I decided to take on the responsibility so we're doing it so that means the old setup that most of you guys have been used to
[00:16] seeing in my backdrop for The Last 5 Years in my videos that's no longer going to be that setup has been completely deconstructed taken down boxed up and shipped to my new place here but now the next big question is
[00:30] where do I put it all what's the next space going to look like for the future of the videos on this channel well when I first toured my soon to be home that I'm in now I discovered the basement you know it was very outdated very old as
[00:44] you can see here but a little bit further down we had this door which entered into this room where I could start to feel my imagination and creative juices just tingling inside my brain for what this space could soon be
[00:58] it may not look very pretty right now but this is where my eventual studio is but this is where my eventual studio is going to be and I'm so freaking excited for it now this home was built in the 1960s and by the looks of this room it
[01:15] hasn't been updated since the 1960s we had these old brown looking doors here this old type of side wall paneling and also the drop ceilings above me which
[01:27] almost were touching my head there wasn't much space in between that made me comfortable standing within this room so yeah the space wasn't looking too bad initially here and I could have totally just moved all of my tech and stream and
[01:40] gotten right down to business but I knew that the space could be so much more than what it was so this all jumped my first Dream YouTube Studio space I had a
[01:52] few requirements it needed to look clean as F keep the noise contained within the studio and cost under $115,000 to complete I know that is freaking insane but we got to go big or go home so that's exactly what we're going to do
[02:05] that's exactly what we're going to do step one in this build was the demo work this required the contractors that I hired to strip away everything that was down in this basement that included all of the old materials that were down
[02:18] there the flooring the carpet the side paneling and even the wood framing that was down there this gave me and the contractors a concrete block to build off of as there was nothing down here it was a dark abyss in this basement with
[02:34] some semi functioning lights but you know that was all right we weren't using the space for anything and it was at this next step to set the framing that would be in this basement so I actually like the room setup that was in there
[02:46] previously so I kept the dimensions of where that room was the same I then had an electrician come to install the recess lights that I needed throughout the entirety of my basement I had a total of eight lights installed but only
[03:02] five of those lights were in the studio space with the frame and lighting now into place it was then time to set up the walls the first material that I needed to pick up for this work was some insulation now this isn't required but
[03:17] you know this is going to be a studio space so I want the sound to be more absorbed than echoing out or even you know Annoying my neighbors or anyone else that might be hanging in the house with me so I went on down to Lowe's and
[03:30] picked up the insulation material called safe and sound it's basically this really thick cotton feeling type stuff but it goes in between the open slots of the frame or between the wooden studs my contractors did a good job of putting
[03:46] this on the ceiling as well as the back wall even where the HVAC is cuz sometimes that system can get a little bit noisy it was then time to get the drywall which I got this/ in purple gypsum board which is actually really
[04:00] good for basements as it's fire and mold resistant and let me tell you moving these drywall sheets around was not easy they are freaking heavy and hard which they are freaking heavy and hard which is why they're perfect for walls as you
[04:13] can see things are slowly starting to come together here it doesn't look quite like a space you would want to hang out in just yet but we're getting there the next things that were applied which I just call cosmetic materials that being
[04:27] the sanding of all of that dry wall that way it can be painted and everything is nice and smooth I had to get doors installed as well one for the entrance to the studio as well as to the back room closet area after all that was done
[04:42] I then had the brand new floors installed into the entire basement area they were the exact color that I wanted and matched the color and the aesthetic Vibe all the above that I was going for in this basement in studio area and
[04:58] that's on top of the fact that these vinyl planks were waterproof which is perfect for a basement I realize at this point I haven't really given you the wasn't going to show you the whole
[05:11] completed thing right away I mean but I I guess I will now so let me take you I guess I will now so let me take you down we are headed down to the basement okay y'all ready I don't think y'all are ready but here we go Moment of
[05:28] Truth the dreams Studio [Music] so bright oh my go I just I I I just still
[05:45] at a loss for words everything that has been created here there is so much more I want to do with this setup in this room as a whole but as of right now we first have our network attached storage here from
[06:01] sonology this stores all of my old footage and videos right on these drives speaking of footage I wanted to give a quick shout out to our sponsor today story blocks I've actually personally used story blocks for the past few years
[06:17] for things such as animated backgrounds for transition effects I've also used it plenty of times to get cool green screen effects like you see right now story blocks offers a vast library of royalty-free stock footage music and
[06:30] templates for your YouTube videos so yes this means that any of the assets that you use off of story blocks can be used without the fear of getting a copyright infringement what you decide to end up needing to overlay on top of your videos
[06:44] will depend of course on your content but luckily story blocks has a really cool search function where you can type in exactly what you're looking for and story blocks will dig into its media library and pull up all of the content
[06:56] related to that search once you find an asset you like you you can preview it by hovering over the image or by clicking into it and then when you're ready to download button if you want to check out the templates those are great because
[07:09] those will add a nice professional quality looking Graphics to your video all you need is the respective video editing software to modify those templates now the platform's music library is very extensive you can filter
[07:21] on the genre and the mood and the music choices actually sound pretty good too choices actually sound pretty good too [Music] go ahead and use my link in the description below to start taking your
[07:36] storytelling to the next level I'm a freaking goober I meant to put on my DJI mic when I was filming with my phone here see yeah it just it just sounds so much freaking better oh remember I told you guys the lights can be dimmed in
[07:50] this space check this out oh yeah gets it right in the mood this gives me so much more power I what the backdrop and overall Vibe of my the backdrop and overall Vibe of my videos and streams can be with this kind
[08:05] of control now the microphone you guys just heard me speaking into for the sponsor portion of this video was the Elgato Wave 3 microphone this has been my go-to microphone for the past several years at this point it connects directly
[08:19] to your laptop or computer via USBC it's plug andplay and it's just so easy to use it can feed right into OBS Studio as well which you see my game play up on screen at the moment coming through from the PlayStation 5 in great quality the
[08:35] capture card I'm using for all of this is the Elgato 4kx as you can see right here with the HDMI ins slot of this capture card I'm getting the video signal from my PlayStation 5 to this device and then I
[08:48] PlayStation 5 to this device and then I have an HDMI out going to this beautiful have an HDMI out going to this beautiful 4K 120 HZ monitor the BenQ ex3210 U just beautiful my my favorite display of all time as of right now we'll see if that
[09:03] future here but this is just freaking awesome and then I have my gods spin awesome and then I have my gods spin USBC to USBC super speed cable to get the feed from the capture card to my laptop my MacBook Pro M1 Max right there
[09:20] so that we can record the gameplay and that's literally all I got going here at the moment guys like it's it's not a crazy setup I just have a simple recording semi streamy setup going here but it's gonna get so much crazier as I
[09:36] continue to build out the studio this is just the beginning and we are just getting started guys also you guys might have been curious how am I listening to have been curious how am I listening to my audio well I'm using the steel series
[09:48] my audio well I'm using the steel series arctus Nova Pro wireless headset amazing freaking headset love this thing so much I was actually going to return these to test them out for a video they were so freaking good I couldn't return them
[10:01] guys that's what happened and this is the game deck that comes along with this and you can't get those without this you know uh it all goes together and I'm using the Elgato chatlink cable here to be plugged into uh the capture card to
[10:15] get all the audio to to to be recorded it's all working very well and I got a PC here right now that I kind of just blew by here but I'm going to be doing blew by here but I'm going to be doing more with that I may get a legitimate PC
[10:28] Tower so that way I can can test out some internal capture cards and do other stuff that I can't do with a Mini PC you know I got my duvet light pole strip here right now uh you know we're we're rocking with that uh also yeah I'm sure
[10:41] the on the left that's like my primary camera I use for all the videos on the camera I use for all the videos on the channel like this is my baby number one Canon R six Mark I it's just absolute freaking Beast um love it um you and
[10:56] guys I put links in the description to all the stuff that I predominantly use in my setup so if you're curious of what it is and how much it all costs it's recommendations for things that you think I should add here I have a list of
[11:09] my own ideas but I'd be curious to know what you guys think I should be putting the wall I got these disc plates I can throw up here like there there's so much that can be done uh but I want to take my time with it I don't want to rush and
[11:23] put stuff up here that I might regret uh putting up because then it's just going to be a whole you know maybe I got to repaint the walls do other stuff with it Etc so I'm trying to put stuff up and and hopefully you know that's what's
[11:35] going to be up there for a while and I want to be efficient also here is the closet room nothing really exciting back here except boxes from when I was moving other Tech items that I need to probably unpack here but yeah that's that's
[11:49] crazy honestly there is a light switch there's a light switch so I can I can see stuff pretty dope okay so I just took a good minute to use my handy Dand calculator and check out all of my receipts and credit card payments oh
[12:04] they hurts oh I added them all up for you guys so let's start with the materials so the materials that's going to be our drywall our nails to nail the to be our drywall our nails to nail the drywall drywall the paint the flooring
[12:19] the baseboards I think you guys get the point here that all total the contractors do to put all those materials together that totaled
[12:37] $7,100 then the electrician his work costed $1,525 the tech in this room and the Furnishings well that's TBD cuz we're
[12:49] not finished yet I have several other items that I need to include in this space before I can say that this is done and I can give you a total cost count so that'll be for a future video so all in all if we count the build itself as a
[13:02] whole we're totaling $1 13,34 which is just below our budget of 13,34 which is just below our budget of $115,000 so we did it obviously I spent $115,000 so we did it obviously I spent much more uh overall for the work in my
[13:17] house um not just this basem in this room but if we're just looking at the space that's what we came down to which is not too bad honestly I got some is not too bad honestly I got some relatively on the cheaper side labor to
[13:31] put all the materials together and the electrician uh also gave me a very fair price for his work so that's all I got for today's video too
⚡ Saved you 0h 13m reading this? Transcribe any YouTube video for free — no signup needed.