
Struggling to Assemble a Heavy Mic Stand
57sThe relatable struggle of assembling heavy gear with one person is both humorous and engaging for DIY enthusiasts.
▶ Play Clip"Delivers exactly what the title promises: a straightforward unboxing and assembly guide for the Elgato Wave Desk Stand. No fluff or exaggeration."
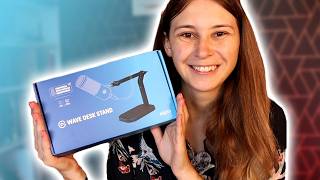
This video provides an unboxing and step-by-step assembly guide for the Elgato Wave Desk Stand, a microphone stand designed for streamers and content creators. The reviewer demonstrates how to attach the heavy base plate, mount the arm, and connect various microphones or accessories like the Elgato Wave Neo, highlighting cable management features.
The box contains a manual, heavy plate, arm, screws, and rubber bands for cable management. The packaging is plastic-free, which is appreciated.
Screwing the arm to the heavy plate is doable but difficult alone; it's easier with someone holding the plate. The plate needs to be heavy for counterweight.
One screw is fully inserted, attaching the arm to the plate. Additional screws are for cable management wraps.
The universal end comes with different screws: 1/4 inch, 3/8 inch, and 5/8 inch. The reviewer uses the thick one for the Elgato Wave Neo. The Elgato foam grip can use the standard thread.
The microphone screw is tightened onto the stand arm. The stand elevates the mic to eye level for steady TikTok recording without holding the phone.
To attach the Elgato Wave Neo, remove an existing part, pull out the middle spin by turning (not pulling), insert a small screw with a thicker flat side into the mic, then screw the mic onto the stand.
The stand includes rubber bands for routing cables. The reviewer runs the mic cable through these to keep a clean setup.
The Elgato Wave Desk Stand is a versatile and well-designed accessory for streamers, with easy cable management and compatibility across microphones. Assembly may require assistance, but the result is a professional, clutter-free desk setup.
What screw sizes are included with the Elgato Wave Desk Stand?
1/4 inch, 3/8 inch, and 5/8 inch.
03:38
Why is the base plate heavy?
It needs to be heavy to act as a counterweight for the arm.
02:06
How do you attach the Elgato Wave Neo to the stand?
Remove the top part, turn the middle spin to pull it out, insert a small screw with a thicker flat side into the mic, then screw the mic onto the stand.
05:24
What additional accessory can be used with the standard thread?
The Elgato foam grip can use the standard thread already on the universal end.
04:08
What is the purpose of the rubber bands on the stand arm?
Cable management — to route microphone cables cleanly.
06:46
Assembly Requires Help
Practical tip: mounting the heavy plate is easier with a second person.
01:09Counterweight Principle
Explains why the base plate is heavy — essential for stability.
02:06Eye-Level Recording
Shows how the stand enables steady hands-free TikTok recording.
04:36Cable Management Aesthetics
Demonstrates the clean look achieved by routing cables through rubber bands.
06:46[00:02] vve desk stand this is a new desk stand from
[00:18] go we have a manual here a the box is empty so I'm just going to put that aside we're going to see what's
[00:30] put that aside we're going to see what's in the box in the
[00:47] absolutely no Plastics in here which I do appreciate
[01:09] you know what we do have a manual so what we need to do is we basically need to screw this thing on that really heavy plate so we push the screws TR
[01:21] the the big heavy plate we have the sting in the in h I'm going
[01:52] doable but it's difficult it's easier if somebody's holding that plate or holding somebody's holding that plate or holding something else the arm
[02:06] then I'm doing the second screw so I don't have to hold it as much heavy because it needs to be counterweight so it needs to be
[02:28] heavy okay I got one of the screws all the way in
[02:40] in now this is attached the the screws in the these just for cable management so we can wrap them around
[03:25] are basically to mount your microphone because now we have this end and this end is a universal end and it doesn't fit on all microphones in the menual says it's a 1
[03:38] microphones in the menual says it's a 1 14 in a 38 in and a 58 in I don't know Americans so I don't know inches that much but I do recognize these shapes and the thick one is usually for bigger
[03:54] usually for bigger microphones so my X microphone does have the the thick one so just screw this on here and then you can screw your basically because otherwise your microphone doesn't attach to this screw
[04:08] right here if you want to attach something else this might screw on this screw they basically wanted to make it versatile by giving you different option screws for example if you have the Elgato foam grip this one needs the
[04:22] normal tread that is already on it so you can just trat this on it there's two trats on it actually but let me just use this one
[04:36] I'm not good at doing this but here we go that's on the strp make sure it's secure I don't want to lose my
[04:55] basically I can start recording a Tik Tok video because now it's on eye level and I don't have to like I can just talk into my my camera lens and now I don't have to hold my phone and it will be a steady shot you can also look at the
[05:10] back of the camera like this and look at these lenses however it's a little harder to see yourself like that if you're recording a Tik Tok because then you don't know if you're in the frame or not and how how the frame is looking
[05:24] guess then you can see it because then you can look at the mirror but then anymore next up I'm going to show you how to put on there is the aato wave Mar Neo first of all you need to get this part off then there's this spin in the
[05:41] middle which you need to pull out uh by turning not by pulling by turning and then if you look inside there's already a tread in
[05:53] here and I'm wondering if that's already treading on and if you try you don't tread that on so what we need to do is we grab the little Trad so you have two little one we grab the little one it has like
[06:09] the ticker flat side and the screw side the screw side goes inside the wave
[06:23] Neo and now we can screw it on top of the stand
[06:46] go and that's how you attach the elato wave Neo to the elato wave desk stand how to do it and then we have cable management right we could plug this back
[06:58] in because we need to when we we're going to use it and then we can run it through all these Cable Management things run it through all the rubber bands right here so it looks clean and not cluttered at all which I totally do
[07:12] with everything I run every cable through a nice River Band and I totally do not have any cable mess at all underneath my PC if you want to buy The aato bave Descent the Elgato wave Neo or the Elgato phone clamp I'll leave the
[07:29] links Down Below in the description you will also get 5% discount with my code zc try I'll leave that down below in the description as well and make sure to click on the affiliate link if you accept the cookies I will get an
[07:43] percentage of the sale as well without you having to pay more so that's a videos about AATA products make sure to click on this playlist and YouTube thinks you're going to like this video subscribe for more and I'll see you in
[07:56] subscribe for more and I'll see you in the next video
⚡ Saved you 0h 07m reading this? Transcribe any YouTube video for free — no signup needed.