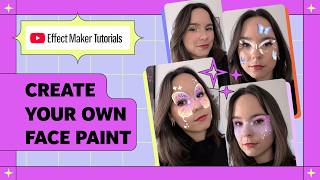

This Face Paint Template Hides Buttons While Recording
40sThe auto-hiding buttons during recording is a neat usability hack that viewers will appreciate.
▶ Play Clip"Delivers exactly what the title promises — a clear, step-by-step tutorial with useful pro tips."
This tutorial from Effect Maker demonstrates how to customize the Fairy Look template to create unique face paint effects. It walks through downloading the reference file, designing assets in Photoshop, swapping textures and button icons, and adding animated sequences — finishing with submission tips. The video is practical for AR creators wanting to build their own look switcher effects without writing code.
The Fairy Look effect template in Effect Maker lets users create a custom face paint look with a button system to swap between four different looks. The buttons auto-hide during recording for a clean final video.
Open Effect Maker on your computer, go to the Templates section, and select the Fairy Look effect template. Under the hood, it's a full look switcher with four button objects and a core face paint component.
The variable panel contains a 'current look' variable plus look1-4 variables that store the actual assets for each look. Replacing these default assets with custom ones is the key to creating your own face paint.
To design custom looks accurately, download the Photoshop face reference file from the face effect folder > face paint section. Use this file in Photoshop, Procreate, or any image editor.
Organize your design into groups (eyeliner, eyebrows, blush base) and use the built-in tracking landmarks, UV map, and layer mask for precise placement. Enable the symmetry tool to keep both sides uniform.
Use the brush tool to add dots around the eyes for a sparkle effect, then soften with the blur tool. Repeat on the other eye, and add blush on the cheeks and nose, lowering opacity for subtlety.
Export your design as PNG with transparency, set scale to 50%, and ensure only the active (foundation base) layer is visible. Test on different skin tones to ensure it works on everyone.
Upload your custom image via the Upload Asset button, then open the variable panel, find look1, and replace the default texture with your new imported asset. Also swap the button icon to match.
The visual script tracks button taps to show the selected look, handles UI cleanup by hiding outline objects and the button when recording starts, and reapplies the correct look when recording stops.
For effects like glittering sparkles, use an image sequence — a series of static images shown in rapid succession. Keep the total grid size within 2048x2048 pixels using the formula width x height x image count.
Duplicate and position sequences for multiple areas, adjust frames per second for speed, then test on multiple models. Submit with a thumbnail (e.g., 400x400, under 2MB, created with Nano Banana on Gemini) and a name.
This video provides a complete, beginner-friendly walkthrough for creating custom face paint effects in Effect Maker, from designing assets to final submission. Follow the steps and pro tips to build professional-looking AR effects quickly.
What is the Fairy Look effect template in Effect Maker?
A template that uses a four-button system to let users switch between four different face paint looks, with buttons that auto-hide during recording.
00:02
Where are the assets for each look stored in the Fairy Look template?
In the variable panel: look1, look2, look3, and look4 variables, plus a 'current look' variable.
00:57
What file should you download before designing a custom face paint look?
The Photoshop face reference file from the face effect folder > face paint section.
01:23
Which tool ensures a design remains perfectly uniform on both sides of the face?
The symmetry tool.
02:04
What export settings are recommended for custom face paint assets?
Export as PNG with transparency, scale set to 50%, and only the active layer visible.
03:35
What is the maximum grid size for an image sequence in Effect Maker?
2048 by 2048 pixels, calculated using width × height × image count less than or equal to 2048 × 2048.
06:13
How can you make an image sequence animation play faster?
Change the frames per second (FPS) in the animation settings; higher FPS makes it faster.
07:33
What tool was used to generate the thumbnail in the video?
Nano Banana on Gemini, generating a 400x400 pixel image under 2MB.
07:58
Layer organization and symmetry
Using groups and symmetry in the reference file ensures accurate, uniform face paint designs that adapt to different face shapes.
01:51Testing on multiple skin tones
Previewing on different models and skin tones is a crucial step for inclusive AR effects that look great on everyone.
03:35Visual script handles interaction logic
Understanding the visual script shows how button taps, UI cleanup, and recording state are managed without writing code.
04:52Image sequence optimization formula
The formula width × height × image count ≤ 2048 × 2048 helps creators avoid memory issues while keeping animations efficient.
06:13Submission requirements
Clear submission guidelines (thumbnail size, testing, naming) streamline the process of publishing a professional effect.
07:58[00:02] fairy [music] look effect template in effect maker to create a beautiful custom face thing effect. The fairy look template is super fun. It lets you quickly apply whatever face paint to your face. You can tap the button on the
[00:15] screen to swap between them. The buttons automatically hides when you start recording so your final video looks clean. But the real magic is the potential. I'm going to show you how to swap them out to create your own amazing
[00:29] custom face paint like this cute glitter sparkle look I made. To get started, open up effect maker on your computer. Head over to the template section and select fairy look effect template. Now that we're in, let's quickly look
[00:43] under the hood so we know what we're customizing. This is a full look switcher. The template lays out four button system that let the user switch between four looks. In the object panel, you'll see the core component, the face
[00:57] paint object which applies the looks, and the button objects. The most important part for us is the variable section. You'll find the current look variable which track with the active look and four look one through four
[01:10] variables. These variables are where the actual assets for each looks are held. We're going to replace the default assets held in those variable with our own custom asset. Before we jump back into effect maker,
[01:23] we need to create our own custom look. Head to the face effect folder and find the face paint section to download the Photoshop face reference file. Always use this file to design your looks. I'm using Photoshop here, but you could use
[01:36] Procreate or any other image editor. Once you open the file in Photoshop, you'll see a central face template and the layer panel organized in two groups like eyeliner, eyebrows, and blush base. For this project, we're focusing on the
[01:51] foundation base. Use the tracking landmarks, UV map, and layer mask provided in the file to get your placement and ensure accuracy.
[02:04] element of your design to make future adjustment quick and easy. Enable the symmetry tool to ensure a design remains perfectly uniform on both side of the perfectly uniform on both side of the face.
[02:26] I'm using a blur tool to soften the edges. polished the effect looks compared to the un-blended version.
[02:39] Using the brush tool, I'm adding dots around the eye to add a sparkle effect. I'm using the blur tool again to soften the dots around the eye.
[03:00] Repeat the same process on the other eye. Now, let's [music] move on to adding blush on the cheeks and the nose.
[03:22] You can lower the opacity to make it more subtle. graphics into the file to add unique details to your look.
[03:35] skin tones to ensure they look great on everyone. selecting export [music] as, checking the transparency box, setting the scale
[03:47] at 50%, and ensuring only your active layer, in this case the foundation base, layer, in this case the foundation base, is visible.
[04:00] Click the upload asset button in the asset panel and bring in your custom image we just created. Head back to the variable panel, find look one, and swap out the default texture by selecting your new imported
[04:14] texture by selecting your new imported asset. Next, let's replace a button icon so it matches.
[04:37] button icon. And replace it with the new button image that matches your new look. Create your own asset, or if you need inspiration, you can use Gemini to generate a new button image for you.
[04:52] Now let's dive into the visual script to see how the logic is actually handled. First, there's a logic that triggers the visibility of the selected makeup look whenever a button is being tapped. Then there's a section that handles the
[05:07] UI cleanup. It toggles the visibility of the outlining objects and completely hides the button when the user starts recording.
[05:19] when recording stops, so the user can switch looks again. and applies specific makeup look ID number, keeping track of which look one
[05:31] details on how to modify the visual tutorials to learn more. To see what your full effect looks like, use the preview window. You can change the model and skin tone to ensure your
[05:44] face paint works on a variety of people, which is a crucial step before For the sparkling glitter, we use that an image sequence. An image sequence is a series of static images that when displayed in a rapid succession creates
[06:00] a simple fluid animation. Pro tip for assets. To maintain efficient resolution and minimize memory usage, ensure all the individual images that make up your glitter animation sequence, when arranged in a grid, fit
[06:13] sequence, when arranged in a grid, fit within a maximum size of 2048 by 2048 pixels. You can calculate the size by using this simple formula, width times height times image count. Make sure this is less than
[06:28] image count. Make sure this is less than or equal to 2048 by 2048 for images of the same size. To visualize your animation as a face paint effect within Effect Maker, you first need to add it using the add image
[06:42] sequence. Then you either upload a new file or Then you either upload a new file or select one already in your assets.
[06:57] beneath the face paint layer and position it where you prefer. Such as on the cheeks. First, click the move button in the top left. Let's slide this to the left cheek.
[07:10] You can drag these arrows in any direction. If it's not the right size, grab the scale tool. Just drag the arrow to shrink or enlarge the asset. Then give it one final nudge into place.
[07:33] To make it go faster, go underneath to animation. You can change the frames per seconds here and the duration will go faster.
[07:46] To save time, you can duplicate the sequence and move the copies wherever sequence and move the copies wherever else you need them.
[07:58] four looks are perfect and we've tested on multiple models, click submit to finalize. Upload a thumbnail. I created mine using Nano Banana on Gemini to generate a 400 by 400 pixel image. Make sure the
[08:12] thumbnail is under 2 megabytes. Give your effect a name and write a short review. That's all there is to it. For more info on hacks in the effect maker, check out the links in the description below.
[08:25] to subscribe for even more updates and tutorials.


⚡ Saved you 0h 08m reading this? Transcribe any YouTube video for free — no signup needed.