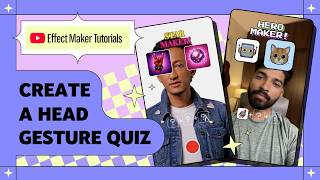

How to Build an AI Head Gesture Quiz Effect
40sThis intro taps into the viral AI filter trend while showing creators they can build one themselves.
▶ Play Clip"Delivers exactly what the title promises—a thorough walkthrough of building and publishing an AI head gesture quiz, with a few slightly rushed segments."
This tutorial demonstrates how to create an AI-powered head gesture quiz effect in Effect House Maker. By customizing the built-in AI head gesture quiz template, viewers learn to build an effect called Star Maker, where users tilt their heads left or right to answer questions and receive a unique AI-generated star portrait at the end. The video covers template setup, workspace navigation, visual scripting logic, customization, and publishing.
Users answer questions by tilting their head left or right and receive an AI-generated result. The effect is built using the AI head gesture quiz template in Effect House Maker.
Understand how the template works, how prompts connect to choices, how to swap icons, and how to test and publish the effect on YouTube.
Open Effect House Maker, select the AI head gesture quiz template under Effect Templates, and click 'Got it' to dismiss the info card.
The template already includes head turn detection, question flow logic, answer storage, and AI image generation, so you only need to customize rather than build from scratch.
Left side has the objects panel, beside it the assets panel with folders for icons and prompts, bottom has the visual script panel, and the right side has the preview panel.
Because each question has two options and there are three questions, 2 × 2 × 2 = 8 possible combinations, hence eight prompts in the prompts folder.
Tilt head left to select the left option, right for the right option. After three questions, a countdown timer appears, a selfie is captured with flash, AI generates the image, and the final result is displayed.
The final AI image depends on the combination of all three answers; changing any answer produces a different result.
AI image object captures selfie and shows result; background darkens during loading; spinner rotates via visual script; countdown text times the selfie; body segmentation captures reaction; left/right icons are options; icon1-3 show chosen answers; flash mimics a camera flash.
Select the hero text object, change it to 'Star', update font, size, colors, and reposition using the move tool.
Increase spinner opacity, upload a custom PNG (made with Gemini's Nano Banana Pro model), then reduce opacity and hide it again.
The visual script uses identical sub-graphs for left and right tilt detection; the top portion triggers on tilt left, bottom on tilt right.
After an answer, the script advances to the next question, updates icons, stores the answer as a boolean, and adds it to an answer list variable for calculating combinations.
The prompt selection sub-graph chooses the final prompt for AI generation based on the answer combination and sets the 'generation started' variable to true.
The camera snapshot sub-graph captures the selfie and begins AI image generation by triggering the create AI image node with the calculated prompt.
Tilt animation makes the chosen icon grow and turn blue; icon switcher updates question icons; a drag node allows repositioning body segmentation.
Click the phone icon, scan the QR code to open the effect in the YouTube app, and test all eight combinations plus the head gesture feel.
Upload a thumbnail (use a 50/50 split for AI transformation effects), name it 'StarMaker', write a description, set trigger to 'record and tilt head', and submit for review.
Once approved, the effect goes live on YouTube.
By leveraging the pre-built AI head gesture quiz template, creators can quickly build and publish polished AR effects without coding from scratch. Customizing prompts, icons, and visual script logic allows endless variations, making complex interactions accessible to any creator.
Why does the AI head gesture quiz template contain 8 prompts?
Because there are 3 questions with 2 options each, resulting in 2 × 2 × 2 = 8 possible answer combinations.
01:35
What happens after the user answers all three questions in the default effect?
A countdown timer appears, then a selfie is captured with a flash, the AI generates an image during a loading phase, and the final result is displayed.
02:18
What controls the visibility of objects in the effect?
The visual script panel controls when objects are shown or hidden.
01:08
What is the purpose of the background object during the loading phase?
Its opacity slightly increases to indicate that the AI is generating the image.
03:01
How does the head gesture detection logic work?
It uses two identical sub-graphs—one triggered on tilt left and one triggered on tilt right.
08:11
Where are the user's answers stored before prompt selection?
After each question, the answer is stored in a boolean variable, and all answers are added to an answer list variable.
08:27
What does the prompt selection sub-graph do?
It selects the final prompt to send for AI image generation based on the answer combination and sets the 'generation started' variable to true.
09:13
What thumbnail style is recommended for AI transformation effects?
A 50/50 split image showing the before state on one side and the after state on the other.
11:48
What trigger is set for the Star Maker effect?
Record and tilt head.
12:18
What happens when the AI image is generated?
The AI image object's visibility is set to true, and the loading UI elements are hidden.
10:23
Pre-Built Template Accelerates Development
The template already includes head turn detection, question flow logic, answer storage, and AI generation, so creators can focus on customization instead of building everything from scratch.
00:56Answer Combinations Determine Output
The final AI image is uniquely determined by the combination of all three answers, making the effect highly interactive and personalized.
02:33Visual Script Acts as the Brain
The visual script panel drives all interactivity, from prompt selection to object visibility and animations, demonstrating a no-code way to build complex logic.
09:13Thumbnail Strategy for AI Effects
A 50/50 before/after split is recommended for AI transformation thumbnails because it clearly communicates the effect's value to users.
11:48[00:02] you how to build an AI-powered head gesture quiz effect where users can answer questions by tilting their head left or right and get a unique AI-generated result at the end. We'll be taking a look at the AI head gesture
[00:14] quiz template in Effect House Maker and customizing it into an effect called Star Maker. It's a quiz where users become a rock or a pop star based on their choices. By the end of this tutorial, you'll
[00:27] understand how the template works, how prompts connect to choices, how to swap icons, and how to test and publish your effect on YouTube. To get started, open Effect House Maker on your browser and here under effect template, select the
[00:42] AI head gesture quiz template. Once you open the template, you'll see this card pop up that tells you about the effect and ways to customize it. For now, I'll click on got it. This template already includes head turn detection,
[00:56] question flow logic, answer storage, and AI image generation. With these features already included, we can simply customize the template rather than building the entire effect from scratch. Now, let's look at the workspace.
[01:08] On the left side, we have the objects panel which shows all the objects used in the effect. Some of them are visible, some are hidden, and the visual script controls when they are shown. You can see the visible ones in the scene view.
[01:21] Just beside that, we have the assets panel where your icons, prompts, and images are neatly organized in folders. These are all the assets that are currently being used in this effect. Because each question has two options
[01:35] and we have three total questions, 2 * 2 * 2, that is eight possible combination. This is why we have eight prompts in the prompts folder. We'll customize these prompts and icons to match our desired effect. Here at the
[01:50] bottom, we have the visual script panel. This is the brain of your effect. And on the right side is the preview panel where we will test everything in real time. Before customizing anything, let me show you the default effect first.
[02:03] I'll scale up the preview panel and I'll start the effect. On start, you'll see two icons. I tilt my head left, it selects the left option. I tilt it right, it selects right option. After I answer all three questions, I see a
[02:18] countdown timer. Once it ends, my selfie is captured with a flash animation. Then I get into a loading phase. This is when the AI is generating the image. And once done, the final result is displayed. The key thing here is the final AI image
[02:33] depends on combination of all three answers. So, if I had selected the right option instead of the left in question one, my resulting AI image would be different. Now, let's look at what's happening behind the scenes. I'll jump
[02:47] to the objects panel. The first object we have is the AI image. This captures the user's selfie and displays the generated result. And it's usually hidden until the photo is captured. Next, we have the background. It is just
[03:01] a black image whose opacity slightly increases during the loading phase to tell the user AI is generating the image. I'll revert it also back to how it was. Below that, we have the loading spinner.
[03:13] It's hidden by default. I'll enable it and increase its opacity to make it visible. This is only visible during the loading phase. It is just a PNG image whose rotation is animated via the visual script. I'll again set it back to
[03:27] how it was. Below that, we have the countdown text. This is the timer that gives user time to get in the frame after the quiz is complete. Then we have body segmentation, which is
[03:40] used to capture the user's reaction to the AI generation. Below that, we have the text divided into two parts, hero and maker. These are the title text objects. And next, we have the left icon and right icon. These
[03:56] are the options that appear for each question above the user's head. They get updated dynamically by the visual script. The empty icons are the blank answer graphics that you see at the bottom. Icon one, icon two, and icon
[04:11] three show the selected answer for each question after you choose. And finally, we have the flash image object, which is just a white image whose opacity animates between zero to one and back to zero mimicking a camera
[04:25] flash. Now, let's start customizing this effect. I'll start with the branding elements, that is the title text. I'll select the hero text object and change it to star. I'll keep the maker text as it is. I'll update the font, size, and
[04:40] colors of the text to match my Star Maker theme. Then I'll reposition them using the move tool in the scene view. Next, let's update the loading spinner to match our theme. To do that, I'll first select the loading spinner object
[04:54] and in the properties panel, I'll increase its opacity. Then I'll click on add asset and upload my new custom loading spinner image. Once uploaded, it will be automatically applied to the object. By the way, I made this one
[05:08] using Gemini app using the Nano Banana Pro model. After adding it, I'll reduce its opacity and hide it back to how it was. Now, let's swap the icons to match our theme. To do that, first I'll go to the assets panel and click on upload
[05:23] the assets panel and click on upload assets and navigate to the icons
[08:11] Next, here is the head gesture detection logic. This is how the effect understands when you have tilted right or left. The top portion is triggered on tilt left and the bottom on tilt right. They are both identical graphs.
[08:27] Next is question progression sub graph. This is where, after one answer is chosen, the script advances to next question and updates the icons. It is identical for all three questions. After each question, their answers are
[08:43] stored in a boolean variable. All the stored answers are added into an answer list variable via this graph. This list will be used to calculate the eight possible answer combinations using
[08:57] the answer to prompt sub graph. Each answer will be checked whether it was marked yes or no. Now, we have both the combination and the answers. Next step is prompt selection. And as the name suggests, this prompt selection sub
[09:13] graph selects the final prompt to be sent for AI image generation. And it also sets the generation started variable to true. Now, let's see how the variable to true. Now, let's see how the image capture and AI generation works.
[09:26] Here, this graph checks if the generation started variable is true and then it hides the UI. If I open this, you'll see this hides only the question you'll see this hides only the question UI items. Then, after a slight delay of
[09:41] triggered. Inside the countdown sub graph, it triggers a 3 2 1 countdown using a transition node. Once the countdown is over, the hide answer sub graph hides
[09:55] the chosen answers from the bottom of the screen and triggers the camera snapshot. The camera snapshot sub graph captures the selfie and begins the AI image generation with a calculated final prompt. Inside it, you'll see both
[10:08] camera snapshot and create AI image nodes. When the snapshot begins, it also triggers a loading sequence sub graph, which animates a flash and presents a loading UI with background and an animated loading spinner. And finally,
[10:23] as soon as the image is generated, the AI image object visibility is set to true and the loading UI elements are hidden. This is the main working logic. Now, I'll show you some of the visual polish logic. If we come here, we can
[10:37] see that this section creates the tilting animation that occurs when the user is making a selection. The chosen icon grows and turns blue. Both left tilt and right tilt animation sub graphs are identical. They are just
[10:52] set to different icons. Next is the icon switcher. This section switches the icons for questions once answered. This is how it looks on the inside. And finally, we have a drag node which allows us to drag
[11:07] the body segmentation around on the screen. That is the whole logic. Now, let's preview the effect on our phone and see how to submit the effect. To preview, just click on this phone icon on the top right side and scan this QR
[11:20] code with your camera app or any QR code scanner. Once scanned, it will open the effect on the YouTube app. For this, I would recommend trying every possible combination to see if you're getting all the eight prompts and also check that
[11:34] the head gesture feels natural. Once everything works perfectly, click on the submit button and it will ask you to upload an effect thumbnail. Click on upload image, select your thumbnail and open. This is what the user will see
[11:48] before opening your effect. So, make sure that it looks good and for AI transformation effects, use a 50/50 split image that shows before on one side and after on the other side. Click on continue. For the name, I'll type
[12:02] StarMaker and for the description, I'll write create your star persona with AI. Tilt your head left or right to choose your style, instrument, and stage, then reveal your final AI generated star portrait. Set the trigger as record and
[12:18] tilt your head. Click submit and that's it. Your effect goes to YouTube for review and once approved, it will be live. Congratulations, you have successfully created your own AI head gesture quiz effect. For more
[12:31] information on using Effect Maker, check out the links in the description below. >> [music] >> for more tutorials just like this and >> for more tutorials just like this and I'll see you in the next one.
⚡ Saved you 0h 12m reading this? Transcribe any YouTube video for free — no signup needed.