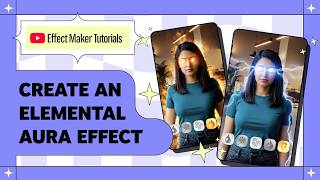

Build an Elemental Aura Effect for TikTok
42sThe promise of transforming into fire, water, lightning, air, or earth on camera is instant eye candy for short-form viewers.
▶ Play Clip"Delivers exactly what the title promises: a clear, step-by-step tutorial with all the details needed to recreate the effect."
This tutorial demonstrates how to build an elemental aura effect in YouTube's Effect Maker using the AI video switcher template. Viewers learn to customize AI prompts, button icons, and assets, then understand the visual script logic and publish the effect. The final effect lets users tap one of five elemental buttons to transform into fire, water, lightning, air, or earth versions of themselves.
Build an elemental aura effect using the AI video switcher template, where users tap buttons to transform with one of five elemental powers.
Unlike the AI video transformation template, the switcher adds a button-based selection layer; each button maps to a different AI prompt.
The template includes five button icons, five AI video prompts, an animated GIF preview, a countdown, a flash object, and a visual script.
The preview GIF plays about 3 seconds, buttons appear, tapping starts a countdown and snapshot, and AI video generation begins; if no tap within 5 seconds, a random prompt is selected.
In the preview window the full flow runs at once; on phone, recording stops at the snapshot and goes to a generation page.
The AI video object holds the output canvas and camera snapshot; the effect preview GIF shows the transformation preview; the flash object signals the snapshot moment.
In the assets tab, edit the video description field for each prompt; example fire prompt describes crossing arms, opening, and a golden/crimson aura with ember eyes.
Describe transformations as motion and action; start with the subject, separate actions with commas, and use 'then' for sequential actions.
The logic is organized into seven sections: preview GIF control, button fade-in, opacity, auto-generation, button taps, countdown/snapshot, and AI generation.
Upload a before/after thumbnail, name the effect, write a description, keep the trigger as tap to start, and submit for review.
By following the step-by-step customization and understanding the visual script, creators can successfully build and submit their own themed AI video switcher effects. The video empowers viewers to replace prompts, icons, and assets while explaining the underlying logic.
What template is used to create the elemental aura effect?
The AI video switcher template in Effect Maker.
00:02
How many elemental buttons are in the effect, and what elements do they represent?
Five buttons: fire, water, lightning, air, and earth.
00:29
What happens if the user doesn't tap any button within 5 seconds?
The template automatically picks a random prompt and starts generation.
02:35
What is the visual signal that tells the user their selfie has been captured?
The flash object, which is shown during the snapshot moment.
04:09
What are the key principles for writing AI video prompts in this template?
Describe transformation as motion and action, start with the subject, separate actions with commas, and use 'then' to ensure sequential actions.
06:28
What is the prompt index for the air button?
Three (fire=0, water=1, lightning=2, air=3, earth=4).
11:24
What should be done to the preview video before using it as the effect preview GIF?
Trim it to 3 seconds and convert it to a GIF.
08:26
What happens on the phone after the snapshot is taken?
Recording stops and the user is taken to a generation page.
02:50
What kind of thumbnail is recommended for AI video switcher effects?
A clear before and after split showing the transformation paired with the original state.
14:36
What is the default trigger for this effect?
Tap to start.
15:03
Prompt Writing Technique
Explains how to structure text-to-video prompts so actions happen sequentially, a key skill for AI effects.
06:28Auto-generation Fallback
The effect never idles; it randomly picks a prompt after 5 seconds if no button is tapped, keeping engagement alive.
02:35Visual Script Structure
Breaks down the entire logic into seven manageable subgraphs, showing how no-code AR effects are architected.
09:10Publishing Best Practices
A before/after thumbnail clearly communicates the effect's value to potential viewers.
14:36[00:02] you how to build an elemental aura effect using YouTube's Effect Maker. In this effect, users tap a button to transform with one of the five elemental powers. We'll be using the AI video switcher template and customizing it
[00:15] >> [music] >> Unlike the AI video transformation template, which runs a single video transformation, this one adds a button-based selection layer on top. Instead of just one result, users tap
[00:29] one of the five on-screen and each button maps to a completely different AI With this template, you can build themed switcher effects like these. By the end of this tutorial, you'll know exactly how to set up multiple video
[00:44] prompts, replace the button icons, and customize the template assets to match To get started, open Effect Maker on your browser and here select the AI video switcher template from the template gallery. Once you open the
[00:58] gives you an overview of the effect and ways to customize it. I'll click on got This template already comes pre-built with everything you need. It comes with five button icons, each connected with its own AI video prompt. It also has an
[01:14] animated GIF preview, so users know exactly what the transformation is going to look like before they even activate the effect. It also has a countdown and a flash object for the snapshot moment, and finally a full visual script that
[01:26] connects everything together. With all of these pieces in place, we can simply focus on customizing the effect. Now, here is your workspace. On the left, the objects panel shows all the objects in your effect. Just beside
[01:40] that, we have an assets panel, where your prompts and other effect assets are stored. Beside the asset panel, we have the scene view, which shows the visible objects. And here at the bottom, we have the visual script panel, which houses
[01:53] the logic that connects everything together. And finally, on the bottom where we can test the effect in real time. Let's see how the default effect I'll close the visual script area, and I'll scale up the preview panel. You'll
[02:07] notice that the effect preview is not visible. That is because it's hidden by default. So, I'll enable it first. I'll enable both effect preview and effect preview frame. When I restart the effect, you'll see the GIF play for
[02:19] about 3 seconds. This gives the user a visual hook. They can see an example of the transformation before it appears. And once the GIF fades out, five buttons Tap any one of these buttons, and the countdown starts. Then, a snapshot is
[02:35] taken, and the AI video generation begins. If you don't tap anywhere within the 5 seconds of the record trigger, the template automatically picks a random own. It is important to note that in the
[02:50] preview window here, the full flow happens in one go. But, on the phone, it works slightly different. On the phone, the effect records until the snapshot moment, and once the snapshot is taken, the recording stops, and you are taken
[03:03] to a generation page. And once the generation is complete, you are shown the generated video. I will hide the effect preview and the every time we make a change to the
[03:15] effect, the effect restarts, and the preview GIF keeps playing again and again. But, make sure you enable these before publishing the effect. Now, let's take a closer look at the objects that make up this effect. First is the AI
[03:28] video object. This is the canvas where the generated video plays back after the generation is complete. It also holds the camera snapshot canvas, which is the user selfie that gets fed into the AI video generation pipeline.
[03:42] Next is the effect preview. This is an animated GIF that plays automatically once the effect loads, giving users a preview of what the transformation is going to look like before they even activate the effect.
[03:54] Below that, we have the effect preview frame. It is just a thin black border which sits around the effect preview GIF. It adds a bit of visual polish to And next, we have the flash object. It is hidden by default and gets shown only
[04:09] during the snapshot moment. It's the visual signal that tells the user that the selfie has been captured. Next, we have the five button icons. DJ icon is the first button. This is mapped to the DJ themed AI video prompt. Similarly,
[04:23] the rest four buttons are also mapped to their own AI video prompt. Next, we have keyboard, drums, and then finally, saxophone. Each one of these buttons is a tap target. When a user taps one button, it tells
[04:37] the visual script which prompt to use for AI video generation. The icon is just the visual. The connection to the prompt lives in the visual script. And finally, we have the countdown. This is the text object that displays a 3-2-1
[04:51] the text object that displays a 3-2-1 timer once the button is tapped or once the auto generation fires. It gives users a brief moment to settle in into These are the building blocks that we'll
[05:03] customizing. The first and most important thing to do here is to replace all of these five prompts. To do that, I'll go to the assets tab. You'll see them listed under the prompts folder, one for each button. I'll set
[05:17] the DJ prompt, and in the properties panel, we'll see the video description field. This is where your prompt lives. This text is what gets sent to the AI along with the user snapshot. Let's start replacing this. I'm going to clear
[05:32] the existing prompt and type our fire prompt. I'll type the subject crosses their arms in front of them, then opens them, then a mythical golden and crimson
[05:45] energy aura glows around the outside edge of the subject's silhouette from The subject's eyes gradually shift into glowing orange ember. Fiery light pulses through the scene. The background radiates with intense
[06:01] supernatural glow. You'll notice that the prompt is a bit longer, but that is intentional because I want these actions to happen in a sequence. So, once you have your prompt ready, just click on preview AI video to check the
[06:15] preview AI video to check the generation. this template. The same principles apply here as the AI video transformation
[06:28] template. Describe the transformation as motion and action. Start with the subject and separate each action with a comma and use words like then to make sure actions happen sequentially. For a full deep dive on how to write
[06:42] AI video transformation tutorial where I've covered all of this in detail. I'll link it in the description down below. For now, I'll get back to writing all the remaining prompts. Once I've written my prompt, I'll also rename it to fire.
[06:57] Next, I'll select guitar prompt, clear the field, and write the prompt. And I'll rename this to water. I'll do the same for the remaining ones as well.
[07:19] you can see. Notice that fire, water, lightning, and air all use the same starting action where user crosses their arms and then opens. For earth, I've kept it slightly different.
[07:32] Once you add all the prompts and rename the items, make sure you download a preview video with one of these transformations, which will be later used for effort preview GIF. Now, let's swap these instrument icons for our
[07:44] element icons. In the assets panel itself, I'll right click on the DJ icon, icon. Once uploaded, I'll rename it to fire. I'll do the same for the remaining four
[07:58] icons as well. Now, I've replaced all of these icons. A quick tip here is when you're creating your new assets, make sure you make them in the same aspect ratio as the original icons. So, when you replace them, they
[08:11] fit perfectly without needing any external adjustment. Now, the last preview GIF. For that, in the assets tab itself, I'll select the effect preview asset, right click, select replace, and navigate to
[08:26] I'll select it and open. This GIF is the first thing that the user sees when they open the effect. It plays for about 3 seconds, so make sure you trim your video to 3 seconds and
[08:39] then convert it to a GIF. I used an online MP4 to GIF converter to convert my video into a GIF. I will also rename the button objects to I will also rename the button objects to keep everything organized.
[08:55] works. I'll scale down the preview panel and toggle the visual script. This is the full logic of the effect. but knowing the structure helps you customize it later if you want to.
[09:10] Section one here controls the effect preview GIF using this start node. When the effect loads, the GIF begins playing. After 3 seconds, it fades out automatically and shows the buttons. This gives users a moment to see what
[09:25] the transformation looks like before the buttons appear. The buttons also immediately become visible if the record is pressed or if the user taps anywhere on the screen. Doing so sets the button visible variable to true and hides the
[09:39] preview GIF and frame. You can see how the effect preview fades inside the effect preview subgraph. Section two is where the buttons get Once the effect preview fades out, a transition node fires.
[09:53] It drives the button opacity variable from zero to one over 1 second and also true. Section three is the button opacity subgraph. This is what makes all five element buttons appear on screen
[10:09] smoothly after the GIF. A frame update node runs every single frame and reads the current value of the button opacity variable. It then applies that value to all five button icons simultaneously, so they all fade in together at the same
[10:25] pace. Section four is the auto-generation logic. If no button is tapped after 5 seconds, this section fires automatically. A delay waits for 5 seconds from the
[10:39] moment the button becomes fully visible and the trigger is pressed. Then, an if node checks whether a button has already been tapped. If not, a random node picks a number between zero and six, which corresponds to one of the five prompts.
[10:54] That random index gets passed through and generation starts. This means the effect never just sits there waiting after it is triggered. It always runs. Section five is the button subgraph. This is where each button tap gets
[11:10] translated into a prompt number. There are five object tap nodes, one for each button icon. When a button is tapped, its tap node fires. An if node checks whether the generation
[11:24] has already been triggered. If not, a set variable node assigns the prompt index number to that button. Fire is index zero, water is index one, lightning is index two, air is index three, earth is index four. That index
[11:39] number is what tells the visual script which prompt to pull from generate. Section six handles three things in sequence. The countdown, hiding the buttons, and taking the snapshot.
[11:55] Once a prompt index is set either from a button tap or from auto-generation, this section kicks in. The countdown subgraph shows a 3-2-1 timer using a transition node. A number to text node converts that value so it
[12:11] can be displayed on screen as the countdown text. Simultaneously, the hide button subgraph fires five set visible nodes, one for hiding them all so the UI clears the frame for the snapshot. And once the
[12:28] countdown ends, the camera snapshot and the flash fire together. The camera snapshot node then captures the selfie of the user, which will become the input for the AI video generation. And finally, section seven is where AI
[12:42] video generation happens. A 1-second delay node gives the camera snapshot just enough time to finalize before anything is sent off. Then a get variable node pulls from the prompt list, and a get from list node
[12:58] uses the prompt index number to retrieve the specific prompt that was selected. These two inputs, the snapshot image and the selected prompt, are passed together into the create AI video node, which sends everything off to the
[13:14] generation pipeline. Once that fires, the effect ends and the recording stops automatically. You are taken out of the camera view and into the generation screen. This is where the AI is generating your video.
[13:29] result. That is the full logic. Now, let's preview our elemental aura effect. I'll close the visual script. I'll enable the preview GIF and preview frame.
[13:43] I'll restart the effect and click on one of the five element buttons. switch between different people in the preview window by clicking on the view
[13:57] video button to see how the effect holds across different faces. If any generation looks off here, you can always go back to the prompt, adjust it until you get the desired result. Now, to test the effect on your actual
[14:10] phone, click on this preview on phone button and scan this QR code. While testing on the phone, see where the buttons sit on the screen. Make sure there is no overlap between them or the YouTube UI icons.
[14:22] And also see how the generated video looks on mobile. This is the closest to how users will actually experience your effect. Once you're happy with your effect, click submit. It will ask you to upload an effect thumbnail.
[14:36] Click on upload image. Select thumbnail and click open. For AI video switcher effect, a good thumbnail shows the transformation paired with the original state. A clear before and after split works best here,
[14:49] just like what I have here. Click continue. Click continue. For the name, I'll type elemental aura. effect does and how it works. I'll write, "Tap an elemental button to
[15:03] write, "Tap an elemental button to transform with fire, water, lightning, air, or earth powered version of yourself." Keep the trigger as tap to start. Click submit. Your effect goes to
[15:17] YouTube for review. Once approved, it will be live on your YouTube channel. Congratulations, you've successfully created your custom AI videos with your effect. For more information on using effect maker, check out the links in the
[15:30] so much for watching. Don't forget to hit the subscribe button, and I'll see you in the next one. >> [music]
⚡ Saved you 0h 15m reading this? Transcribe any YouTube video for free — no signup needed.