
Junkyard Engine Swap - Will It Start?
42sThe suspense of installing a junkyard engine and the satisfying first start makes for a rewarding and shareable moment.
▶ Play Clip"Delivers exactly what the title promises: a detailed guide to prepping a car for endurance racing, with practical steps and lessons learned."
ChrisFix prepares his Lemons BMW for an endurance race, addressing reliability issues from the previous year. The video covers installing a junkyard engine, upgrading the exhaust, adding safety features like a quick-release steering wheel and kill switch, and making weight reductions. The goal is to build a bulletproof $500 race car that can survive a 16-hour race.
ChrisFix aims to prepare his Lemons BMW for an endurance race without blowing up the engine, learning from last year's failure.
Installed a 140,000-mile junkyard engine from a BMW X5 to replace the original 240,000-mile engine. The new engine starts and runs smoothly.
Learned that getting seat time in the car before the race is crucial to ensure the engine lasts and drivers are prepared.
Replaced stock exhaust with full-length stainless steel headers found on eBay for under $500, saving 20-30 lbs and improving sound.
Conducted a 4-hour test day to try to break the car. Discovered the exhaust is very loud, and experienced a ticking sound due to collapsed lifters from oil thinning.
Installed a quick-release steering wheel for easier entry/exit and safety in case of fire. Detailed steps include removing airbag, breaking bolt loose, using thread locker, and torquing to spec.
Installed a master kill switch to cut all power, accessible from driver and outside. Demonstrated that it kills the engine instantly above 3000 RPM.
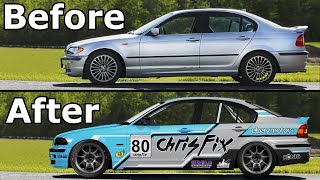
Redesigned the car's livery with a professional Soapy Wooder theme, properly displaying sponsors like eBay Motors and Peak Performance.
Installed oil pressure, oil temperature, and coolant pressure gauges to monitor engine health. Tapped into stock sensor location using an oil sensor manifold.
Added wheel studs to hubs for quicker wheel changes. Considered a performance item, costing $50, and installed with high-strength thread locker.
Replaced inadequate plastic firewall cover with a steel plate to better seal the hole, also welding shut the AC hole for weight reduction.
Installed a heel plate and throttle pedal to fix the driver's floor area, using riv-nuts for secure mounting without welding.
Removed door glass, motors, regulators, rear seats, sound deadening, and heavy exhaust components, saving a total of 185 lbs, offsetting the roll cage weight.
Sold old exhaust manifolds on eBay for $500, offsetting the cost of headers and keeping within budget.
Collaborated with AirShaper to analyze drag. Found that closing rear windows reduces drag and lift, improving efficiency.
Installed polycarbonate (Lexan) rear windows for better aero and rain protection, as glass is not allowed. Found on eBay for $100.
Drained 5w40 oil and replaced with fully synthetic 10w60 to prevent thinning under high heat, reducing risk of engine failure.
Received a backup engine from Elite Motorworks, built for reliability with factory upgraded parts, but not installed to stay within budget.
Car is ready for the race, having fixed last year's issues. Next video will cover the 16-hour endurance race.
The video demonstrates a comprehensive preparation process for an endurance race, focusing on reliability, safety, and weight reduction. By learning from past failures and making strategic upgrades, ChrisFix aims to complete the 16-hour race without mechanical failure.
What was the cause of the engine failure last year?
A spun bearing from lack of oil pressure due to oil thinning out.
06:26
What oil weight was used for the race and why?
10w60 fully synthetic, because it's thicker and less likely to thin out under high heat.
16:53
What is the penalty for exceeding the $500 budget in Lemons racing?
Each $10 over the budget results in one penalty lap.
08:42
Why are wheel studs considered a performance item and not a safety item?
Because they make wheel changes quicker, which is a performance benefit, not a safety feature.
08:27
What is the purpose of the quick-release steering wheel?
To allow the driver to exit the car quickly and safely in case of fire or emergency.
04:06
How much weight was saved by removing door glass, motors, regulators, rear seats, and sound deadening?
Approximately 185 lbs.
12:48
What did AirShaper's analysis show about closing the rear windows?
Closing the rear windows reduces drag and lift, making the car more efficient.
14:13
What type of material is used for the rear windows and why?
Polycarbonate (Lexan) because it doesn't shatter into dangerous pieces like glass.
15:25
Junkyard Engine Swap
Shows a practical solution to replace a high-mileage engine with a lower-mileage one for reliability.
00:14Test Day Importance
Emphasizes the value of testing to identify issues before the actual race.
02:09Gauge Installation
Demonstrates how to monitor critical engine parameters to prevent failure.
06:26Weight Reduction
Quantifies the weight savings and how it offsets the roll cage weight, improving performance.
13:02Aerodynamic Analysis
Uses CFD analysis to make data-driven decisions about window configuration.
14:43[00:00] Hey guys ChrisFix here and today I'm going to show you how we got our Lemons BMW, that way the engine won't blow up 15 laps into the race, So clearly last year's race didn't go very well,
[00:14] but we learned a lot so this year we're going to be prepared, and let me show you what we've done. All right, so first we started off installing our 140 000 mile junkyard engine from a BMW X5 to replace the original 240 000 mile engine that came with the car.
[00:28] And now with the new junkyard engine installed in the car listen to this... So she starts up on the first try nice and quick she idles nice and smooth and she drives great so we are ready to race!
[00:42] thing we learned is we need seat time in this car before our next endurance race. Everybody needs to go and do a bunch of laps and be on it that way we know the engine's gonna last
[00:55] We also learned that this car is way too quiet with the stock exhaust so listen to this... So that sounds really good and how we did this was we got stainless steel
[01:12] full length headers and you're probably like Chris but there's a $500 budget, I found them on eBay, full length stainless steel headers. So we have headers, we have the rest of the stock exhaust,
[01:27] which not only saved us 20-30 pounds, but it also makes this car sound awesome! so I asked you guys to vote on your favorite exhaust tip style in a poll...
[01:40] I got to work running the pipes to fill the area where the muffler used to be, I also welded an exhaust hanger and don't worry I ended up cutting off that bottom extra bit,
[01:54] but I was just too excited and I wanted to show you guys how awesome this came out! and you guys picked out an awesome style exhaust tip, it looks so good! All right so next up we went to Raceway Park to do a test day where we beat on
[02:09] this car over and over and over to try to break it for 4 hours straight. This is when I learned the exhaust actually doesn't sound that great (obnoxiously loud car exhaust sounds)
[02:25] Ari: The car feels great, it really does... ChrisFix: Excited for the race? So each of us got in the car to get some experience,
[02:41] (tires screeching) And then finally we had our first problem, something nobody wants to hear... what's that ticking sound?
[02:56] Luckily the diagnosis was collapsed lifters from the oil thinning out Right now the oil is 5w40 which is really just made for street use.
[03:09] Aaron: I was pushing the car super hard just like, at redline every shift, Okay, so after our track day we realized how difficult it was to get in and out of
[03:21] So I made a video on how to install a quick release steering wheel, First you need to pop out the airbag and remove the electrical connectors Next you need to break the bolt loose which holds the steering wheel in,
[03:36] Then with the tug, the wheel comes right off... and it's important you add medium strength thread locker to the bolt Then you want to torque down that bolt to spec.
[03:51] and tighten it down in a crisscross pattern to evenly seat that onto the hub. Next the quick release could be attached and that just snaps in... like that. And finally the steering wheel could be bolted on, again tightening the bolts in a crisscross pattern
[04:06] And check it out now we could quickly remove the steering wheel to get out of the car a lot safer and easier just in case there's a fire or something when we race. Next I made a full in-depth video to show you guys how to install a
[04:20] First I showed you what wires that we need to cut and how to properly crimp together those thick gauge wires so that they make a good electrical connection just like from the factory. Then I showed you how to run them to a switch on the driver's side that's easily accessible
[04:34] from the driver strapped into the seat and from a track worker who's outside of the car. that you don't have any problems with reliability. so I showed you guys the process of making a bracket from a template,
[04:50] suppression switches and here's the end result... (engine starting noises) All right so I let the engine idle for a few minutes and she's running
[05:05] (loud revving noises) on the track we need to be able to rev our engine over 3000 RPMs and hold it there,
[05:17] switch off and make sure the engine dies quickly so let's give it a try. Let's get our RPMs above 3000 RPMs and hold it steady.. All right now that's what I'm talking about!
[05:30] we flipped the switch, and it killed everything instantly, and we have no power at all, So after installing the kill switch we needed to address a very weak livery from last year.
[05:45] Yes, we did get the sponsors on the car for the race but let's be real You guys know how I like to go above and beyond, So out with the old...
[06:00] That is more like it! So now we had a professionally designed livery that went with the theme of our team: And just look at this car! Not only does the Soapy Wooder theme look great
[06:13] but we have all the team sponsors including the main sponsors, eBay Motors and Peak Performance, properly displayed on the car in a way that looks amazing. And my favorite part is the roof with the Soapy Wooder decal for my spray bottles.
[06:26] So with the amazing livery done, we only had a few days until the race and Last year we figured out the engine blew up due to a spun bearing from a lack of oil pressure, So this year we installed gauges to give us oil pressure, oil temperature, and coolant pressure.
[06:41] To get the oil temperature and oil pressure we tapped into the stock oil pressure sensor location So all we had to do is remove the OEM sensor. we have this oil sensor manifold which accepts up to three sensors total.
[06:56] So all we had to do is tighten down the banjo bolt into the stock sensor location, and then we could add the smaller temperature sensor and hand tighten it, place so that those copper crush washers crush and prevent leaks.
[07:12] in and then snug up all the sensors with the wrench so they won't leak. harnesses from the gauges right to the sensors, and with the engine running we have oil temperature on the left at 191°F
[07:28] and the pressure is in the middle at 53 PSI and we're at about 3000 RPMs. because we couldn't get the correct adapters in but the oil pressure and temperature are the most important ones
[07:44] Next up, I wanted to add wheel studs to the hubs because BMW's hub design Let me show you what I mean. So let's remove all the lug bolts and yes I said lug bolts not lug nuts,
[07:57] but watch how difficult it is to put back on because there's no studs. holes and then get it into the center of the hub. and it's just not quick and it's not easy to do.
[08:13] we're going to install studs into these holes just like on a normal hub and then the wheel could go on that and then you could put lug nuts on and then tighten it down. Now I would consider these wheel studs a performance product and not a safety product
[08:27] off quicker which will hopefully mean that we'll be able to get more laps in. So because of that, this does count towards our $500 budget. or something that has to do with keeping the driver safe,
[08:42] that doesn't count towards that $500 budget but performance items do and every $10 over that $500 budget is one penalty lap. and to do that I went on eBay Motors and I found wheel studs that fit the
[08:58] and they're only $50 so we stay under budget. know is if you get your parts and they're not as described So remember that just just in case and with that
[09:14] It's a perfect fit, especially for this Lemon build where we're trying to save So let me show you how to safely install these studs into the hub. into the hub and it's very important to use high strength thread locker.
[09:31] need to remove with heat that way these don't back out by accident. So first let's lay a bead of thread Locker along the threads and you don't need to use a lot here. Now we could just hand tighten the stud into the hub and then we're good to go.
[09:45] just hand tighten each one into the hub all the way, and then we can torque each one of these down to spec which for these is 25lb-ft. And look at how much quicker and easier it is to
[09:59] And then finally we could torque down the lug nuts to spec. and then we want our thread locker to cure before we go for a test drive. Next up I had a safety concern that I wanted to address which was this plastic piece that
[10:14] barely covered the huge hole in the firewall. So I removed this less than adequate plastic and you can see how large that gap is in the firewall so I used this plastic piece as a template to cut out a piece of steel,
[10:27] But first we removed the air conditioning for weight reduction and this left a hole And with that hole welded shut and painted to prevent rust then we installed that steel firewall block off plate I cut out
[10:42] and you can see this does a much better job at closing up that huge hole in our firewall. Another thing we have to do is down here at the driver's side floor. because there used to be a piece of foam here and then carpeting on top
[10:55] Even where the brake is you only have this so we need to fix that. eBay Motors for a $100 and I made them a $75 offer and he accepted.
[11:10] Now while this is made for an E46 BMW, That's because our transmission tunnel on the all-wheel drive There's a little hump to make room for a transfer case, but this is a simple fix.
[11:26] Then with the heel plate removed, I drilled two holes in the floorboard covered the holes in some paint to prevent it from rusting and then used a riv-nut tool to install the riv-nuts into the floor of the car.
[11:44] And riv-nuts are a great way to install threaded inserts without having to weld. the bolts that hold this in place so it's secured. And the last thing to do is install the throttle pedal, and I want you guys to remember this...
[11:59] Remember that! You'll see why in the next video... have somewhere to put our feet so we could comfortably control the pedals. so let me show you some more stuff we removed because it's
[12:16] So we took out all the glass from the windows on the doors and that's about 40lbs. We took out all the motors and window regulators that's another 15lbs. we're not going to need this so that's another 40lbs, this thing weighs a ton.
[12:34] and this is about 20lbs of sound deadening. steel headers in which weigh 10lbs but these weighed 30lbs plus we removed our 30lb muffler so we saved 50lbs.
[12:48] each to the Konig countergram wheels which weigh 18lbs each so in total we saved 185lbs which is almost
[13:02] exactly what our roll cage and fire suppression system weigh. Now since we installed headers which is a performance upgrade it was only $100 bucks but still every little bit counts, we don't want any penalty laps,
[13:18] exhaust manifolds so I put them up on eBay for $500 so now we have an extra $500 to play with
[13:30] And now I'm gonna go ship these out to the new owner... Alright so the next thing we need to do before we get to the racetrack Actually there are a couple of you who said "hey running with your windows open
[13:44] air is going to come in here and get trapped" and you're actually 100% right check this out... A YouTube channel called AirShaper reached out to me and ran two aero-models for the
[13:56] Lemons BMW this model you're looking at right here has both side windows open. and you can see how much drag the side windows create. rear window closed and you can see with this model there is a lot less drag.
[14:13] the airflow towards the rear of the car is disrupted. So in summary, if the rear window is closed there's less lift and
[14:25] Also the car is more efficient with a smaller drag coefficient and although they're not huge changes every little bit counts in a 16 hour endurance race. leave a link to his channel in the description if you guys like aero I think you'll like it.
[14:43] but we're getting lift on our rear end which is not good. We can't run glass, you're not allowed to run glass on the side windows because
[14:55] it is tempered glass and if it shatters it breaks into little pieces it's dangerous for the driver You have to run your front laminated windshield, you can't run anything here on the driver's side because if there's a fire
[15:07] there can't be anything blocking this so this has to stay open no matter what but the rear windows, since we have a sedan, these could be closed off. This is polycarbonate, it's a piece of plastic that doesn't shard, it doesn't
[15:25] break into small pieces in an accident, it stays together and is allowed to be run on this car. but once we get this installed we could take that coating off So we could install this to give us some better aerodynamics
[15:40] So to keep within budget again I found these on eBay Motors for $125 and I offered the guy $100 and he took it and that keeps us under the $500 budget. So to install these just get it into the window channel where the glass window would normally sit.
[15:53] and then now we can tighten down the two screws on the support pillar here and then the two screws on the bottom window channel and that's bolted in. And finally my favorite part the reward of pulling off that protective shipping coating
[16:07] and check it out so now we have our side Lexan for both rain protection and also so we have better aero giving us a little bit more down force and just more efficiency in general. things and that is drain out all the 5w40 oil which is the stock spec for this car.
[16:26] And as that's draining let me show you why this is so important So our engine failure last year was from our engine oil getting hot, thinning out, and add that to our very worn out 240,000 mile engine we probably had low oil pressure
[16:41] and that happens so quickly that our number So to make sure this doesn't happen again with our junkyard engine we drained out all the oil
[16:53] and installed a brand new oil filter and added a fully synthetic 10w60 oil that's pretty thick. That way if the oil does thin out after 16 hours of beating on this thing
[17:07] And with our oil change this is perfect timing the delivery truck just pulled up And look what arrived just in time.
[17:21] Okay this is definitely, our BMW motor from Elite Motorworks. I cannot wait to see what's inside this so let's unscrew the box and let's get in and check it out. Okay let's see what we get we have a brand new engine it's like Christmas
[17:38] Here goes the reveal... holy smokes check that out that is so cool! Motorworks built for us just in case we need to swap it in.
[17:52] It was torn down to the bare block and put back together with all factory upgraded parts. Not to make more power but instead to be the most reliable BMW engine out there. I'd love to swap this thing into the car now but unfortunately that would
[18:05] put us way over that $500 limit and it doesn't fit the whole purpose of Lemons. So with that our car is ready we took all the mistakes and shortcomings from last year learn
[18:17] from them and fix them to give us the most bulletproof $500 Lemons BMW we could build. So everything's all packed up and we're ready to head to the track and in the next video we're gonna find out if we can make it through the entire 16 hour endurance race.
[18:30] and if you're not subscribed consider hitting that subscribe button, that way you can see if we make the ultimate comeback or if we end up failing again!
⚡ Saved you 0h 18m reading this? Transcribe any YouTube video for free — no signup needed.