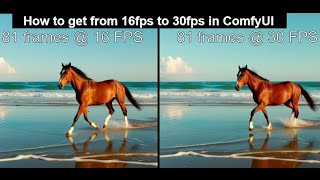
16FPS vs 30FPS: See the Difference!
35sThe side-by-side comparison visually demonstrates the improvement, making viewers curious about how to achieve it.
▶ Play ClipThis tutorial demonstrates how to increase video frame rate from 16 FPS to 30 FPS in ComfyUI using the ComfyUI-Frame-Interpolation node. Frame interpolation creates new frames between existing ones to make video playback smoother.
81 frames at 16 FPS is jagged, while the same frames at 30 FPS is smoother and better.
Frame interpolation creates new frames between existing ones to make video playback smoother and more fluid.
Go to Manager > Custom Nodes Manager, search 'interpolation', and install 'ComfyUI Frame Interpolation'.
Use three nodes: Video Upload, VFI RIFE (frame interpolation), and Video Combine (output). Set output to 30 FPS and H.264.
Add the interpolation and combine nodes to an existing text-to-video workflow to automatically create a 30 FPS output.
Frame interpolation in ComfyUI is an easy way to improve video smoothness. The method works well for the creator and may work for others too.
"Title accurately describes the tutorial content; delivers exactly what it promises."
What is frame interpolation?
A video processing technique that creates new frames between existing ones to make video playback smoother.
0:24
What node is used for frame interpolation in ComfyUI?
ComfyUI-Frame-Interpolation node (VFI RIFE).
0:50
What are the three nodes needed for the interpolation workflow?
Video Upload, VFI RIFE, and Video Combine.
1:10
What output settings should be used for the Video Combine node?
30 FPS and H.264 format.
1:54
Visual comparison of frame rates
Clearly demonstrates the benefit of higher frame rate for video smoothness.
Definition of frame interpolation
Provides a clear, concise explanation of the technique.
0:24Simple three-node workflow
Shows how easy it is to implement frame interpolation in ComfyUI.
1:06[00:00] Hello folks. On the left is 81 frames at
[00:03] 16 frames pers and on the right is the
[00:06] same 81 frames at 30 frames pers. The
[00:10] right is clearly smoother, less jaggedy,
[00:13] much better. So if you're creating
[00:15] videos in Comfy UI at 16 frames pers,
[00:19] there's a very easy way to upscale these
[00:21] to 30 frames a second.
[00:24] What is frame interpolation? Frame
[00:26] interpolation is a video processing
[00:28] technique that creates new frames to
[00:30] insert between existing ones, making
[00:33] video playback appear smoother and more
[00:35] fluid. So, it's actually making up fake
[00:38] frames in between.
[00:40] All right. Firstly, you want to check
[00:42] that you've actually got the
[00:43] interpolation node. So, click on manager
[00:47] and custom nodes manager. In the search,
[00:50] you type interpolation.
[00:55] And this is the one you want here. Come
[00:57] for UI frame interpolation. I've already
[01:00] got it installed. But if it's not
[01:02] installed for you, then do the install
[01:04] like it says on these other ones. Okay.
[01:06] Once that's installed,
[01:10] let's build a quick workflow with the
[01:11] three nodes we need. We're going to use
[01:13] a video upload node, the conversion
[01:15] node, and then output node. So, we're
[01:18] going to double click
[01:21] uh video
[01:24] upload.
[01:25] Yeah. And have that one there. There we
[01:28] go. Now, we want our frame
[01:30] interpolation. So, right click, add
[01:33] node,
[01:35] come UI frame interpolation. VFI
[01:39] re VFI. There it is. Join that to that.
[01:44] And now we want an output. So, we're
[01:47] going to go for a scroll down the video
[01:50] helper suite and the video combine.
[01:54] Turn that to six uh 30 frames.
[01:58] There we go. Change that to H.264.
[02:03] Uh, and we're done. So, let's load up.
[02:06] This is one I was working on earlier. My
[02:08] Duke Nukem video. Never made the cut.
[02:11] So, let's choose a video. So, our 16
[02:14] frames per second. There we go. And that
[02:17] is it. All we got to do is run it.
[02:26] Okay, that's um that's finished. There's
[02:28] our 30 frames. So, let's go and look at
[02:30] that in Explorer.
[02:34] Here we go. That one there.
[02:40] Lovely. Tools,
[02:42] codeex. Here we go. 30 frames pers.
[02:48] Job done.
[02:51] Okay. So, let's join that to um an
[02:54] existing workflow. So, here's our I got
[02:56] a text to video workflow here using
[02:58] Fusion X. Um it's creating a 81 frame
[03:03] output 640x 640 just for the purpose of
[03:07] demonstration and it's a 16 um frames
[03:10] per second. So all we've got to do is
[03:15] rightclick add node
[03:19] come UI frame interpolation VFI
[03:23] rife vfi. There it is. There you join
[03:26] the VA code onto there. Add a video
[03:30] combine.
[03:33] Where are we down here? Video helper
[03:35] suite video combine.
[03:38] Join that to that.
[03:40] Turn that to 30
[03:42] frames pers.
[03:45] Uh, turn that to
[03:48] H.264 output.
[03:52] Sorry, wrong one. There we go. That one
[03:54] there. And it will not only will it
[03:56] create the 16 frames per second one, it
[03:58] will then go on to create the 30 frames
[04:00] per second output. I hope that was a
[04:03] useful exercise, guys. Um, it certainly
[04:05] made my video outputs better now, and
[04:07] that's what I'm going to be using from
[04:09] now on. Uh, it may not be the best way
[04:11] to do things, but it's the way that I
[04:13] found that works for me. So, I hope it
[04:16] works for you, too. Goodbye.
⚡ Saved you time reading this? Transcribe any YouTube video for free — no signup needed.