Compressor vs Limiter: What's the difference?
30sClarifies a common confusion in audio production, perfect for beginners.
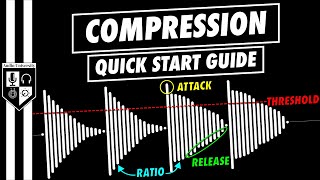
▶ Play ClipThis video explains the core concepts of audio compression, focusing on controls like threshold, ratio, attack, and release using the FAB filter Pro C2 compressor. It clarifies how compression reduces dynamic range by turning down loud parts relative to quiet parts, then using makeup gain to boost the overall level.
Dynamic range is the difference between the quietest and loudest portion of a signal; compression reduces this range by turning down loud parts relative to quiet parts.
Compressing alone reduces overall level, but boosting after compression leaves a louder signal by turning down loud parts and bringing everything up together.
Threshold is the point where compression starts; with threshold set to zero and ratio 1:1, no compression occurs even on loud peaks.
Ratio determines compression amount past threshold; 4:1 means for every 4 dB over threshold, only 1 dB passes. Beyond 10:1 it's considered limiting.
Gain reduction meter shows how much the signal is reduced; gray lines show I/O levels, red line shows reduction over time.
Lowering threshold or increasing ratio increases gain reduction; setting threshold to quiet peak with high ratio creates a brick wall limiter.
Some compressors (e.g., UA 1176) have fixed threshold; you boost input signal level up to threshold instead.
Makeup gain turns up overall signal after compression; example: bring up quiet hits without loud hits clipping (0 dB in digital).
Attack determines how fast compression begins; ranges 0.005–250 ms. Fast attack crushes transient; slow attack lets transient through. Release sets recovery time (10–2500 ms).
Knee softens or hardens compression around threshold; softer knee gives more transparent compression. Hold prolongs gain reduction before release begins.
Wet signal is compressed output; dry is input. Blending preserves transient while adding thickness (parallel compression).
Compression is essential for controlling dynamic range; mastering threshold, ratio, attack, release, knee, and parallel compression enables transparent and powerful audio shaping.
"The title accurately reflects the content; the video teaches threshold, ratio, attack, release, and more using a detailed demonstration."
What is dynamic range in audio?
The difference between the quietest and loudest portion of a signal.
What does a compressor do to dynamic range?
Reduces dynamic range by turning down loud parts relative to quiet parts.
How can compressing and then boosting produce a louder signal?
Compress first (reduce loud parts), then use makeup gain to bring everything up together.
00:14
What is the threshold on a compressor?
The level at which compression starts.
01:14
What does the ratio control determine?
How much compression occurs when signal exceeds threshold; e.g., 4:1 means 4 dB in yields 1 dB out.
01:30
What ratio defines a limiter instead of a compressor?
Greater than 10:1.
02:44
How do fixed-threshold compressors like the UA 1176 work?
No threshold adjustment; you boost the input signal up to the threshold using input gain.
03:02
What is the purpose of makeup gain?
To turn up the overall signal level after compression to compensate for reduction.
03:31
What does the attack control set?
How quickly the compressor begins compressing once signal exceeds threshold (range 0.005–250 ms).
04:24
What does a fast attack do to a transient?
It clamps down on the transient quickly, crushing it.
04:38
What does the release control determine?
The time the compressor takes to recover after compressing (10–2500 ms).
05:06
What is the hold control on a compressor?
It prolongs the gain reduction before the release begins.
05:31
What is the knee setting used for?
To soften or harden compression around the threshold (softer knee = more gradual/transparent).
05:48
What is parallel compression?
Blending the compressed (wet) and uncompressed (dry) signals to preserve transients while adding thickness.
06:12
Dynamic Range Definition
Foundational concept for all audio compression; essential for understanding the whole video.
Ratio Mechanism Illustrated
Clear numerical example (4:1) makes the abstract ratio control tangible.
01:30Fixed vs. Adjustable Threshold Compressors
Highlights a common real-world difference in compressor design, helping users avoid confusion.
03:02Attack/Release Transient Shaping
Explains how attack affects transient preservation, which is critical for genre-specific compression.
04:12Knee Setting for Transparent Compression
Describes how a softer knee creates more natural compression, a nuance often overlooked.
05:48[00:00] Dynamic range refers to the difference between the quietest and loudest portion of a signal. The most basic use of a compressor is to reduce the dynamic range by turning down the loud parts in relation to the quiet parts. This has the effect of smoothing out the signal level throughout
[00:14] the performance. The action of compressing a signal alone will reduce the overall signal level, but when you boost the signal after compressing it, you'll be left with a louder signal than you started with. That's because you're turning down the loud parts in relation to the quiet parts
[00:28] and then bringing everything up together. Let's take a look at the controls that you'll commonly find on a compressor and how to use them. I'll be using one of my favorite compressors for this demonstration, the FAB filter Pro C2. You'll find a link for that compressor in the description below
[00:42] the video if you want to try it out for yourself. The reason I love this compressor so much is because it sounds great, it's very flexible, and the metering is unmatched. For the sake of visualizing and understanding what a compressor actually does, let's start with a snare drum track that I put together.
[00:58] You can see and hear that these snare drum hits alternate between quiet and loud. Right now, the compressor isn't doing anything because the threshold is set to zero, and the ratio is set to one to one. The threshold is the point at which the compressor will start compressing. With the
[01:14] current setting, even the loud snare hit doesn't exceed the threshold, hence the compressor isn't doing anything. Let's turn the threshold down so that the peaks of the signal reach it. Still, nothing is happening, and that's because we need to set the ratio. The ratio determines how much compression
[01:30] will occur when the signal level exceeds the threshold. Right now, it's set to one to one, which means that for every one dB past the threshold, one dB will pass through. Again, this amounts to the compressor doing nothing. But if we set the ratio to four to one, we'll start to see some action. Now, for every four
[01:48] dB past the threshold, only one decibel will pass through. Over here, we see the input signal level on the left, the gain reduction level in the center and red, and the output signal level on the right.
[02:00] The gain reduction meter tells us how much the compressor is actually reducing the signal level. These gray lines show the input and output signal level over time, while the red line shows the gain reduction over time. Maybe you're starting to see why I like this compressor so much, especially as a
[02:16] teaching tool for teaching what a compressor does. Let's play around with the threshold and ratio settings before moving any further. We'll see more gain reduction anytime we lower the threshold
[02:30] or anytime we increase the ratio. Let's say I want to make the loud and quiet snare hits the same level. I'll set the threshold to the peak of the quiet snare hit so that the quiet snare hit
[02:44] isn't reduced much at all. Then I'll set the ratio as high as possible, effectively creating a brick wall limiter that doesn't let any sound pass the threshold. By the way, this is considered a limiter rather than a compressor because the ratio is greater than 10 to 1. I want to take a moment
[03:02] to mention that some compressors don't have a threshold adjustment, but instead have a fixed threshold. This is the case with the classic UA1176 and any plugins that model it. Instead of bringing the
[03:14] threshold down to the signal level in these cases, with these compressors, you'll boost the signal level up to the threshold using the input gain knob. Okay, back to the fab filter proceed to. So far, we've just turned down the louder parts, making the track overall quieter, but you might be
[03:31] thinking I thought compressors were used to make things louder. Well, this is where makeup gain control comes into play. The makeup gain control is used to turn the overall signal level up to make up for the
[03:43] reduction we've applied with the compressor. I find it helpful to think about it this way. If we wanted to make the quiet snare hits louder, we could just turn up the overall level, but then the louder snare hits would exceed 0 dB, which would cause clipping in a fixed point digital system,
[04:00] or some distortion in an analog system. This is why we use a compressor to turn the loud hits down and use the makeup gain to turn everything up. If all this makes sense so far, leave me a comment that
[04:12] says I understand ratio and threshold. Next, let's look at the attack and release controls. The attack knob determines how quickly the compressor will begin compressing once the signal level has
[04:24] exceeded the threshold, and this compressor's attack ranges from 0.005 milliseconds to 250 milliseconds. When I was trying to crush that loud snare drum hit down to the same level as the quiet snare drum hit,
[04:38] I used a very fast attack time, but you may sometimes want to let the transient through and only compress the tonal part of the signal. The transient is the high amplitude short duration sound at the
[04:51] beginning of the waveform. The tonal part of the sound comes after the transient. Using the attack on a compressor, you can decide if the compressor will quickly clamp down on the transient, or if it will let the transient through and only kick in during the tonal part of the sound.
[05:06] The release knob determines the time the compressor will take to recover after compressing. The release time on the FAB filter Pro C2 ranges from 10 milliseconds to 2500 milliseconds. A fast
[05:18] release time will recover more quickly, while a slow release time will take a little bit longer to recover. The whole adjustment controls how long the peaks and gain reduction will be sustained.
[05:31] While the release will usually begin right after the peak and gain reduction, the whole time can push that back in time so that the gain reduction is prolonged before the release begins. To visualize the knee setting, I think it's easier to look at a more traditional compressor
[05:48] plug-in layout. On this graph, the input signal level is shown on the x-axis and the output signal is shown on the y-axis. The threshold is the point where the line bends while the ratio determines
[06:00] how much the line bends. That brings us to the knee setting which can be used to soften or harden the compression around the threshold. A softer knee will generally create a more gradual and transparent
[06:12] compression. Many plug-ins have a wet dry knob for parallel compression. The wet signal is the signal at the output of the compressor that's been compressed, and the dry signal is the signal at the input of the compressor before it's been compressed. You can sometimes achieve a more realistic
[06:29] product by blending the two together, preserving the transient of the dry signal while adding in the thickness of the compressed wet signal. This is called parallel compression and I'll go into more detail in the future video. You can find links to all of these plug-ins in the description below
[06:44] this video. I hope you enjoyed the video. If you did, hit the like button and watch the video that's on your screen now. I'll see you over there.
⚡ Saved you 0h 06m reading this? Transcribe any YouTube video for free — no signup needed.