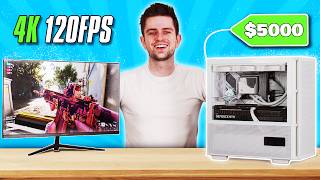

Building a $5000 Editing Beast
45sTech enthusiasts love extreme PC builds, and this segment showcases the insane specs and the promise of a crazy build.
▶ Play Clip"The title promises a 'crazy' build and the video delivers with impressive specs and performance tests, though some parts feel like a sponsor showcase."
The video documents the building of a high-end PC for video editing and gaming, featuring an Intel Core i9-14900K and an RTX 4090, sponsored by DeepGlue. The host tests the system's performance in 4K gaming and video editing, highlighting the benefits of the new hardware and a fast external SSD for workflow improvements.
The host introduces two new full-time team members, Dana and Matthias, and explains the need for a new powerful PC due to the studio's 8K and 4K cameras. The build is sponsored by DeepGlue, who provided a PC with a 4090, 128GB RAM, and 14TB SSD.
DeepGlue contacted the host to promote a cooler, but the host negotiated a full PC build including a 4090, 128GB memory, 14TB SSD, and an anime-themed case. The PC also includes the newest Intel Core i9-14900K, a 24-core CPU.
The host unboxes the case and expresses excitement about the built-in info display showing CPU and GPU usage. The build process begins, with the host noting the aesthetic appeal of the components.
A cable issue with the CPU cooler is resolved. The host installs the RTX 4090, noting its size and weight, and connects a 600W power cable. The host also installs a 10GB network card for faster server connections.
The host tests the PC with games like Call of Duty and Alan Wake in 4K. With ray tracing off, the system achieves around 58 FPS, but with ray tracing on, performance drops. The host also tests the 240Hz OLED UltraWide monitor.
The host sets up a scratch drive using two unallocated NVMe drives for video editing. The host plans to export a video project on the new PC and compare export times with the old one, expecting a 3-4x speed increase.
The host thanks DeepGlue for the PC and mentions the Samsung T9 SSD for organizing footage. The video ends with a call to action to like, subscribe, and watch the next video.
The video showcases a high-performance PC build that significantly enhances gaming and video editing capabilities. The host emphasizes the practical benefits of the new hardware, including faster export times and smoother 4K gaming, while also promoting the sponsor's products.
Sponsorship Deal
The host negotiated a full PC build in exchange for promotion, showcasing the value of influencer-brand partnerships.
00:264K Gaming Performance
Demonstrates the RTX 4090's capability to handle 4K gaming at high frame rates, a key selling point for the GPU.
07:24Storage Setup for Editing
Shows a practical technique for combining NVMe drives to create a fast scratch drive, useful for video editors.
08:35[00:00] Since this month I have two full time team members here in the studio. One of them is Dana, she's filming me right now. And the other one is Matthias who will be editing most videos from now on. However, we do have a big problem here in the studio.
[00:13] One of our cameras is 8K and the other ones are all 4K. And that means that my old gaming PC which Matthias is currently using to edit these videos is definitely not strong enough. So we're building a crazy gaming and editing beast.
[00:26] So initially Deepcool contacted me to promote this cooler here. Which by the way looks amazing. However I replied to the email and I said that I would make the video. If they could send me a whole PC with a 4090, 128GB of memory, 14TB of SSD storage and of course a cute anime non-title game.
[00:46] I wanna start with unboxing the case. By the way I forgot to mention that we also have the newest Intel Core i9-14900K just released. It's a 24 core CPU. Matthias is gonna love this for editing.
[00:59] This feels like Christmas, however it's Christmas for Matthias and not for me. The cage looks absolutely amazing. I'm really looking forward to checking out this info display. CPU usage, GPU usage, I really want to see the numbers appearing here when the PC gets turned on.
[01:14] Now one of the reasons I'm so excited about this build is that Deepcool is sampling all white parts. Even the power supply is completely white so this build is going to be really clean. By the way, not sure if you've seen it already but there's an anime girl on our motherboard.
[01:28] And I think we have a limited edition, so I definitely wanna check that out. However, before we dive into the whole build, I wanna quickly thank the sponsor of this video, OWNZ. Want to livestream but not spend days on finding great stream graphics?
[01:40] OWNZ Pro is the ultimate stream graphics companion. It now features the Scene Builder, which allows you to very quickly set up a complete overlay by choosing one of their free or premium designs. After personalizing your overlay, you can add it as a browser source in OBS Studio and boom!
[01:55] You have your first complete streaming scene. You can also add your own stream graphics and with their live widgets, labels like recent follower are easily customizable to fit your design. And it gets better because Owned Pro now also features a new AI assistant.
[02:09] You can ask it any streaming related questions, for example, ideas for channel point rewards. Owned Pro is completely free to use but in case you wanna upgrade, there will be a discount code in the description. Now for the motherboard, apparently we got a wifey edition from China.
[02:24] Even if we open it up, on the inside there's an anime girl greeting us. And I did look for this motherboard online, the Wi-Fi S version. I can't find it anywhere. Now I'm not a hundred percent sure, but what I assume is that this is a China version.
[02:37] Because as you can see, even on the motherboard itself there's an anime girl. And you can look it up yourself, the only thing I found is a Reddit post of someone asking where he can get this version And even on that version from the Reddit post the girl isn on the motherboard itself it only on the box look at this even the cpu protector has a girl on it there are also stickers in the box and then
[02:57] this here a plastic cutout to put in your case so there are two parts i think we can push this out i definitely don't want to break it okay and then we can just push it in like this and then it can stand in our pc case
[03:11] so the first thing i'm going to quickly install is the memory together we have a 128 gigabytes it's also RGB so it's gonna be really clean in this case this is gonna make sure that even from your pro will be smooth and I think it's gonna make editing videos much faster
[03:26] for Matias. Now I want to take off these cover plates this is a 2 terabyte Kingston Fury the speed is 7.3 gigabytes per second this NVMe system drive is going to be crazy fast let's put it on
[03:38] and I'll lock it over here now besides the main system drive I bought three 4 terabyte NVMe drives 4 matias to be editing on, so I'm gonna combine two of them to form 8TB which he will use
[03:50] as active editing space, and then the other 4TB will be for Premiere Pro as a scratch drive and preview drive, so the SSD in the middle will be running Windows and Premiere Pro, and then the 3 SSDs on the bottom will be handling all the footage and the project.
[04:03] Now next I wanted to check out the RGB fans because figuring out how to connect everything
[04:15] is usually kind of an annoying task and today wasn't any different. I think I figured everything out. There was an RGB controller, I disconnected most things and everything should be connected to these two pins that will go in the motherboard.
[04:28] I'm gonna turn the case, the window comes off magnetically and this way you can just disconnect the whole thing. So that means we have three intake fans on the front then two intake fans from the bottom then there's one going out at the back
[04:40] and three going out through the pump on the top. There were extra long screws that came with the case to connect these fans on the bottom. Not sure if nine against seven fans will make a difference but Deepcool sent them to us so I figured I could just install them.
[04:54] Now before we install the motherboard in the case I want to attach this CPU cooler. This is a 720mm liquid cooler from Deepcool and it has really beautiful infinity type
[05:10] RGB on the front. It's also completely white so it perfectly fits this build. So while the case is completely open I also wanted to install the power supply. It's a 1200 watt completely white and fully modular one.
[05:22] The chip crew definitely seems to like all white parts and I'm all for it. I'm pretty sure the 49G is going to eat up half of the power. I still pretty sad about the fact that the GPU is going to be black since even the cables of the power supply are white I definitely have to consider the painting of the GPU Alright and as you can see the power supply will be hidden from the front By the way I am so looking forward to seeing this infoscreen in action
[05:47] I especially wanna see the GPU usage of the 4D90 in Premiere when Matias is rendering something. By the way, as we're on the topic of the GPU, this is a GPU support bracket. I've seen them but not pre-installed. In a case, it will support the GPU when it's sagging down, so that's pretty cool.
[06:02] Now we've had some more trouble with these fans here, also because apparently the fans of the cooler are not RGB, but Deepcool sent us three extra ones and I thought they were for in the case somewhere, which is why I installed two of them on the bottom.
[06:14] But the reason they sent them is to use them right here on the radiator to make dead RGB as well. So before finishing up this build, I wanna test if everything works. Okay, so let's see if all of them work. Moment of truth.
[06:26] I think they do. So the CPU cooler is the only thing that doesn't work now. All the rest of the fans do look great. Ok, we found the problem, the cable wasn't plugged in, so I think if we connect these, the cooler will light up, and look at that, this is gorgeous.
[06:40] Alright, we've made quite some progress on the build, the CPU cooler is installed, we connected all the fans, also the motherboard cables, which are always a hassle, but I need to check which power supply cable the 4090 needs, and look at this beast, you see that
[06:54] it's big in videos but man let me see if you can realize this is absolutely nuts look at how thick this is it's also very heavy and it's barely gonna fit in our case look at this we should absolutely
[07:09] paint this white we will in the future and this is what i was looking for the power connector so the motherboard had a cable that said 600 watts and i think this is gonna fit the 4090 yes there we go now what i did next was finishing this whole pc because i want to start
[07:24] testing games on it and I also want to test some effects in Premiere Pro that we weren't able to use before. This 4090 definitely should be able to handle it since this PC has crazy specs it should be able to handle everything we throw at it
[07:37] but I still want to test it. I think the fans are gonna look absolutely gorgeous when we turn on this PC. The case also had a pre-installed GPU support bracket which comes in very very handy with this 4090 that's really heavy and something
[07:50] extra that I installed is a 10GB network card as this will give Matias a much faster connection to our server.
[08:10] Alright, so I've connected the PC to the TV as you can see and I cannot wait to test some games on the OLED Ultra Wide, it's 240Hz, I believe that might be a great use of this for the 9D if you wanna play competitive games in 4K resolution or at least high resolution with an Ultra Wide like that in 240Hz Now that that screen is 4k so i want to test allen wake on that we got it with the gpu and as you can see we have a
[08:35] scratch drive that's one of the nvme drives in here however there are two unallocated ones and i wanted to show you this because some people don't know you can add two disks then right click one of them click on new stand volume and as you can see we'll combine the volume i'm gonna call it
[08:50] editing drive because this is the huge volume that nutshells will use to edit all the videos really fast now together with the gpu we got lsx 243 the tv is 4k so really looking forward to the
[09:02] test okay so full screen 4k okay so i set everything to the maximum all right so we're getting about 30 fps but all the rate racing settings are set to the maximum so i'm gonna turn off rate racing and i think this alone is gonna be a huge change okay we're getting about
[09:17] 58 FPS however the car definitely looks worse right now than it did before I'm gonna show you the car without and then with ray tracing so this here is without and this is the same car with ray tracing the difference is huge it's much
[09:31] more realistic however if you're playing a game with everything turned to the maximum in 4k the game is not gonna be smooth even on a 4090 that's crazy so I just bought and launched modern warfare 3 I'm entering a gun game right
[09:43] now and I want to check the FPS I set my graphics to the ultra preset current in the corner I can see we have 240 FPS which is the maximum set in the settings as you can see the preset is set to ultra and my display's refresh rate is 240
[09:57] Hertz you can see the resolution right here and I have to honestly say this is so smooth. Well of course it's 240 FPS but it's crazy that we're reaching this frame rate while the ultra preset is active. It's been a while since I've played Call of
[10:11] I have to say Call of Duty on this screen with that card, this is an amazing experience. Okay so this here is a complete project of one of our last videos, which by the way Matthias
[10:26] is currently editing from this drive, I'm really excited about it. This is the Samsung T9, they finally came out with another one. Now that Matthias will have this crazy PC, me and Zana will be able to use this drive here to organize all the footage of the videos we were actively filming and then just transfer
[10:41] them easily to the PC and I'm going to export this whole project with the new PC after that I will do the same thing with the old one and I will put the export times on the screen. I think the 49G is gonna be at least 3 to 4 times as fast and that's really gonna change
[10:55] our workflow. Now I wanna deeply thank DeepGlue for giving this PC, it's gonna be a huge help in this video here, I will put all of the links in the description. If the YouTube algorithm knows you then that video will look very interesting to you so
[11:09] maybe you wanna click it. Thank you so much for watching, like the video, subscribe to the channel and I hope that I will see you in the next one. Have a nice day.




⚡ Saved you 0h 11m reading this? Transcribe any YouTube video for free — no signup needed.