One Inch from Your Shins: The Deadlift Stance
41sThis setup rule is simple yet critical for proper bar path, making it a common mistake viewers want to fix.
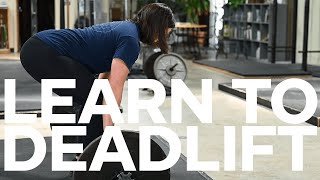
▶ Play ClipThis video presents a five-step method for learning the deadlift, based on the Starting Strength approach. It covers stance, grip, knee positioning, chest elevation, and the actual pull, emphasizing proper form and bar path.
Heels 8-12 inches apart, toes out 10-30 degrees, bar 1 inch from shins (over mid-foot).
Grip bar double overhand, bend at waist with straight legs, do not move the bar.
Bend knees forward until shins touch bar, then push knees out to contact elbows; keep hips high.
Squeeze chest up, tighten lumbar spine, stare 12-15 feet ahead; hips will be higher than expected.
Take a big breath, hold it, drag bar up legs in a straight line; lower by unlocking hips and knees first.
"The title accurately describes the content—a step-by-step tutorial on deadlifting using the Starting Strength method."
What is the correct stance width for a deadlift?
About 8-12 inches between the heels, toes pointed slightly out (10-30 degrees).
00:12
How far should the bar be from your shins at the start?
One inch from your shins, which places it over the middle of the foot.
00:25
How should you grip the bar in Step 2?
Bend over at the waist with stiff legs, without bending the knees or lowering the hips.
00:53
What is the correct knee movement in Step 3?
Bend your knees and drop them forward until your shins touch the bar, then shove knees out to contact elbows.
01:37
Describe the 'chest up' step in detail.
Squeeze your chest up, shove rib cage up, tighten lumbar spine, and stare at a point 12-15 feet ahead on the floor.
02:03
What is the correct way to pull the bar?
Take a big breath and hold it, then drag the bar up your legs in a straight vertical line.
02:54
How should you lower the bar after a deadlift?
First unlock hips and knees, shove hips backward, let bar slide down thighs, then bend knees as bar passes them.
03:42
Stance width and bar position
Establishes the foundational setup that ensures the bar path is vertical and safe.
00:12Knee and elbow contact
Ensures proper alignment and prevents the bar from drifting forward.
01:37Chest up and back tightness
Critical for maintaining a neutral spine and preventing injury; often the hardest step for beginners.
02:03Dragging the bar up the legs
Keeps the bar close to the body, optimizing leverage and reducing stress on the lower back.
02:54Lowering the bar correctly
Emphasizes that the descent is the reverse of the ascent, maintaining back position throughout.
03:42[00:00] This method for learning the deadlift precedes in five steps. Step 1.
[00:12] Stance. The stance for the deadlift is about the same as the stance for a flat-footed, standing vertical jump, about 8-12 inches between the heels, with the toes pointed slightly out.
[00:25] The bar should be 1 inch from your shins. For almost every human being on the planet, this distance places the bar directly over the middle of the foot, the position over which the bar stays on its way up to lockout.
[00:39] The angle of the toes will be at least 10 degrees and may be as much as 30 degrees. Step 2. Grip. After you have assumed the correct stance, grip the bar, double overhand and thumbs around
[00:53] at a width that places your hands in a position close to your legs, without being so close that you rub your thumbs against them as you pull. Take your grip on the bar by bending over at the waist, stiff leg it, without bending
[01:08] the knees, or lowering the hips. Most important at this point and for the following steps is that you do not move the bar. You have gone to considerable trouble to place the bar directly above the mid-foot and if
[01:22] you move it during this or any subsequent step, you will have undone, step 1. Step 3. Knees forward. With your grip secure, bend your knees and drop them forward just to the point where your
[01:37] shins touch the bar. Again, do not move the bar. Now shove your knees out just a little so that they are in contact with the elbows and are parallel to your feet.
[01:49] Remember, do not lower your hips. Do not move the bar. Step 4. Chest up. This will be the most difficult step for most people. Squeeze your chest up into the deadlift, start position.
[02:03] While gripping the bar, shove your rib cage up so that your chest rotates up between your arms. Let this contraction continue down your back until your lumbar spine is tightened into contraction
[02:16] as well. Before in the correct position, stare at a point 12-15 feet in front of you on the floor so that your neck can assume its normal anatomical position. You might need to think about keeping your chin down.
[02:29] This step will be difficult because of hamstring tension. Remember, the back muscles and the hamstrings are in a war for control over your pelvic position and the lower back must win.
[02:42] Your hips will probably be higher than you want them. That's just fine. After you do a few deadlifts and your hamstrings get warm, the movement will feel better and more familiar. Step 5. The pull.
[02:54] Take a big breath and hold it. Remember, air is support for your back and then drag the bar up your legs. This means exactly what it says, drag implies contact and the bar never leaves contact with
[03:09] your legs all the way up to the lock out at the top. And correctly, the bar path will be a straight vertical line, starting at its position directly over the midfoot and ending at the top at arm's length with your chest up, knees and hips
[03:25] in extension, spine in normal anatomical position, your eyes looking slightly down and your shoulders back. Down should be the perfect opposite of up. Be sure that you lower the bar by first unlocking your hips and knees and then shoving your hips
[03:42] backward. Letting the bar slide down your thighs in a straight vertical line. As the bar passes your knees, you may bend them to finish setting the bar down, never unlocking the back.
[03:54] Pull a set of five, concentrating especially on your back position and keeping the bar close to your legs. If you're sure your form is good enough, add weight for a few sets until it feels like the
[04:07] next increase might be a problem and that's your first deadlift workout.
⚡ Saved you 0h 04m reading this? Transcribe any YouTube video for free — no signup needed.