
Upload Image to Google Drive with Python
55sShows the instant gratification of a successful script run with visual confirmation.
▶ Play Clip"The video delivers exactly what the title promises: a functional Python script to upload images from URL to Google Drive."
This tutorial demonstrates how to upload an image from a public URL to Google Drive using a Python script with the PyDrive library. It covers the OAuth2 authentication flow, including obtaining a client_secrets.json file from the Google Cloud Console, and provides a complete code example.
The script uploads an image from a URL to Google Drive using PyDrive and OAuth2. It shows the authorization flow and confirms the file appears in Drive.
Source code is provided in the video description. Requires a client_secrets.json file from Google Cloud Console with client ID, project ID, OAuth URIs, client secret, and redirect URI.
In Google Cloud Console, create an OAuth 2.0 Client ID for a web application. Set authorized JavaScript origins to http://localhost:8080 and authorized redirect URI to http://localhost:8080/.
Download the JSON file from the Cloud Console and rename it exactly to 'client_secrets.json' in the project folder.
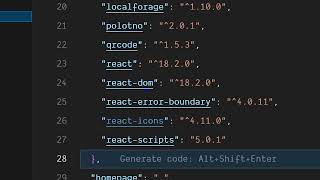
Install the PyDrive library using 'pip install pydrive'. Import GoogleAuth from pydrive.auth and GoogleDrive from pydrive.drive.
Define image URL, file name, and folder ID (root for this example). Create a metadata dictionary with 'title' and 'parents' (folder ID).
Instantiate GoogleAuth, use LocalWebServerAuth for access token. Build a multipart upload request with metadata (JSON) and file content (bytes from URL using requests library). Send POST request to Google Drive API v3 endpoint with authorization header.
Execute the script, complete authorization, and the image is uploaded to Drive. Verify by refreshing Drive to see the uploaded file.
The video provides a complete, step-by-step guide to automatically upload images from URLs to Google Drive using Python and PyDrive, requiring only a client_secrets.json file and minimal code.
What file must be placed in the project folder for PyDrive authentication?
client_secrets.json
01:11
What are the two URIs that need to be set in the Google Cloud Console?
Authorized JavaScript origins: http://localhost:8080; Authorized redirect URI: http://localhost:8080/
02:22
Which library is used to make HTTP requests to Google Drive API?
The requests library (import requests)
04:16
What is the endpoint URL for uploading files to Google Drive API v3?
https://www.googleapis.com/upload/drive/v3/files?uploadType=multipart
08:09
How do you obtain an access token in the script?
By calling LocalWebServerAuth() on a GoogleAuth instance (gauth.LocalWebServerAuth())
05:17
What are the two main properties in the metadata object for the file?
title (file name) and parents (folder ID array)
05:29
Successful upload demo
Shows the end-to-end process working in real time, confirming the script's functionality.
00:02OAuth 2.0 client creation
Critical step that many tutorials skip; provides exact URIs needed for local development.
02:08Multipart upload construction
Explains how to combine metadata JSON and file bytes into a single request, a key concept for Google Drive API.
05:10Using requests library for upload
Demonstrates making a POST request with headers (Authorization) and body (files) to the Drive API.
07:51[00:02] I will be showing you that how basically we can upload a image file from a URL to Google drive automatically using a python script and we will be using pi drive library for making this process. Let me show you a very simple example.
[00:16] You can see this is the URL of the image that we are uploading it. Let me run this Python script here. Uh basically it makes use of access token o2 flow. Uh let me show you the drive here. This is a Google drive here. No file is present
[00:31] right here guys. So you don't see no image file is present. Let me just run this Python script here. Python app. py. So what will happen guys? It will allows account here. You need to select your account. As we select the account here
[00:45] after that the authorization flow is completed. Now inside the console you will see basically the file is returned to us. Inside the JSON response we get the four properties. the ID of the file, name of the file and the name type which
[00:57] is a JPG image. And if I check my if I refresh the Google drive here guys, you will see that you uploaded today. This is the uh JPG file which is uploaded right here from the URL to straight to my Google Drive. So this is the Python
[01:11] script guys which will actually upload the image to Google Drive automatically. Now let me show you how basically we can achieve this. I have given all the source code in the description of this video guys. You can right click just go
[01:23] to the description of this video and copy paste all the source code. And now first of all what we need to do is guys we need to get this client secrets dojson file which basically contains your client ID, project ID, O URI, token
[01:36] URI, client secret and redirect URI. So these guys. So I will show you step by step how basically we can achieve this. And uh now basically if you don't provide this file here and if you just execute
[01:53] this application you will get a error something like this that invalid client secret file. So you need to create this f file the naming should be same to same which is client secrets. So the name should be same like this
[02:08] and after this guys what we need to do is that we need to go to our uh Google cloud console here. Basically you need to create a O2 client ID and simply this will be a web application and these two things are very much important. First is
[02:22] the authorized JavaScript origins and the authorized redirect URI and you need to copy paste the same value that I am copy pasting here. This needs to be http copy pasting here. This needs to be http localhost_8080.
[02:36] JavaScript origins. Now inside your authorized red redirect URI this needs to be HTTP localhost. Again port number will be 8080 and then you need to put the slash symbol like like this. And now click on the create symbol. As you click
[02:52] create here your O2 client ID will be created. You will get your client ID client secret. But you need to click this third button which is download JSON. So it will store all this file inside your JSON file. So this is your
[03:05] file here. You need to simply now cut this file and simply paste it inside your folder. So right here, open this here and simply you need to paste it here and uh
[03:21] you need to basically rename this file here to client secrets. This is the naming that you need to do same to same client secrets. So now this is the file here guys. Basically it contains the information
[03:35] client ID, project ID, all this useful information. So this will be different for you. So just do this process first of all. And now guys we need to go to command line and install this library which is called as pip install pi drive.
[03:48] This is the library that we are using for this project guys. This is the library that you need to install. So I've already installed this. So after this guys we will first of all import a module of o from this library. And here
[04:02] we need to import Google O. This is the module we need to import. And after this we will import the input output module as well. [snorts] And uh we will also import the request module which will actually make a post request
[04:18] to the Google Drive API passing this image file. And now you need to provide the URL of the image guys. So whatever URL that you are uploading it, you can just take any image from a internet. Let's suppose I take a image of a flower
[04:32] that I need to upload. So you can simply copy image address. Simply go to here, paste it here. You can take any image. After this you can put a file name. So this file name can be anything. Let's suppose I give here flower
[04:47] two. This is a file name. And here we can even uh basically like upload to a specific folder guys. But here I will be uploading to a root Google drive. This will be basically not upload to a specific folder. This will simply upload
[05:02] to the Google drive. You can even paste the folder ID as well. Here after this guys, what we need to do is we need to instantiate a new instance of Google O. So we will simply say all the new constructor like this. And after this we
[05:17] will set here guys, we will simply call this local web server authentication. So we will follow the local client side authorization flow where we will basically get the access token. After this we need to set the metadata of the
[05:29] image guys. Basically this will be a simple JSON object which will contain the two properties. First is the name of the file which we have set here to file name. And the second one is the parents. Parents basically set is the folder ID
[05:43] guys. So this time we have provided the folder ID which is root here which will actually upload it to the root of the Google drive. After setting these two options guys, now we need to set up a Google image
[05:55] uploading this will again be an object and basically this will contain two properties. First is the data and here the data will be guys first of all this takes the meta data property and this needs to be here we just need to
[06:11] import the JSON module as well import JSON. So this JSON module guys contains JSON. So this JSON module guys contains a method called as dumps and uh dumps method and inside this we will pass our metadata that we have declared. You will
[06:25] see we are passing this metadata. The first one is the actual file name that is flower and basically the folder ID is root. So we are just dumping this JSON here. After this guys, we also need to set a header which is called as content
[06:41] set a header which is called as content type which is actually application/json. then the second option is the actual file that you are uploading to Google drive. So for this we need to have the input output
[06:58] module of Python. This is a built-in module and basically it contains a method guys which is called as bytes input output and basically what it does guys it will actually convert this image from the URL
[07:12] that you have here this is the image here you can see it has converted this image it will convert this image here to a it will convert this image here to a basically a bytes array so now what we
[07:24] need to do is that here we need to simply say request we We are importing the request module here and we are simply getting it from the URL. We will pass the URL and then we will simply call the content
[07:39] method. Content we will get the textual content from the URL of the image and then we will convert it to a bytes array and then we will be setting the file here. That's all. And now we simply need to make a post request guys to the
[07:51] Google Drive API request. So there we'll be making a simple post request. So the be making a simple post request. So the endpoint will be simply like this https endpoint will be simply like this https www.googleapis.com/upload/drive
[08:09] version 3 and then we will say files question mark upload type question mark upload type and this is equal to multiart put a comma here and after this we need to set the headers. So headers would be
[08:23] basically the authorization header guys. Basically we just need to set the header here authorization uh basically this equals to colon here and basically this value equal to be error b e a r e r and then followed by
[08:38] some space and then we will concatenate the access token that we can get simply the access token that we can get simply by g credentials by g credentials and dot access token that's it access
[08:51] and dot access token that's it access token that's all so again. token that's all so again. Basically, this is an object here.
[09:04] need to put this inside curly brackets like this. This is a JSON object. We are passing it header here. So, close it by curly brackets. Put a comma.
[09:30] then parenthesis and put a comma here and this takes the third option which is the actual body. So this will take the actual files and this will be equal to the files that we constructed earlier
[09:42] on. You will see this is a files object we are passing here. And if I just format the document, you will see basically it takes three options. This request it first of all takes the URL which URL you're making the request to.
[09:55] Secondly, it takes the header object which contains this authorization header here. It can contains this access token. Thirdly, it takes the body of the request which is we are passing the actual file up from the URL to upload it
[10:08] to Google Drive. So now we can simply upload this guys to Google Drive. Let me run the script here. Python app.p py. So first of all it will ask for the account. Authorization flow will be completed. And now you will see that
[10:24] basically uh oh sorry we need to pass the URL. So we have passed the B 64 code. So we need to pass a URL here. Let me select this to pass a URL here. Let me select this image. So you can see it's a B 64 URL.
[10:36] It's not a URL of the image. It should be a URL URL of the image. It should be a URL which is publicly accessible.
[10:48] I think it's again so what I can do is basically you can let me take this one copy image address yeah this is my URL here which has http attached to it so this is a public url [snorts]
[11:03] [snorts] let me paste it here. let me paste it here. So now if I run this once again, [snorts] sorry, let me select this account.
[11:30] Uh [snorts] let me close this and start again.
[11:53] completed and basically you will see that if I refresh the drive here. So you will see that flower 2 is successfully uploaded guys. You will see
[12:05] successfully uploaded to my Google drive [snorts] with the same name that I configured right here. You will see flower 2. So in this way guys you can simply upload images from URL to straight to your Google drive using uh
[12:17] this pie drive library. Uh basically it is using a simple post request to the Google drive API. We are passing the access token here itself. You just need secrets.json JSON which contain the information about your project which
[12:31] will actually contain client ID, secret, token URI, redirect URI. I explained all this process in this video. Please hit that like button, subscribe the channel and I will be seeing you in the next one.
⚡ Saved you 0h 12m reading this? Transcribe any YouTube video for free — no signup needed.