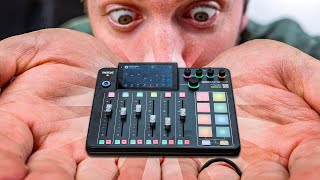

RodeCaster Pro 2 vs Duo: Which One?
60sQuick comparison of two popular audio mixers, helping viewers decide which to buy.
▶ Play Clip"Delivers a solid quick-start guide, but the 'MasterClass' title oversells the depth; it's a good overview, not a masterclass."
This video is a comprehensive guide to setting up the RodeCaster Pro 2 (and Duo) audio mixer for streaming and podcasting. The host walks through the entire process from unboxing to configuring microphones, faders, smart pads, and dual PC setups, while also showcasing the Insta360 Link 2C webcam as an affordable camera option.
The RodeCaster Pro 2 is a powerful audio mixer that can do everything, but the video condenses the setup to the essentials.
The video is shot on a $150 Insta360 Link 2C webcam, which has a large 1/2-inch sensor and can shoot 4K30 or 1080p.
The Pro 2 has 4 mic inputs, 4 headphone outputs, 6 faders, and 8 smart pads, while the Duo has 2 of each, 4 faders, and 6 smart pads. The Duo has a front headphone jack, making it more convenient for gamers.
Plug a mic into input 1, and the display shows signal. Press the top button to access mic setup. Use presets for popular mics like the SM7B; the device doesn't know which mic is connected, so try different presets.
For first-time users, don't manually adjust EQ and compression; instead, try all presets and tweak if needed. For condenser mics, enable phantom power and lower gain.
You can save your current settings as a custom preset, e.g., 'cool vox'.
The host demonstrates the difference between raw and processed audio with the SM7B preset.
The webcam has a 1/2-inch sensor, 4K30 or 1080p, and costs $150. It has background blur, gesture control, vertical mode, and hotkey presets. The Link 2 is $200 with a motorized gimbal.
The RodeCaster has effects like echo and reverb, adjustable via smart dial. There are more effects on smart pads.
Faders can be reassigned to different channels. For example, set fader 2 to game audio, fader 5 to music. You can also combine inputs 3 and 4 into a stereo channel.
There are three virtual faders that can be assigned to additional channels, controlled via the smart knob.
Smart pads can trigger sound samples, voice effects (fog horn, megaphone, robot, voice changer, pitch shifter), and can be set to latching or momentary mode. Up to 8 pages of pads (32 total).
The RodeCaster Pro 2 has dual USB for dual PC setups. Primary PC gets two channels (main mix and chat mix), second USB output for streaming PC or extra track.
Wireless mics can connect directly, smart pads can be MIDI controllers, and you can record separate audio tracks to microSD or SSD.
The RodeCaster Pro 2 is a versatile and powerful audio mixer that simplifies setup with presets and customizable faders, making it ideal for streamers and podcasters. The video provides a quick-start guide, with deeper dives available in other videos.
What are the main differences between the RodeCaster Pro 2 and the Duo?
The Pro 2 has 4 mic inputs, 4 headphone outputs, 6 faders, and 8 smart pads; the Duo has 2 of each, 4 faders, and 6 smart pads. The Duo has a front headphone jack.
00:53
How do you set up a microphone on the RodeCaster Pro 2?
Plug the mic into input 1, press the top button to access mic setup, and select a preset for your microphone.
02:05
What should you do if your microphone is not in the presets?
Try different presets; the device doesn't know which mic is connected, so you can experiment.
03:00
How can you customize faders on the RodeCaster Pro 2?
Tap the settings icon on a fader, select the input or virtual channel, and assign it to the fader.
07:25
What is the purpose of virtual faders?
They allow control of additional channels that are not assigned to physical faders, using the smart knob.
08:44
How many smart pads can you have in total?
Up to 8 pages of smart pads, which is 32 pads.
10:33
What is latching mode on smart pads?
Latching is like a toggle: tap to turn on, tap again to turn off. Without latching, you hold to activate and release to deactivate.
12:08
How does the dual USB setup work on the RodeCaster Pro 2?
Primary PC gets two audio channels (main mix and chat mix), and the second USB output provides an additional output for a streaming PC or extra track.
12:51
What is the price of the Insta360 Link 2C webcam?
$150.
04:32
RodeCaster Pro 2 vs Duo
Clarifies the key differences between the two models, helping buyers choose.
00:53Preset-based mic setup
Shows how presets simplify setup, a major time-saver for beginners.
02:17Affordable webcam quality
Demonstrates that a $150 webcam can produce high-quality video, challenging the need for expensive cameras.
04:32Fader customization
Explains how to reassign faders to different audio sources, making the mixer highly flexible.
07:25Smart pads versatility
Highlights the many uses of smart pads, from sound samples to voice effects, enhancing stream interactivity.
10:21[00:01] the most powerful audio mixers you can buy. It just does everything and it does everything really well, which makes me both excited and a little bit scared to talk about this device today. If I were to cover everything, this would be a
[00:15] 3hour video. So, we're not going to do that. I've done myself and you all a favor and condensed everything in this machine down to the bare necessities. Everything you need from the moment you turn it on until the moment you push go
[00:27] That's what we're going to talk about today. I'll walk you through the entire setup. And if you want a deeper dive, if you want me to make a It's not going to comments down below. But we should probably get
[00:39] [Music] started. I don't know if you guys have noticed, but I'm not shooting this video on my typical relatively expensive camera setup. I'm actually shooting this on $150 webcam, the Insta 360 Link 2C.
[00:53] So, uh, more on that later. Let's jump into the Roadcaster Pro. First things There are two models of the Roadcaster. There's the Roadcaster Pro 2 and there's the Roadcaster Duo. There are very few differences between these two. A lot of
[01:06] the other, but that's not true. They are essentially the exact same machine. and outputs. The Roadcaster Pro 2, the one that I have next to me, has four microphone inputs and four headphone outputs. The Roadcaster Duo only has two
[01:21] of each. Also, the Pro 2 has six faders and eight smart pads, while the Duo only has four faders and six smart pads. Just a little downsizing. Other than that, The exact same processor, the exact same interface, the exact same preamp, so you
[01:37] is actually one thing that the Duo has that the Pro doesn't, and that is a headphone jack on the front, making it not only a cheaper, smaller option that more convenient option for gamers and streamers. singular singular content
[01:51] need more than two inputs or more than four faders, you're not sacrificing any Well, let's move the mic over here. Let's talk about setting up a mic on microphone plugged into input one at the back here. And when I talk, it shows
[02:05] microphone one giving a signal. You can see there's a little purple line at the bottom underneath my mic one. And there's a purple dot above the first fader showing this is the fader for microphone one. And if I press that top
[02:17] microphone setup. Now, we're already getting into cool territory with the Roadcaster because this is where things already get easier than other interfaces. Normally, you'd go through here and you'd set up your gain manually
[02:30] and set up your EQ and your compression manually, but the Roadcaster comes with these nice little presets here. Lots of preset microphones. Look at that. And I'm using an SM7B. And look, they've got an SM7B right in here. So, that's what I
[02:45] They got a lot of popular mics in here, especially broadcast and podcasting microphones. They got the Procaster here. They got the Pod Mic. They've also But I'm going to tell you a little secret. The Roadcaster Pro doesn't know
[03:00] what mic you have plugged into here. So, if you have a different microphone that's not in the presets, you can still try out the presets and it's going to be I'm getting over something. In fact, that's probably what I recommend any of
[03:13] you do that are using this for the first time. Don't try to go in here and adjust time. Don't try to go in here and adjust all the little parametric EQ stuff. Oh, there's a lot. And they're very they're very studio. They're not like consumer
[03:26] plugins the way Elgato stuff works. They're very they're very proumer. So rather than coming in here and trying to tweak stuff for your microphone, check all of them. You might have to make some tweaks. For example, if you're using a
[03:40] mic, you'll have to turn on the phantom power and turn down the gain quite a first. I've seen situations where condenser mics sounded amazing using the SM7B preset. And maybe you'll find something close and want to go in and
[03:54] tweak it a little bit. Maybe adjust the compressor or the EQ a little bit. And want it, just go back and hit this presets button. And you can actually save your current preset. name it
[04:08] it cool vox and you now have a custom want. But let's take a listen to what this has actually done to my voice. If I turn off the processing, you can hear what this sounds raw going directly in
[04:20] with no effects on it. And if I tap this, it brings the preset back onto my microphone. What do you think? How's the SM7B preset on here? That's all I did. tell you more about this camera that
[04:32] we're shooting this entire video on. This is the Insta 360 Link 2C and it is This is the Insta 360 Link 2C and it is a $150 webcam and it looks like this. out of the box. All the settings are on auto right now. You plug it in, this is
[04:45] this camera looks so good is because of the large 1/2 in sensor built into it that allows you to shoot in up to either 4K 30 or 1080. Just for fun, let's do a sidebyside between this webcam and the laptop webcam I've got over here. And
[04:58] light side by side. The typical camera setup that I shoot these videos on goes for about 4 grand. So, for this being about I want to say like 4% of the cost effective ways that you can get started making a high-quality live
[05:13] bummed that you're missing out on the background blur from a camera like this, the best bokeh simulation or simulation of any camera I've seen. Especially if you stay reasonable and keep the setting down to like 7% where it should be.
[05:25] looks like that. But if you pair this background blur with proper lighting, that looks like a mirrorless camera. It's also got a couple really cool initiate by putting your hand up to the camera. And then it will zoom in on you
[05:40] your head so you're always in the center of the frame. It's got a vertical mode for easy short form content. And you can customize hotkey presets. So if you want to zoom in real fast for the memes on stream, it's easy to do. So, while the
[05:52] Link 2 is the most affordable way to get started with Insta3's image quality, they also have the Link 2, which is $200, but they use the exact same image has that motorized gimbal built into it. Plus, right now, if you use the Amazon
[06:05] get $24 off of this webcam. It's for their summer sale. It lasts until June 8th. So, if you're watching this before June 8th, click the link down below and we don't just have regular plugins like EQ and compression. We also have this
[06:18] other tab called effects where we have an echo which I can't hear but I'm reverb where I can tap on any of these dials and use this smart dial to adjust
[06:30] it. We can go to a small room, we can go to a large room, we can turn up the may have even noticed this button here that says more effects on smart pads which we will get to the smart pads in a little bit. Now the Roadcaster Pro has a
[06:44] there. Feel free to mess around with them. I'm not going to go over these because again, that would be the 3-hour video. Just make sure that when you microphone that you want your voice to be right in the middle of this little
[06:57] That's what we're aiming for. But let's move on to the next section. Let's talk about the faders right here. Mixing on this device is incredibly powerful and added a new update a couple months ago that makes this work a lot like normal
[07:11] You do have to make sure your device is updated and you have to activate it on you how to do that. I will link to it down below. But if we go back to our different channels. You can see we've got our four microphone inputs on our
[07:25] first four faders, but I'm only using one microphone input. That seems like a waste of faders to me. I want this to be my game volume. So, I tap on the button right here. I hit the little settings icon. And right now, you can see it's
[07:37] selected to mic input 2. But I'm going to go down here to my virtual inputs and outputs. and I'm going to change it to the little game icon and then hit the check mark in the top right. Hit the home button. And now if I go into the
[07:49] Windows settings and set my game output to be Roadcaster Pro game, this will now control my game volume. You can actually see I set the fifth fader over here to be my music volume. So this will control Spotify as well. These faders are super
[08:02] customizable. And I know you guys are used to gaming interfaces where you can faders, but this takes it one step further. For example, at my setup, I've output, and I'll plug that left and right stereo output into microphone
[08:16] control those separately with faders three and four, but that seems like a waste of a fader if it's both my guitar. So, if I go in here and I hit the settings, I can hit the stereo button
[08:28] between input three and four and turn that into a single stereo channel. Let's can see that fader 3 is actually controlling inputs three and four as a stereo channel. And if for some reason six faders are not enough for you or you
[08:44] than four faders. There's a button in this bottom left that lets you assign all the faders at a glance. You can see we got the six physical faders. These are the six here. And there are three virtual faders down here. Well, what do
[08:56] those do? Let's set uh input two to one of them just for fun. You can see it's not assigned. And then let's assign this one to I don't know, let's make it You can see between the sixth and seventh channel, there's a thicker line
[09:10] saying these are physical faders, these are virtual faders. And if I tap on the microphone here, I can now adjust the volume from this smart knob here. Same thing with this next one. So, even though they're not assigned to physical
[09:23] faders, I can still control the volume of these three more virtual channels for channels that you'd like control over, but you don't mess around with out for an intro track that you only need to do once and you don't want to
[09:38] we're setting this up for gaming, let me make some adjustments here and turn this into a good gaming mixer. Let's set this second one to be the chat. I actually definitely an input. Let's change this one from game to our standard USB, like
[09:52] there's channel A and B here. Those are just two more virtual outputs from your want to make separate channels, they just they're just not named. So, they you want with them. Let's make this one music. We'll make this next one A. We'll
[10:06] make this fifth fader the audio coming from our second PC, which we'll get into two PC in just a second. And we'll make this last one our smart pads, which we what? No, let's get into smart pads. Now, these smart pads are really cool.
[10:21] And not only are there eight of them, but I want to say there are eight. I've got it set to four different pages, which is 16 different buttons. But when I add an effect to page four, you can see it gives me a page five. I'm pretty
[10:33] sure you can get up to eight pages on this. That is 32 different smart pads. smart pads is you can set sound samples to it. So, let's go to edit here. Now, you can just hit record and record something from your voice right into
[10:52] detour and look at why? Let's take a little detour real quick. Let's go into outputs. Go to routing. And we're going to go to USB1 chat, which is what's going into my PC right now. And you can see the smart pads are not coming
[11:06] detailed here. We're not going to go into this, but I made this output a are actually going into it. Right here, I turned on the samples. So now, hit voice right into it. I think you heard
[11:20] OBS go up and down, but that recording was probably a little bit quiet because the sixth fader that we set to the sample pads is all the way down here. your voice right into it. So, you can
[11:32] pads by using the fader that you assigned to it, which is great for things like intro music or outro music or maybe music that you want to play during an intense moment. You want it to fade in or fade out. You can do that by
[11:44] these sample pads is the thing I mentioned earlier with these voice reverb and we have the echo like we had before, but we also have a fog horn
[11:56] megaphone. A megaphone effect. Honestly, this is probably my favorite one. We've also got robot effects effects with multiple got robot effects effects with multiple robots. We have this robot or this robot
[12:08] or this robot. And we've got a voice changer which sounds like this. And you latching. Now, latching is like the audio term for toggle. So you can see when latching is on, if I tap it, it turns on the voice effects. If I tap it
[12:22] again, it turns it off. But if we turn off latching, I hold it to turn on the voice effects. I let go to turn it off. And lastly, we have a pitch shifter. And this is going to pitch our shift and down and then back back
[12:39] some of the things you can do with these smart pads. You've got a couple other sections here I didn't talk about like the mixer settings with censorships and powerful stuff inside these smart pads here. The last thing I really want to
[12:51] mention here is the dual USB on the back. And that is a great way to set up a dual PC setup. It's not quite as powerful as Beacon's dual USB setup. So, if that's really what you want, like a robust dual USB audio interface, go
[13:04] this week. I will link to that down below as well. But but you do have a fairly robust dual USB setup here where primary PC, probably your gaming PC, has
[13:16] two different audio channels. One is your entire mix that would be going into The other one is the chat mix that would only have your microphone and you'd send that to Discord. The second USB output only has one output. So again, if you
[13:30] to your streaming PC. Or if you're on a single PC setup and you want an extra doesn't have music in it, you can plug it into the same PC and you can get all three of those tracks going to your first PC. Again, there are no rules for
[13:44] what you're doing. Use it how you need to use it. And I wish I could go over couple other little features I want to tell you about right now. Like, did you know you can use wireless mics directly connected to this? The road, what is it
[13:58] called? The wireless pro 2 or something. And I think the the wireless Mi, I don't two latest versions of the wireless mics will connect directly to this. And you may have noticed that in the microphone setup earlier where there was a wireless
[14:12] you're really big on controlling things with MIDI, you can set these smart pads to be MIDI controllers. If you want to record your VODs but have all the audio tracks separately, you can actually go into the output settings and record a
[14:24] your different channels separately and records them to a micro SD. or I'm pretty sure an SSD plugged into the second USB slot. I haven't tried that, this record button is for. Now, I would love to go over how to set up submixes
[14:39] and also how to properly EQ your voice, but that would make this video very long. And I also went over them deeply in recent videos on other audio devices. I went over submixes on the Elgato Stream Deck Plus video that we posted a
[14:51] couple weeks ago. And then I pretty heavily went over vocal effects like EQ posted earlier this week. So again, links to both of those below if you want links to both of those below if you want some clean up, some extra help with
[15:04] those specific subjects. I'm trying not to repeat myself too much in these necessary. But I think that'll just about do it for the Roadcaster Pro. That Let me know if you have any questions in the comments. If you're still here, make
[15:16] well, you obviously like the video, otherwise you wouldn't still be here. If comments, leave a random emoji for engagement. And uh as always, happy streaming. Oh, and subscribe if you're not already. Bye.
[15:31] not already. Bye. [Music]
⚡ Saved you 0h 15m reading this? Transcribe any YouTube video for free — no signup needed.