
Podcast Setup in 5 Minutes?
45sThe challenge and promise of setting up a full podcast in 5 minutes is engaging and hooks viewers interested in quick tutorials.
▶ Play Clip"Delivers on the promise of easy setup with a clear demo, though the 5-minute claim is missed and the review adds extra length."
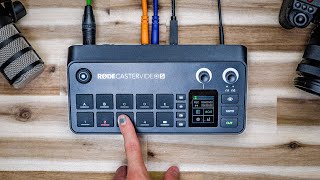
The video demonstrates how to set up a professional podcast studio using the RodeCaster Video S, a compact all-in-one video switcher, audio mixer, and PC. The host builds a multi-camera setup with custom scenes, overlays, and automatic camera switching based on microphone input, all within a few minutes. The video also provides a detailed review of the device, comparing it to its predecessor and discussing its value proposition.
The host aims to set up a complete podcast studio from scratch, including multiple cameras, custom overlays, scenes, and automatic camera switching, all within a short timeframe.
The device is a new product that simplifies professional podcasting. It was sent to the host for free, but he is not being paid and had approval over the content.
The device has three HDMI inputs and one USB input for cameras. The host uses four cameras: one main, one above, one side, and one via USB. Buttons 1-3 switch between HDMI cameras, and the USB input can connect a webcam or capture card.
Top buttons are customizable for images or scenes. The companion app allows building custom scenes with multiple cameras, cropping, and previewing wirelessly over Wi-Fi.
The host creates a 50/50 split screen with two camera angles, cropping each to half the screen. He assigns it to a custom button for quick switching.
The scene builder allows rounding corners, adding colored borders, and inserting media backgrounds. The host demonstrates adding a green border and a custom background.
Buttons can control colors (e.g., purple) and overlays. The host shows an overlay of the device's back panel to explain microphone inputs.
The intro can be played once, looped, or played once and then auto-switch to a specific scene. The host sets it to switch to camera one after the intro.
Cameras can be linked to microphones. The host links camera one to mic one and camera three to mic two. Auto switching activates when a mic is used, with priority settings.
Pressing any manual button disables auto switching. The device can be expanded with additional USB devices or capture cards for more cameras.
The RodeCaster Video S is the smaller version of the original, with fewer ports but same video quality and features. It's priced at $500, half the original's $1,200.
The original was criticized for lacking 4K, but adding 4K would have increased cost. The S model lowers the price, making it more accessible for entry-level podcasters.
The host highly recommends the device as the best, simplest, and most cost-efficient way to start a podcast, despite the financial barrier being a positive filter.
The RodeCaster Video S simplifies podcast production by combining video switching, audio mixing, and scene building into one affordable device. It's ideal for beginners and offers professional results with minimal setup time.
What are the main inputs on the RodeCaster Video S?
Three HDMI inputs and one USB input.
01:14
How do you create a custom scene with multiple cameras?
Use the companion app's scene builder to add camera sources, crop them, and arrange them on the canvas.
02:26
What is the price of the RodeCaster Video S?
$500.
11:18
How does auto camera switching work?
Cameras are linked to microphones; when a mic picks up audio, the corresponding camera becomes active. Priority can be set.
06:26
What is the main difference between the RodeCaster Video S and the original?
The S has one less HDMI in, one less HDMI out, one less USB port, fewer buttons, no SD card, and no speaker monitor outs, but same video quality and features.
11:18
What was the main complaint about the original RodeCaster Video?
It lacked 4K support and was priced at $1,200, making it too expensive for entry-level users.
10:21
RodeCaster Video S introduction
Reveals the device's purpose and the host's disclosure of sponsorship.
00:47Scene builder demo
Shows how to create a split-screen scene in the app, a core feature.
02:26Auto camera switching
Demonstrates a key feature that simplifies live production.
06:264K pricing trade-off
Explains the business decision behind the 1080p limit and price drop.
10:21Final recommendation
Summarizes the host's strong endorsement of the device.
11:47[00:01] feel a little bit intimidating. So today we're going to build one from scratch and I'm going to try to do it in like 5 minutes. Fingers crossed cuz this is all of things we're going to talk about including how to set up multiple
[00:15] cameras, switch between them super quickly. How to set up a custom overlay, custom scene like this. You can have multiple people on at once as well as a custom graphic background. how to set up multiple microphones and have the
[00:28] cameras automatically switch views based on who's talking at once. That and a about to do right now, which is play your custom animation at the beginning your custom animation at the beginning of your podcast, like this.
[00:47] device that's come out today as of posting this video. It's called the posting this video. It's called the Roadcaster Video S. And in my opinion, it's probably one of the simplest ways and most professional ways to start a
[00:59] that this device was sent to me and I get to keep it. But I'm not being paid and approve it before I post it. So, whatever level bias you want to call going to be talking more about this device at the end of this whole setup
[01:14] that I did in setting this up was set up my cameras where I wanted them placed. this device where you can see right around here we have inputs one, two, and three. Those are all HDMI inputs. So, I've got four different cameras that you
[01:29] camera angle. One right there, [music] one above me, and one right here. And on this device, we have four numbered buttons at the bottom. 1, two, and three I can switch back to this camera, or if I hit one, it switches back to [music]
[01:44] fourth USB input you can see right around here where you can actually connect another camera, a capture card, a webcam, anything that you want through there. These top buttons up here are all custom buttons that allow you to set
[01:58] images like this one we were doing or even custom scenes like this one we were looking at before. So let's set up one of those. You can see that in the top left corner here. This is my Roadcaster Video S. I
[02:12] the two other than connect both devices to the same Wi-Fi network and it just shows up. [music] And in here, we have something called a scene builder. That's angles. It's going to allow me to build a custom scene with multiple cameras.
[02:26] And then I can even preview the entire podcast from inside the app wirelessly. Let's go ahead and make a new scene in the Bspot right here. screen's going to go blank. We're going to make this one a 50/50 split down the
[02:42] screen with two different camera angles. So, let's go to the first source right We're going to make it input one. We're going to crop it
[03:00] Let's go ahead and center it and then finish filling out this crop here. It the middle of the screen is. And now let's add one more angle. And this can be your other guest. We'll make it camera three for another person angle
[03:16] here. Let's go and crop this one halfway. It snaps to the middle. Drag it And now we have a split screen view of these two camera angles. And it'd be person in here. I should make more friends. So now if I hit this button,
[03:31] back to my one camera. But if I'm going to hit this B button right here, it's just made. Now, if I wanted to make this a little bit more interesting, have an animated background with borders, that's very easy to do. Also,
[03:45] let's go ahead and crop these in a little bit. Let's just do it with this one. You can see there's a rounded corner icon right
[03:58] it to the right. It's going to round these corners in. We're going to add a border. We're going to make it whatever color we want. Let's go ahead and make color we want. Let's go ahead and make it uh let's make this one green.
[04:10] Let's make it a thicker border. That border is going to apply to all of the add a background to go behind this camera on the left. That's going to be media. You can see I've got my media over here.
[04:25] So, I'm going to call it senthi background. And let's move this down to the bottom. And there we go. I wouldn't call this one looking great, but with a couple little tweaks. Let's go and do the same
[04:38] little bit more even over here. And here we go. Here's our multiple guest scene that we've just made. These top buttons up here also do other custom things. And that's what these two buttons on the
[04:50] side of these buttons will control. So if I hit this top one, this is for colors. This is kind of a purplish color. I don't know if that's showing through on camera. And these buttons turn purple. And you can see I've got
[05:02] two things here. One is that intro background that I threw on there. And showed in the beginning. That's how I switch to my intro. Let's talk about how to do that. Over here in my software here, this is where the intro is stored.
[05:15] button, it's going to allow me to adjust it without switching to it on the podcast itself. And I can either have it play once, I can have it play on an endless loop, or I can have it play once and automatically switch to a scene
[05:29] afterwards. I've got it set to switch to camera one. Meaning, even if I'm on this scene here, if I play that intro, which I'm going to do right now, it's going to I'm going to do right now, it's going to switch to camera one. I'll show you.
[05:48] one instead of back to the one it was before. That is incredibly useful for a smalltime podcast where you don't have a dedicated person controlling the scenes The fewer buttons you have to press while you're also trying to be
[06:00] entertaining, the easier it's going to be. Let's jump to this other button down pictures. It's called overlays. And this is where you can add images into it. And in that same scene building software, you can choose where they're going to
[06:13] display. So over here, I actually have an image of the back of the Roadcaster video. So I was able to show you that by hitting this button. It turns it on and off. But you can see on the back of this device, we actually have two microphone
[06:26] inputs. And I've got a second microphone right here that I'm going to plug in and I'm going to show you how to get cameras to automatically switch. Let's do that to go to auto switching. And what we're going to do is we're going to take
[06:38] either scenes or inputs and we're going to link them [music] to a microphone. So, I'm going to take this camera angle, which is one, and I'm going to link it to mic one. It's called a combo jack. That's why it's got the XLR and the
[06:52] quarterinch inputs. So, combo one is this microphone right here. Then we're going to go to input three, which is my camera over here. And we're going to link that one to combo two, which is this new road microphone that I plugged
[07:05] button for both, so they're both activated for auto switching. Now, another thing I can do is I can make one a higher priority than the other. That way, maybe this one is my guest, and I want them to be able to talk, and I want
[07:18] Oh, interesting." without it make my guest a high priority and I would make myself a low priority. So it only switches to me if I start talking for a longer period of time.
[07:33] you can see how it works. [music] And then on this device here, I'm going to The light turns blue and it automatically switches to my camera angle because I'm talking into this microphone. But if I move it further
[07:47] away, if I talk into this microphone, it's going to switch to this camera angle because this camera and this microphone are linked. And then I go back to this microphone
[07:59] and it switches back to here. But if I hit any of these buttons on here, the auto button turns back to white and auto switching automatically turns off. [music] I'm back to manual mode. Now, if two microphones isn't enough for you,
[08:12] you can expand it. If you were to take a Roadcaster Pro 2 or the Roadcaster Duo, Roadcaster Pro 2 or the Roadcaster Duo, you can go out of the second USB port and go into uh again, this one right here, the four right there. That's your
[08:26] expansion port. Or if three cameras isn't enough for you, you can connect isn't enough for you, you can connect something like a Cam Link and plug in a fourth HDMI port, a fourth camera into there, and you have four capture cards
[08:39] now, making this thing super expandable and and versatile for starting a podcast on easy [music] mode. And that's it. That is the entire podcast properly [music] edited on the fly. That's the most important stuff. I have a feeling
[08:52] we did not make it under 5 minutes and I formally apologize. But let me go back to my office and let's talk about the Roadcaster Video S and my thoughts on process. So, I really like this device. This is the Roadcaster Video S. It's the
[09:06] smaller version of the Roadcaster Video that came out last year. These two are essentially the same thing except the original one has an extra USB port, an extra HDMI out, an extra HDMI in. Basically, it's it's bigger, more
[09:21] buttons, more ports, but same exact video quality between the two. Same exact capabilities, same features. It's important to know what this is, though, because it got criticized originally for being compared to the Blackmagic A10
[09:35] Pro, which is an HDMI switcher. You plug in multiple cameras and you switch time with some other features like picturein picture, etc. This is a bit more than that. This is an HDMI switcher
[09:50] plus a professional mixer because it's got all the hardware of the Roadcaster Pro, the audio mixer, and it's got basically a PC built into it for some building that you saw for professional keying, uh, professional audio mixing.
[10:05] So, it's kind of a a threein- one, a video, audio, and PC allin-one device. The main complaint of the original Roadcaster Video was that it didn't do 4K. you were limited to 1080p and this was $1,200. That's not really an
[10:21] willing to pay $1,200 for a piece of gear are going to be the people that want 4K. And I understand that complaint, but I also understand that that was a machine that had four capture cards built into it and two uh XLR
[10:37] inputs with full audio mixing suite built into it and a full PC built into it that could record every single input at the same time. and [music] adding 4K to that processing power would have made it much more expensive than $1,200.
[10:52] So, it kind of landed in this weird middle ground where it was not high enough spec at only 1080p. It was it was kind of kneecapped for the pros, but at $1,200, it was too expensive for the entry-level people, and it was in this
[11:05] weird middle ground. They had two options for releasing the next generation. They can either beef up the specs, make it 4K and release a higherend version, or they can lower the price, which they
[11:18] did, down to $500. And all this is is one less HDMI in, one And all this is is one less HDMI in, one less HDMI out, one less USB port, and fewer buttons. The rest is exactly the same. Okay, no SD card and also no
[11:35] speaker monitor outs, but essentially the exact same device with the exact same capabilities for less than half the price. You're just missing some I/IO. So, I am a big fan of this device. Every time I look at it and sit down, I think
[11:47] it's going to be way more complicated than it is and then takes me 10 minutes to set everything up. It's probably the best, simplest, and most costefficient way of starting a podcast. It's only $500
[12:00] plus the cost of mics plus the cost of cameras. But if we're being real here, it's probably a good thing that there's still some financial barrier to starting a podcast. We all know someone that would start a podcast if it was free
[12:14] that probably shouldn't start a podcast. So road, don't make your next one cheaper. Just add 4K to the next one. Just add 4K to the next one. You're crushing it. Happy streaming.
⚡ Saved you 0h 12m reading this? Transcribe any YouTube video for free — no signup needed.