5-Minute Frozen Empanada Hack
44sShows how to make empanadas from frozen in minutes, appealing to viewers wanting quick, late-night snacks.
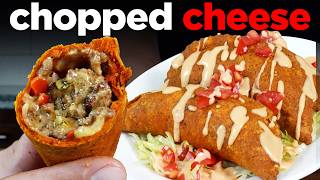
▶ Play ClipThis video presents a recipe for empanadas with a red achiote-spiced dough and a New York-inspired chopped cheese filling. The creator demonstrates how to make the dough and filling, then shows three cooking methods: baking, air frying, and deep frying. A key technique is freezing the empanadas to achieve extra flakiness through thermal shock, allowing for a quick 5-minute cook from frozen.
Use achiote (annatto) powder for color and flavor; cold lard or butter for flakiness; vinegar to inhibit gluten.
Ground beef cooked with onions, peppers, garlic, pickled jalapeños, and a blend of American and Mexican cheeses, plus sazón seasoning.
Freezing the empanadas creates thermal shock when cooked, leading to a flakier crust, especially when deep fried.
Bake at 400-425°F for 25 minutes; air fry at 375°F for 25 minutes; deep fry at 340-350°F for 4-5 minutes from frozen.
Preheat oil to 365-370°F so it drops to 340-350°F when frozen empanadas are added; fry for 4-5 minutes until golden and bubbly.
"The title accurately reflects the core promise: making empanadas in 5 minutes from frozen, though the prep time is longer."
What gives the empanada dough its red color?
Achiote (annatto) powder
1:05
Why is vinegar added to the empanada dough?
To inhibit gluten development and keep the dough tender
1:54
What are the main ingredients in the chopped cheese filling?
Ground beef, onions, bell peppers, garlic, pickled jalapeños, American cheese, and Mexican cheese blend
3:47
What secret ingredient is added to the filling for extra flavor?
Sazón seasoning packet
4:37
What is the scientific principle that makes frozen empanadas extra flaky when deep fried?
Thermal shock: the rapid temperature change causes steam to puff the dough layers
11:01
What oil temperature should you preheat to for deep frying frozen empanadas?
365-370°F (185-188°C) so it drops to 340-350°F (170-177°C) when frozen empanadas are added
14:50
How long do frozen empanadas take to deep fry?
4-5 minutes
15:01
What are the recommended oven and air fryer settings for cooking empanadas?
Bake at 400-425°F for 25 minutes; air fry at 375°F for 25 minutes
11:47
Vinegar inhibits gluten
Explains a key dough science tip for tender pastry.
1:54Thermal shock for flakiness
Reveals the science behind why frozen empanadas become exceptionally flaky when fried.
11:01Oil temperature management
Provides precise temperature guidance for frying frozen empanadas to avoid undercooking.
14:50Empanada as a framework
Emphasizes that empanadas can be filled with anything, like ravioli, encouraging creativity.
3:42[00:00] You've had an empanada before, but you
[00:02] never had one at home at midnight in 5
[00:04] minutes straight from your freezer.
[00:06] Inspired by this Filipino empanada
[00:09] that's making the rounds. This
[00:10] incredible red aiote spiked dough, flaky
[00:15] and crisp. Sort of reminded me of like a
[00:17] Jamaican beef patty out of bodega. So
[00:19] today I'm showing you how to make
[00:20] empanada dough spiked with that
[00:22] beautiful red and filled with a bodega
[00:25] specialty that I love along with a trick
[00:27] to be able to make these at home within
[00:30] 5 minutes anytime you want. This is the
[00:33] chopped cheese and panada. And I'm going
[00:35] to show you three ways of making them
[00:37] each resulting in slightly different
[00:39] characteristics. Airfried, baked, and
[00:42] deep fried. And let me tell you while
[00:44] all of them are great. Deep fried is
[00:46] something special thanks to a little
[00:48] thing called thermal shock, which we'll
[00:50] talk about later. For now, we got to
[00:52] make our dough. So, I've got a food
[00:54] processor here. Into the bowl, we're
[00:56] going to add 3 cups or about 370 g of
[01:00] allpurpose flour. Season that with a
[01:03] pinch of salt. Then, I just got some
[01:05] anato achiote powder. Did I say paste
[01:08] earlier? The powder is better. The paste
[01:10] is difficult to work with. I'm going to
[01:12] spike that flour. about two tablespoons
[01:15] of the achiote. We're going to get that
[01:17] on.
[01:20] Add a little bit more. I want to make
[01:21] sure they're nice and red. Then I've got
[01:23] six tablespoons of cold lard. You can
[01:26] use butter. You just want to get that
[01:28] fat incorporated into the flour. All
[01:31] we're looking for is to be able to
[01:33] scrunch it up a bit. Right. That shows
[01:35] that fat is distributed. Here I got one
[01:37] egg. Let's go ahead and add some achiote
[01:39] to that. The liquids are probably a
[01:41] better vehicle.
[01:44] Get it going. And then we can add in our
[01:47] egg.
[01:49] Since we want them nice and tender, we
[01:51] don't really want to develop much
[01:52] gluten. So, I'm going to add vinegar,
[01:54] which inhibits gluten development. About
[01:56] a tablespoon. And then we're going to go
[01:58] ahead and pulse in about a half a cup to
[02:02] start of cold water. Little at a time.
[02:09] And you can see some are like darker
[02:11] red, some are drier. I really just want
[02:13] them to all be one color of red.
[02:18] That's what you're looking for. Now, I
[02:19] didn't really even use all that half
[02:21] cup. I probably used around a/4 of a
[02:24] cup. We can get it out of the food
[02:26] processor and see where we're at. Now,
[02:27] I've got a penion of cutting myself on
[02:30] this thing, so always be careful. Maybe
[02:32] needs a little bit more.
[02:37] Now, I'm not kneading it. I'm more like
[02:39] I'm compressing. When I want to add a
[02:40] little bit more moisture, I just pour it
[02:42] into my hands. Just work it in.
[02:48] Now, I've got my ball of dough.
[02:51] What I want to do, turn it into a disc,
[02:55] and I want to cut it into fours.
[02:59] You see all those layers? I'm going to
[03:01] stack them.
[03:04] Now, I can see the edges are pretty
[03:05] hydrated. I've used I don't know a bit
[03:08] more than a/4 of a cup of water. Get
[03:11] that board wiped clean.
[03:14] We're going to get that wrapped. Now,
[03:16] besides the act of preventing gluten
[03:19] development best we can, this is a lot
[03:21] like pasta. We're essentially making
[03:23] Latin raviolis. And so, your pasta
[03:26] training today will pay off. It's going
[03:28] to go into the fridge and relax while we
[03:30] prepare other things. Now, on to the
[03:32] filling. The empanada from the
[03:34] Philippines. It's got langana, mung
[03:38] beans, but I'm a New Yorker and an
[03:40] empanada can be filled with anything
[03:42] much like a ravioli. So, given my bodega
[03:45] inspiration earlier, we're doing chopped
[03:47] cheese filling. Just took some ground
[03:49] beef and form them into patties. Just
[03:51] set that off to the side. I got my
[03:52] onion. I got some garlic. Got a red bell
[03:54] pepper and pickled jalapenos. So, I have
[03:57] one onion. I'm going to cut it in half.
[03:59] Going to make some cuts along the top.
[04:01] We're just going to dice it up. Bell
[04:04] pepper. Just cut the cheeks off. We're
[04:07] going to take those. We're going to cut
[04:08] them into strips. Turn that. And we cut
[04:12] them into a little dice. Those into a
[04:15] bowl. Slice our garlic.
[04:19] Then I got my pickled jalapenos. They're
[04:21] in some of their liquid I've got there.
[04:23] I'm going to keep that. Going to add
[04:25] that into the mixture for some acidity.
[04:27] I'm just going to chop up the jalapenos.
[04:30] Get them back into that little bowl. And
[04:33] of course, we got some seasonings. A
[04:34] little garlic powder, a little onion
[04:35] powder, and a little secret trick of the
[04:37] trade. One of these saon packages. It's
[04:40] got inato in it. The same thing we added
[04:42] to the dough. It's got MSG. It's got all
[04:45] the good stuff. Then, of course, we're
[04:46] adding some cheese later. A little bit
[04:47] of American, a little bit of a Mexican
[04:50] blend. Now, we're ready to cook. So, I'm
[04:52] going to go ahead and get the widest
[04:53] sauté pan I've got on the stove
[04:56] preheating on mediumigh heat. I've got
[04:58] my lard off to the side. Since this is
[05:01] an empanada recipe, I'm going to add the
[05:03] lard to cook this beef in. And then I'm
[05:05] going to add in my burger patties. I'm
[05:07] going to allow them to sear on that
[05:09] first side for a good 2 minutes. Once I
[05:12] start to see browning around the edges,
[05:13] I'll give them a flip. They're not
[05:15] perfectly seared, but that's okay. We're
[05:17] going to continue to sear that second
[05:18] side before proceeding to break up the
[05:21] meat into a nice mince. While that
[05:23] happens, that moisture in the meat is
[05:25] going to release. And we need to be
[05:26] patient and cook out that moisture
[05:28] before the meat begins to brown again.
[05:30] Once we've got a good amount of that
[05:31] moisture evaporated, I'm going to push
[05:33] the meat off to the side and go ahead
[05:35] and add in my onions and my peppers.
[05:37] Season the vegetables. I'm really just
[05:40] looking for them to soften, slightly
[05:42] caramelize a bit before I start
[05:44] incorporating them into the meat. Once
[05:46] those vegetables are mixed in and are
[05:48] starting to soften, then we can go ahead
[05:50] and add in our garlic. And then we could
[05:52] just allow that to start to soften as
[05:54] well. And then get that mixed in. and
[05:56] allow this whole mixture to cook down a
[05:57] bit. And then we can go ahead and add in
[05:59] the chopped pickled jalapenos with that
[06:02] liquid. That liquid will sort of deglaze
[06:03] the pan a bit and get that pickled
[06:05] flavor, that acidity mixed into the
[06:08] meat. Wakes everything up. Once
[06:10] everything's looking great, we're going
[06:11] to start to add in the spices. A little
[06:13] bit of garlic powder, a little bit of
[06:14] onion powder, and then finally that
[06:16] packet of sone. Maybe like a half a
[06:18] pack. Then we're going to get that mixed
[06:20] in and allow those spices to fry a bit
[06:22] and wake up. If everything's looking
[06:25] good, we can go ahead and start to add
[06:27] in our cheeses. I'm going to go with
[06:28] about six slices of American cheese and
[06:32] just slap it on top and allow that steam
[06:34] to sort of loosen it and melt it and get
[06:36] it nice and gooey before we start to
[06:39] fold it into the meat. That cheese
[06:41] should bind it all almost gluing all the
[06:44] meat to one another. Then I'm going to
[06:46] go with a shredded blend of like a four
[06:48] Mexican cheese blend. Get that starting
[06:51] to melt and then we can start to
[06:52] transfer this out of the pan and into a
[06:55] bowl. Also going to add the rest of the
[06:57] cheese in and just fold it so we can try
[07:00] and get some stringy action after
[07:02] they're cooked. You see how it's kind of
[07:04] like homogeneous? That's actually what
[07:06] you want. It's going to create a dense
[07:08] filling so that when you fry it and when
[07:11] you're done you eat it, it's not like
[07:12] this hollow thing. Gooey homogeneous
[07:15] mess. A little bit New York, a little
[07:17] bit Latin. It's going to be so good.
[07:19] Now, while that cools, I told you we
[07:21] were going to be cooking these three
[07:22] different ways: deep fried, baked, and
[07:25] air fried. And today, we'll be using the
[07:27] Sousi Kitchen Robot from our sponsor
[07:30] today, Sousi. But Sousi is much more
[07:32] than an air fryer. Sousie is a smart
[07:34] countertop oven and meal delivery
[07:36] service designed to be a convenient,
[07:38] time-saving cooking solution, not just a
[07:40] meal kit. And while you can use it to
[07:42] cook your recipes, you can also choose
[07:44] one of Suve's over 50 chef crafted
[07:47] meals. All you got to do is load that
[07:49] meal up by tapping the recipe card up to
[07:52] the appliance. Then choose what time you
[07:54] want your food to be ready. And with its
[07:56] cool to cook technology, Sousi will
[07:59] safely keep it cool all day and then
[08:01] begin to cook it at your desired time
[08:03] automatically. You don't even need to be
[08:05] home. Saves you time, lets you schedule
[08:07] ahead, and allows for home-cooked meals
[08:09] for people who might not have all the
[08:11] time in the world to cook for themselves
[08:13] or their family. Besides air frying,
[08:15] Sousi's 15 cook modes include roast,
[08:17] broil, slowcooked, steam, and sousi. So,
[08:20] you get perfectly cooked meals, no soggy
[08:23] microwaved food. And the best part about
[08:24] it is Suvi is offering a 100-day
[08:26] risk-free trial. So, you can give it a
[08:28] try, and if it's not for you, Sousi will
[08:31] make it right. That's a fair deal in my
[08:33] book. Just click the link in the
[08:35] description and take advantage of
[08:36] Sousie's 100day risk-free trial. Let's
[08:39] get back into the video. Now, we've got
[08:41] our dough. Let's unravel it. Not going
[08:43] to work with all this dough at once. So,
[08:45] let's cut it in half. Now, I'm going to
[08:48] flatten a piece out. I'm going to start
[08:50] rolling it.
[08:53] I don't need to get it super thin. Then,
[08:55] what I can do is take a ring mold like
[08:57] this, punch out two circles.
[09:02] Now, make sure you get them pretty wide
[09:04] just so you can fit the ring mold.
[09:08] Keep moving it around so it doesn't
[09:10] stick.
[09:12] Then what we do, we take the rolling pin
[09:14] and then we thin it out even more into a
[09:17] nice big circle just like our pasta
[09:19] dough. Quarter turns to keep the circle
[09:22] intact.
[09:24] And this is for if you want to make like
[09:26] a nice big empanada. I go roughly the
[09:29] size of my hand. Then we go a little bit
[09:31] of water that we're just going to wipe
[09:32] on one half. Then I've got my meat here.
[09:35] What I want to do is take one of these
[09:37] ice cream scoops and I want to pack it
[09:39] in there. Remember, we want density so
[09:41] that it doesn't sort of collapse. And
[09:44] then what I'm going to do is take that
[09:45] and sort of mold it. And then what we
[09:47] do, fold it over, pick it up, and I'm
[09:51] going to start at the center where I
[09:52] kept it met. And then I'm going to take
[09:54] my finger and press the air out towards
[09:56] the side where I'm going to pinch it.
[09:59] And then make my way back towards the
[10:01] other side, pressing air out until we
[10:04] get back and we pinch it down here. Now
[10:07] you can flatten it out. I like to lay it
[10:09] down and then use the curvature of my
[10:12] thumbs, sort of seal the meat in there.
[10:15] Now I have this little dowel here to
[10:16] thin out and seal the edges. Pasta
[10:19] cutter with the fluted edge. And we just
[10:21] go around and you got a beautiful
[10:22] empanada in which we're going to place
[10:26] on a sheet tray and it'll go in the
[10:27] freezer.
[10:32] Now with that recipe, you get 12
[10:34] empanadas. And all 12 of the empanadas
[10:37] are in the freezer right now. That's
[10:39] doing two things. One, it allows us to
[10:42] have empanadas in the freezer accessible
[10:44] to us at all times. And if you're frying
[10:47] them, that's empanadas in about 5
[10:50] minutes if your frying oils up to
[10:52] temperature. And at most if you're air
[10:54] frying or baking, 25, 30 minutes. But
[10:56] having them in there means you got
[10:58] empanadas. The second reason is a thing
[11:01] called thermal shock. Here's the idea.
[11:04] Cold dough goes into a hot oven. That
[11:06] kind of creates a reaction where the
[11:08] steam inside of the dough evaporates
[11:10] quickly which puffs the layers of the
[11:12] dough. That happens usually with any
[11:14] dough. But now that we're freezing it
[11:16] and then especially when we deep fry it,
[11:18] those are like extremes, right? So
[11:21] that's going to create real thermal
[11:22] shock. It's going to create a nice
[11:24] tender flaky dough. That's the science
[11:26] lesson of the day. Now, today we're
[11:28] going to bake and air fry our empanadas,
[11:30] and we're going to wait till some of
[11:31] them freeze, and I'm going to show you
[11:33] how they fry up once frozen. First up,
[11:36] we're going to place two of our
[11:37] empanadas on a sizzle platter. All we
[11:39] have to do with these is give them an
[11:41] egg wash. Try and be a little light with
[11:43] it. Get those into about a 400 425°
[11:47] oven. You know, depending on your oven,
[11:48] it's kind of like not browning. Maybe
[11:50] jack it up to 425, but try 400. Place it
[11:53] in the oven for about 25 minutes. We're
[11:56] just looking for that to get brown and
[11:58] beautiful. Then we're going to set up
[11:59] our sousvi for air frying. I've got a
[12:01] drip pan at the low level and then my
[12:03] air frying basket set up in the top
[12:06] shelf of the sousi. I'm going to turn it
[12:08] on, start my cook. The bottom zone is
[12:11] going to be empty on the top zone. We're
[12:13] going to go air fry. I'm going to air
[12:15] fry at 375
[12:18] for about 25 minutes. I get that started
[12:20] now. Get that warming up before these go
[12:23] in the air fryer basket. We can just
[12:25] give those a brush with an egg wash as
[12:27] well. And then we just pop these into
[12:29] the air fryer and let these cook.
[12:33] After about 25 minutes, our baked
[12:35] empanadas are done
[12:39] as are our air fried and we can rest
[12:42] them on a wire rack.
[12:46] Very similar looking
[12:48] mother. All right, we got to let these
[12:50] cool off first. In the meantime, we're
[12:53] going to make a little bodega sauce. Hit
[12:55] it with a little mayo, a little ketchup,
[12:57] a little yellow mustard, a little of
[12:58] that jalapeno juice, another one of
[13:01] those saone packets. Maybe half.
[13:08] Touch more ketchup. Looking for that
[13:09] rosy pink. And take one of our
[13:12] empanadas, a little shredded lettuce, a
[13:15] little diced tomato, bodega sauce all
[13:17] around.
[13:21] Let's see what our air fryer looks like.
[13:25] Take some of our lettuce.
[13:28] Bakes pretty much like a pie dough or a
[13:30] pie crust. Tender, flaky. You can see
[13:33] the flakes throughout. And that's
[13:35] lovely. But I must say, there's just
[13:36] something about the way the fried ones
[13:38] come out that's exceptional. And
[13:41] tomorrow I'm going to show you what it
[13:42] looks like after a day in the freezer.
[13:44] Now they're nice and frozen. So, what we
[13:47] can do now is just package these up for
[13:50] storage in the freezer and we can
[13:53] literally come out and grab them
[13:55] whenever we want. This is the type of
[13:57] meal prep I'm talking about. So, into
[13:59] the freezer tomorrow, we'll wrap it up.
[14:02] Now, here we are the next day or could
[14:04] be 3 months from now. And we got frozen
[14:07] empanadas. Just got home from a night
[14:09] out. I got the munchies. We've already
[14:11] got our oil heating up, so I'm just
[14:13] going to add a little bit of the lard to
[14:14] it just to reinforce some of that
[14:16] flavor. Once we're up to temperature, we
[14:18] got empanadas in 5 minutes. Now, because
[14:21] they're frozen, we need to think about
[14:22] two things. Both based around the
[14:24] temperature of the cooking oil. Because
[14:27] they're frozen, we can't cook them too
[14:29] high of a heat, otherwise the outside
[14:31] crust will cook while the inside stays
[14:34] lukewarm. But we need to get that
[14:36] temperature of the oil high enough
[14:38] because they're frozen. And so that's
[14:40] going to drop the temperature of the oil
[14:42] once we add them to the oil. And so I
[14:44] want to cook them around 340 to 350
[14:47] degrees. So preheating the oil to get it
[14:50] to around 365 370 should drop that heat
[14:54] down to 350 once the empanadas hit the
[14:57] oil. And then all we're going to do is
[14:59] gently fry them for about 4 5 minutes.
[15:03] Generally, we're just looking for the
[15:04] outside to create these bubbles as that
[15:07] thermal shock, which has intensified
[15:10] because of the frozen empanadas, hits
[15:12] the hot oil and all of that dough starts
[15:14] to flake and kind of bubble up a little
[15:17] bit as the steam expands the dough.
[15:23] And once they're golden brown and
[15:25] crispy, we can remove them and dry them
[15:28] on a wire rack. Now, do you see what I'm
[15:30] talking about? When you fry it, there's
[15:32] almost like these layers of flaky pastry
[15:35] that develop because of that thermal
[15:37] shock. They separate more because the
[15:40] heat difference is more intense. It's a
[15:42] much more delicate crisp rather than a
[15:45] crunch. Creates these like air bubbles
[15:47] in the dough that the baked and airfried
[15:49] version kind of lack. Let's see how we
[15:51] did. Smells incredible. You can smell
[15:54] the achiote. You can see the sort of
[15:56] flakes and layers of the pastry.
[16:00] It's amazing. Got this little serving
[16:02] platter right here. Going to place a
[16:03] little bed of shredded lettuce and
[16:05] empanada on top.
[16:08] A little bit tomato for that bodega
[16:10] specialty. A little bit of bodega sauce
[16:12] on top.
[16:16] That's my chopped cheese empanada. Now,
[16:18] of course, you could not add the
[16:21] achiote. You could add picadillo or
[16:23] brazed beef. Whatever you want to add
[16:25] inside, that's up to you. It's more of a
[16:27] framework to make empanadas the way you
[16:30] want and to have them in the freezer
[16:31] whenever you want, which I think is a
[16:33] nice thing to have. Recipes going to be
[16:35] down in the description. That's all that
[16:37] we have today. I'll see you next time.
[16:39] Until then, take care of yourself and go
[16:41] feed yourself.
⚡ Saved you 0h 16m reading this? Transcribe any YouTube video for free — no signup needed.