
AI Summary
This video is a detailed teardown of Valve's Steam Machine, a compact pre-built desktop PC designed for living room gaming. The host walks through the disassembly process, highlighting the device's modular design, upgradeable components, and thoughtful engineering choices, while also noting the high price and lack of included controller.
Chapters
Valve's compact pre-built desktop PC for living room gaming, starting at $1,049, with no controller included (extra $100).
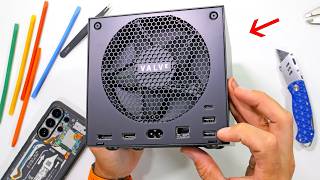
The box has a large fan with hexagonal grill, DisplayPort, HDMI, power port, Ethernet, and USB-C ports. It is six times more powerful than the Steam Deck.
Removing four rubberized T8 screw feet reveals screws; the back grill lifts off after removing two more T8 screws, exposing three more screws holding the computational hardware.
Access to M.2 SSD for storage; Wi-Fi 6 and Bluetooth antennas are visible; LED strip connector is present.
Removing the USB-C/Ethernet board reveals the cooling system: cool air from bottom and front, hot air out the back via vapor chamber.
Backside of motherboard shows upgradeable RAM; adding a second 16GB stick could boost frame rates by ~15% via dual-channel.
Power supply has potting material to prevent component snapping and reduce coil whine; power transferred via two female receivers.
Screws numbered and springs color-coded; thermal paste on AMD processor and 8GB VRAM; copper vapor chamber dissipates heat.
Steam Machine uses one screw type, RAM upgradeable in ~10 minutes; overall design praised for efficiency.
Reassembled and powered on successfully; host promotes dbrand X-ray skins as a mod.
The Steam Machine is a well-engineered, upgradeable PC with a thoughtful teardown-friendly design, though its high price and lack of included controller may deter some buyers.
Mentioned in this Video
Tutorial Checklist
Study Flashcards (7)
What is the starting price of the Steam Machine?
easy
Click to reveal answer
What is the starting price of the Steam Machine?
$1,049
00:15
How much more does the controller cost?
easy
Click to reveal answer
How much more does the controller cost?
$100
00:15
What type of screw is used for the feet?
easy
Click to reveal answer
What type of screw is used for the feet?
T8
01:02
What is the purpose of the potting material in the power supply?
medium
Click to reveal answer
What is the purpose of the potting material in the power supply?
To keep coils and capacitors from snapping off and to reduce coil whine.
03:48
What is the potential frame rate boost from adding a second RAM stick?
medium
Click to reveal answer
What is the potential frame rate boost from adding a second RAM stick?
About 15%
04:28
What type of storage does the Steam Machine use?
easy
Click to reveal answer
What type of storage does the Steam Machine use?
M.2 SSD
02:01
How many screws are needed to remove the back grill?
easy
Click to reveal answer
How many screws are needed to remove the back grill?
Two T8 screws
01:16
💡 Key Takeaways
Upgradeable RAM
Shows that the Steam Machine allows user upgrades, a key selling point.
03:34Color-coded springs
Demonstrates Valve's attention to user-friendly design.
04:42Single screw type
Highlights the simplicity of the teardown process.
05:47Full Transcript
[00:02] quite a few grandmas out there looking to buy a new iron and confuse quite a going to be more affordable when they got older. Inside this cardboard box is a compact pre-built desktop computer designed by
[00:15] Valve to bring PC gaming to your living room TV and it starts at $1,049. the box, but no controller. That would cost $100 more. But, the box is rather
[00:31] exquisite. The accordionated cardboard is definitely worth every penny. Steam Deck, that's to be sure, [clears throat] and six times more
[00:46] powerful than its handheld counterpart. It also has a magnetically removable, back to this later. The rest of the Tesseract includes a large fan with its hexagonal grill, display port, HDMI, power port, Ethernet, and USB-C ports.
[01:02] Steam Machine was going to be difficult, but then I remembered that Valve isn't Apple and they would probably throw us a nice bone or two inside and it looks like I was right. On the bottom, we find four visible rubberized T8 screw feet
[01:16] seas that I can take out. The rubber washer stays captive and there's a small screws in place. Once those four pads are gone, I can flip her over to that back fan and unscrew two more T8 screws at the top.
[01:29] These are captively locked into the panel, so they are impossible to lose, just like we see inside of the Framework laptop, which is almost the same price. The back grill can lift up and now from the frame, exposing three more screws
[01:42] holding the rest of the computational hardware inside the box. And that's it. out of your Steam Machine, then this is probably as far as you need to go. A few soft blasts of compressed air should get all the dust out of the aluminum fins.
[02:01] >> Not really, but thanks. >> Flipping it over again to the underside, we have access to the M.2 SSD. This is the long-term hard drive storage where the Steam operating system and all your games are stored on. If you want to
[02:14] expand the brain to 2 or 4 TB, you'll need to clone this drive. But, that's beyond the scope of our budget and the scope of this teardown. We'll put them right back in for safekeeping. One cool thing that Valve has done is to separate
[02:26] You can see all these little wires heading out to each of the corners of the box. Two wires are for the Wi-Fi 6, the other is for Bluetooth, and the controllers, which are also way out of my budget right now, so I'll be trying
[02:40] right here is for the LED strip in the front. When you peel up the lips, it kind of snarls at you in that creepy, weird little way with its LED teeth. Let's never do that again. I'll remove four more screws holding down the
[02:53] LEGO-style ribbon connectors. If we want to see the cooling and the processor, We do have to completely remove the USB-C and Ethernet port board, since there is one more fan screw hiding
[03:05] impressively long, not used to seeing that, and I'll remove one last fan screw motherboard. The space in here is used incredibly efficiently. Cool air gets pulled in from the bottom vent and front panel
[03:20] vent, and then the hot air gets blasted out of the back of the Steam Deck after the vapor chamber. I'll remove four more screws holding the heat sink and LEGO-style ribbon cables we unplugged earlier also have to be unstuck from the
[03:34] sides of the power supply. And there it is, the backside of the motherboard with its RAM now visible and very upgradeable. We'll get to that in a second. First, I'll pop open the power supply. This guy has four silver screws
[03:48] of its own, and once the top gets lifted off, we see globs and globs of some hard plasticky compound. It looks like a Jigglypuff porta-potty. The stiff plasticky potting material helps keep the coils and capacitors from snapping
[04:00] off when you throw the Steam Machine in your backpack. It also helps eliminate the electromagnetical vibrations and reduce the high-pitched coil whine that on. But, one thing I know about capacitors is that I don't want to be
[04:13] back on and make my way back to the motherboard. If you look here in the corner of the power supply, it has two female receivers that correspond with is how the power supply transfers its power onto the circuits. I have 16 gigs
[04:28] have the funds available, adding a second 16-gig stick to the other slot would unlock the dual-channel bandwidth, and it might boost your frame rates by about 15%. But, to buy that RAM, you'll probably have to mortgage your house.
[04:42] I'm just kidding, nobody has a house. Valve has been nice enough to number the screws on the back of the CPU cooler, and even color-code the springs on the CPU bracket. We have silver, black, green, blue, orange, and pink anodized
[04:55] springs. It's kind of cool, and I feel sad for people who aren't subscribed. things. And then, finally, we can lift the motherboard away from the CPU vast majority of the space inside of the
[05:08] pink thermal paste sitting on top of both the AMD processor and even more thermal paste chilling the 8 gigs of VRAM for the AMD GPU. And we get our closer look at the copper vapor chamber
[05:20] snaking through the aluminum fins as it tries to quietly dissipate the heat tries to quietly dissipate the heat generated from that main board. Machine would use the steamy vapor in a heat pipe for cooling. But, with how
[05:34] days, the Steam Machine box could probably be half this size if it was liquid cooled, like what we saw on the Red Magic Astra 2 gaming tablet. Maybe smaller. To be honest, I'm kind of
[05:47] apart. The Steam Machine has basically one screw type and I could upgrade the RAM in about 10 minutes if the data centers weren't hogging it all. Not bad. Not bad at all. With the Steam Machine slotted back into the exterior housing
[06:00] and the little rubber feeties screwed back into the base, it's time to see if the Steam Machine still turns on. Personally, I think the best mod anyone can make to their black box is to bring the insides to the outsides with my
[06:12] dbrand's X-ray skins. The skins come in both light and dark versions showing the actual metallurgical X-rays of the actual insides. Or, you know, if gaming is your world, you can square earth your box to better pwn the whole planet. Link
[06:25] is down in the description. I got a clean screen hooked up to my Steam button and just like that I can turn the whole world on. All in a day's work. If we get 50,000 likes, I'll sell a kidney and take apart the Steam Deck
[06:38] controller. And thanks a ton for watching. I'll see you around.