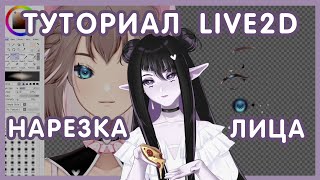
Why Face Cutting is Crucial for Live2D
45sTeaches a specific skill that many beginners struggle with, making it highly educational and shareable.
▶ Play ClipThis tutorial explains how to cut and prepare 2D face parts for Live2D rigging, covering essential layers for the face, mouth, nose, eyes, and eyebrows to ensure smooth deformation and animation.
The video begins a series on creating 2D models for Live2D rigging, focusing on cutting the face and its parts for comfortable subsequent work.
A magic ball (any color) covers the line during rigging. The base is combined with blush, but can be separate. A volumetric shadow is needed for the rigger to create volume.
The bark (likely 'neck') should be separate to be covered by the magic ball. The mouth consists of upper lip, shadow, lower lip, and a unification layer. Each part should be separate to avoid breaking during rigging.
Upper and lower teeth are sometimes cut into 3 parts, but deformation in Live2D handles it. Tongue and throat are included, totaling 9 layers for the mouth. Lower lip and tongue can be skipped depending on detail level.
A simple highlight is easy to deform. The nose can be made from 3 or 4 parts depending on realism desired. For a basic model, a simple option is recommended.
Eyebrows are simple; deformations are done in Live2D. Eyelashes include small, large, side, and lower lashes. Number of small lashes is unlimited, affecting physics.
The eye includes iris, pupil, highlight 1, highlight 2, and eyeball. For a detailed look, cut them separately. Total eye layers: 11. Beginners can merge glare, pupil, iris, and skip lashes.
Upper eyelid is translucent for easier deformation. Lower eyelids are unnecessary as the pupil attaches to the eyeball. The video concludes that while many layers seem daunting, practice makes it manageable.
Properly cutting face parts into separate layers is crucial for effective Live2D rigging, allowing for smooth deformation and animation. While the number of layers may seem overwhelming, practice and simplification for beginners can ease the process.
"The title accurately describes a tutorial on cutting face parts for Live2D rigging, delivering exactly what it promises."
What is the purpose of the 'magic ball' layer in Live2D rigging?
It covers the line during rigging and can be any color.
00:44
How many layers are recommended for the mouth in this tutorial?
9 layers: upper lip, shadow, lower lip, unification, upper teeth, lower teeth, tongue, throat, and possibly more.
02:10
Why should each part of the mouth be cut separately?
To prevent layers from breaking during rigging and to keep the edge even.
01:41
What is the recommended number of layers for the nose in a simple model?
A simple highlight is sufficient; for more realism, 3-4 parts can be used.
02:26
How many layers are suggested for the eyes in this tutorial?
11 layers: eyebrows, small eyelashes, large eyelashes, side eyelashes, lower eyelashes, iris, pupil, highlight 1, highlight 2, eyeball, and upper eyelid.
04:17
What is the benefit of making the upper eyelid translucent?
It makes deformation in Live2D much more convenient.
05:01
Why are lower eyelids considered unnecessary?
Because the pupil attaches to the eyeball in Live2D, so there is no need to hide it behind the lower eyelid.
05:16
What is the simplest eye cutting for beginners?
Merge the glare, pupil, and iris, and skip eyelashes; use three layers: upper eyelashes, side eyelashes, lower eyelashes.
04:30
Magic Ball Layer
Introduces a key technique for covering lines during rigging.
00:44Separate Mouth Parts
Emphasizes the importance of cutting mouth parts separately to avoid rigging issues.
01:41Eye Layers Detail
Highlights the complexity of eye rigging with 11 layers for detailed animation.
03:12Simplification for Beginners
Provides a practical tip to merge layers for easier rigging.
04:43[00:02] artist of the workers' association A.K. Recently, our community has been receiving questions in private messages Recently, our community has been receiving questions in private messages We have decided to release a series of videos explaining certain
[00:16] aspects of creating 2D models for the most comfortable subsequent work. Specifically, today we will talk about cutting the face and all its parts. For this, it was decided to take one of the latest works, you can see it on your screens, and so we
[00:31] will no longer drag the cat by the fact that it is lying there, and let's begin. As you can see, I unpinned all the layers so that you can see them better. layers so that you can see them better. First of all, we have this
[00:44] magic ball. It can be absolutely any color and is only needed to cover the line. It is used during the rigging itself. Next, the base, you will notice Next, the base, you will notice that it is immediately combined with the blush.
[00:59] It can be done separately, but in fact, there will not be much difference. Next, we have a shadow. Such a volumetric shadow is needed so that the rigger himself can
[01:11] drag it to create volume. And of course, we want the bark. It needs to be separate so that it can be covered with this very magic ball. magic ball. Let's move on to the mouth. The first thing
[01:26] we have is the upper lip, the shadow, the lower lip. Here we can see the unification behind which these lips will be hidden. Many people don't do them or combine
[01:41] each of these parts together. In fact, when rigging, there is a chance that your layers will simply break and in order for the edge to look even, it is better to do each the edge to look even, it is better to do each of these parts separately. Next, we have, well,
[01:55] come back to your homeland. Next, we have the upper teeth, the lower teeth, they are also sometimes cut into 3 parts, but in fact, all this is normally deformed in live 2D. You can even not worry too much about this: the
[02:10] tongue and the genus itself, more precisely, the throat, and so we genus itself, more precisely, the throat, and so we get one, two, three, 4, 5, six, 7, 8 as many as 9 layers on the mouth. You can skip the lower lip and the tongue. It all
[02:26] depends entirely on how much detail you are ready to work with and how much of a beginner you are. Let's detail you are ready to work with and how much of a beginner you are. Let's imagination. In my case, I am making a fairly simple option, this is a regular
[02:41] highlight and, in fact, . it's easy to deform and you don't need to put much effort into drawing it, however, you can make a nose from three words or four words. It all depends on how realistic you want the
[02:56] result to be. In my case, you can only dream of realism, but for a raid, this is the simplest and most convenient option. The eyes are the mirror of the soul. They set the main mood of your model, so
[03:12] here, but you don't have to waste time on details. So, first we have the eyebrows. There's nothing complicated with them. All deformations are done in Life 2D itself. That is, all emotions are done there. Next come the eyelashes.
[03:26] The number of small eyelashes is not limited. It all depends on how limited. It all depends on how hard you want them to flap during hard you want them to flap during physics. Your models are then represented by large
[03:38] physics. Your models are then represented by large eyelashes, side eyelashes. They are needed so that you can easily roll your eye when flapping, and lower eyelashes. I only have 4
[03:51] pieces. So, we're at the finish line. We only have the iris, pupil, and highlight number one. Highlight number two.
[04:03] In order to achieve the look of the eyes, it's better to cut them in more detail eyes, it's better to cut them in more detail and, of course, the eyeball. How could we do without them? and, of course, the eyeball. How could we do without them?
[04:17] the eyelids left and it turns out one two three 4 5 6 7 8 9 10 11 layers on the eyes, nothing to worry about, but when registering, you will have to suffer a little,
[04:30] of course, if you start, you can completely merge the glare, the pupil of the iris and do not worry about the eyelashes, the most correct and convenient cutting is a cutting
[04:43] of three layers: upper eyelashes, side eyelashes, lower eyelashes, you can not do the lower eyelashes, for example, simply because the pupil will still be attached to the eyeball in life 2d itself. As for the eyelids, in my
[05:01] case, here you can only see the upper one, it is translucent. Personally, I do this simply to make it much more convenient to deform it in life 2d itself. In the case of the lower eyelids, they are absolutely not necessary and because the
[05:16] same thing happens as with the pupil, everything is attached to the eyeball, that is, there is no point in hiding it behind the lower eyelid. Well, this is where the analysis of the cutting body is finished.
[05:29] The visa is the most with registration, by the way, as you can see many layers really It's a lot of work, but if you get used to it, it won't be difficult for you in the future. I hope this video was helpful, and if so,
[05:45] please leave a comment so we know if it makes sense to continue releasing videos like this. If you'd like to discuss anything specific, we'll be waiting for you there. Thank you very much for watching. Have a nice day.
⚡ Saved you 0h 06m reading this? Transcribe any YouTube video for free — no signup needed.