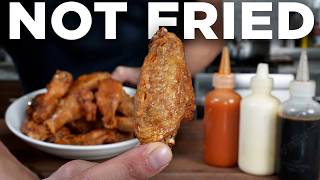

Secret to Crispy Chicken Wings
45sImmediately hooks viewers with a common problem (soggy wings) and teases a scientific secret.
▶ Play Clip"The title delivers exactly what it promises: a clear explanation of why steaming wings works, backed by science and multiple cooking methods."
This video reveals a science-backed trick for achieving perfectly crispy chicken wings that stay crunchy even after cooling. By steaming the wings before cooking, you pre-render fat and gelatinize starches, resulting in a thin, glass-like skin. The method works for frying, baking, and air-frying, and the host demonstrates three cooking methods along with homemade sauces.
Chicken wings cooked without batter often become soggy after frying, even with double frying. The solution is a steaming step backed by science.
The host demonstrates that the steaming trick works for fried, baked, and air-fried wings, catering to different preferences.
Pat wings dry, season with salt, and refrigerate overnight. This dries out the skin and allows salt to penetrate the meat.
Steaming the wings (inspired by Alton Brown) pre-renders subcutaneous fat and gelatinizes starches, creating a surface that browns evenly and stays crispy.
Steaming melts away excess fat that would otherwise make skin rubbery, and gelatinizes starches for a tighter, smoother skin that crisps up like glass.
The host uses a Sousi Kitchen Robot 3.0 with steam and air-fry functions. It offers 15 cooking modes and a 100-day risk-free trial.
After steaming, let wings dry again in the fridge (or use a fan) to ensure optimal crispiness. This can be done in one day or over multiple days.
Three sauces: teriyaki (soy sauce, mirin, sugar), buffalo (Frank's Red Hot with cold butter), and blue cheese dressing (sour cream, mayo, seasonings, blue cheese).
Spray wings with cooking oil, place in air fryer at 420°F for 45 minutes, rotating every 15 minutes for even browning.
Preheat oven to 450°F, place wings skin-side down on a hot sheet tray. Cook for about 30-35 minutes, flipping halfway, until deeply golden and crispy.
Fry at 350°F for 8-10 minutes. The pre-steamed wings produce gentle bubbling, resulting in a light golden brown, crispy skin.
All three methods yield crispy wings. Oven wings are more caramelized, deep-fried are lighter, air-fried are in between. The steaming trick ensures crispiness regardless of method.
Combine equal parts buffalo sauce, teriyaki sauce, and blue cheese dressing. Toss with wings for a one-sauce flavor bomb.
Even after sitting out, the wings remain crispy. The host emphasizes that planning ahead (drying and steaming) is key to restaurant-quality skin.
Steaming chicken wings before cooking is a game-changer for achieving lasting crispiness. With a little planning, you can enjoy perfectly crispy wings whether fried, baked, or air-fried.
Why does steaming chicken wings before cooking help achieve crispiness?
Steaming melts away excess subcutaneous fat and gelatinizes starches in the skin, creating a smoother surface that browns evenly and stays crispy.
02:21
What are the three cooking methods demonstrated for the wings?
Air frying, oven baking, and deep frying.
00:45
What is the basic ratio for making teriyaki sauce?
One part soy sauce, one part mirin, and one part sugar (brown sugar or honey).
05:30
How is buffalo sauce thickened and flavored?
By simmering Frank's Red Hot and then whisking in cold butter until emulsified.
06:26
What temperature and time are recommended for air frying the wings?
420°F for 45 minutes, rotating every 15 minutes.
08:24
How long should deep-fried wings cook at 350°F?
8 to 10 minutes.
09:17
What is the 'Buffalo Teriyaki Blue' sauce made of?
Equal parts buffalo sauce, teriyaki sauce, and blue cheese dressing.
11:26
Science of Steaming
Explains the dual scientific benefits: fat rendering and starch gelatinization, which are key to crispy skin.
02:21Post-Steam Drying
Emphasizes that drying after steaming is crucial for maximum crispiness, a step often overlooked.
04:06Comparison of Methods
Shows that all three methods produce crispy wings, proving the steaming trick works universally.
10:14Crispiness Test
Demonstrates that wings stay crispy even after 10 minutes, validating the effectiveness of the method.
12:05[00:02] life, and ensuring chicken wings are crispy is one of the most important ones. Now, it's easy to make a chicken wing crispy when you design the batter to specifically do so, as I've shown many times. But if you're a chicken wing
[00:14] wing. And the problem is, even if you double fry, chicken wings cooked naked without batter come out of the fryer crispy, but once become soggy. But there is a trick backed by science that will ensure your chicken wings stay crispy
[00:30] >> Yes, science. >> This is the secret to chicken wings that stay crispy. And since I know there's a spectrum of going to be doing them three ways. Fried, baked, and air fried to show you
[00:45] that this works any way you like it. Now, while this could all be done in one day, I've spread this out for various reasons. most importantly because that's how you get the best skin on a chicken wing. So, we got to rewind to 2 days
[00:59] The first step is to get your chicken wings out and dry them off really well. Then, we're going to season them on all sides with salt. This allows that salt to penetrate the chicken so that it's seasoned all the way through. We also
[01:13] like that we can give it time in the fridge to dry that skin out. You can do what they look like when you let that skin dry out overnight. Now, the secret is something I only started doing recently, but first saw maybe 25 years
[01:27] ago from Alton Brown on Good Eats over on Food Network when the Food Network was a cooking channel. Now, I always thought it sounded annoying to do this, but in reality, it's quite easy and effective. And that trick is steam.
[01:41] Little counterintuitive considering we just dried moisture out of it. Why would we steam it back in? I will get to that. But I'm going to be using our Sousie Kitchen Robot, which has a steam function on to steam the chicken wings.
[01:53] two baskets. They're both filled with just a little bit of water to steam. We we're just going to place our chicken wings in the basket. You want to do like a little bit of Tetris just to squeeze these guys in. Then, we're just going to
[02:06] slide our chicken in and allow them to steam. Now, steaming is a worthwhile step for two scientific reasons. the rendering of fat and the gelatinization of starch. Steaming wings first melts away the excessive subcutaneous fat that
[02:21] usually makes skin rubbery. It's almost like a pre-render, allowing it to actually get crisp up instead of that fat getting trapped underneath the skin, turning that crisp skin greasy and soft after cooking. It also partially
[02:34] gelatinizes the starches in the skin, which creates a much tighter, smoother surface that browns more evenly. Essentially, you're pre-rendering the wings so that by the time they hit the high heat, the skin is ready to turn
[02:46] into like a thin glass-like shell. Now, we are steaming it now, and one of the cooking them is air frying. And that's all thanks to our sponsor today, the Sousi Kitchen Robot 3.0. And it's not just steam or air fry. The Sousi has 15
[03:00] cooking modes, including roasting, broiling, slow cooking, sousieing, so that you get perfectly cooked meals rather than soggy microwaved ones. Suvi is more than a kitchen gadget. It's a smart countertop oven and a meal
[03:13] convenient, time-saving cooking solution, not just a meal kit. And while today we're cooking my recipe my way, you could choose from one of Suve's over 50 chef crafted meals. All you got to do is load the meal by tapping the recipe
[03:27] card to the appliance and the machine loads up the recipe and cooks it automatically. You can also choose what time you want the food to be ready. And with its cool to cook technology, Sousi will safely keep it cool all day and
[03:40] begin to cook it at your desired time automatically. You don't even need to be ahead, and allows for home-cooked meals for people who might not have time to cook at home. And the best part about Sui is they offer a 100-day risk-free
[03:53] you don't like it or it doesn't work, you send it back. Sui will make it right. So, to take advantage of Sousi's 100-day risk-free trial, head on down to the link in the description. You can feel the skin's tightened up like this.
[04:06] Feels how some chicken wings are actually served. You could see a little bit of the skin pull back. Tighten up. It's glistening. It's shining. That's perfect. What we have to do now, once again, let them dry. Back into the
[04:18] saying. How many days? Back into the fridge. Out of the fridge. Like, this is You can do this all in one day. You can use a little fan to help dry this out. We can also let this sit in the fridge for like an hour or two, then cook them.
[04:32] going for optimal. I'm going to show you the best way to do it. Then you can cheat a little bit in days or time if you'd like, but that's just me. See you tomorrow. Now remember, this can be done in one day, but this is day three. And
[04:48] in the fridge. And much like we saw when we made the porquetta, the skin going from white to sort of beige is an indication of like the drying of moisture. so we can be sure we've taken
[05:02] the proper precautions to ensure crispy skin on this chicken. Remember one of life's unbreakable rules. Now, before we cook these, we need to prepare the familiar sauces, but I'm going to showcase sort of a riff on it. First up,
[05:17] we need a teriyak because we're going to be making buffalo sauce and teriyak teriyak. It's like when the Power Rangers all come together to form that big new Power Ranger. And ultimately we'll be combining that with blue
[05:30] cheese. So what is a basic teriyak sauce? It's very easy. One part soy sauce, one part mirin, one part sugar. Can be brown sugar, honey, whatever. In a small pan, going to measure out a/4 cup of brown sugar. And we're just going
[05:45] to take the same measuring cup, measure out another part of soy sauce. Again, same thing with the mirin. And then just to show you, you can take a piece of garlic, smash it, and then we can steep that garlic flavor in there. Now, we
[05:59] just want to bring that teriyak up to a simmer. Allow the heat to melt that sugar, dissolve it into the mixture. And we just kind of want to let this cook for about 5 minutes at sort of a hard simmer. The longer you cook it, the
[06:12] allowed it to cook for that amount of time, turn off the heat and allow it to cool. Next up is the buffalo sauce. So, we start with Frank's Red Hot. That is the heart of a classic Buffalo sauce or the best kind in my opinion, the kind I
[06:26] grew up on. I'm going to add about half a bottle. For the buffalo sauce, we're just going to bring the Frank's Red Hot up to a simmer. Once it's simmering, we're going to take maybe 3 tablespoon of unsalted
[06:41] cold butter. Just like any butter sauce or finishing a pasta, we're going to slowly add the cold butter to the Frank's Red Hot until all the butter is emulsified and the sauce has thickened into a nice thick viscous buffalo sauce.
[06:55] up. You can kind of give it a little sneak peek. Oh, they go so well aside, allow those to cool. We're going to make our blue cheese dressing. Very simple. for a nice thick creamy one. One part sour cream, one part mayo. For the
[07:13] flavor, about a teaspoon of garlic powder, a teaspoon of onion powder, salt, fresh cracked black pepper, about a capful of white vinegar, capful wores sauce, tablespoon of Dijon mustard, and we're going to mix that together.
[07:31] little secret of mine, I don't really love blue cheese that much. I do like blue cheese dressing and I do understand it. But I take the unmoldy bits or like it. But I take the unmoldy bits or like the not the most extreme moldy crumbles
[07:44] and I add that into it. So you still get that little funk but it's not too intense. And I like to grind it in and try and melt it into the sauce. Add a little touch of agave and that sort of wakes up a little bit of the flavor. And
[07:56] I think that's good. It's really good. Now we can get into the chicken. So first up we got the air fryer. Divided all of those chicken into thirds. So, a third is going into the air fryer basket. First step is we just take some
[08:08] cooking spray. Flip them. Get them coated on all sides. that fat doesn't burn. Then the skin side up first. And we're just going to Robot. Then we're just going to set it to air fryer. We're going to turn the
[08:24] temp to 420. And we're going to set that to 45 minutes. Every 15 minutes or so, rotate and try and get a nice even browning on all the wings.
[08:37] Then the oven wings. Now, I've placed a sheet tray into the oven. The oven's sheet tray into the oven. The oven's been preheating at 450°, so this about 400° right now. I'm going to hit the pan with some spray and then get my chicken
[08:50] on, skin side down. You can cook them on a wire rack. I prefer them with direct contact. It's a faster, harder browning. Going to cook at 450 for about the same amount of time as the air fryer. That leaves us with six final wings that'll
[09:04] be going into the fryer. And once that oil is hot, we can gently add our chicken to the oil. And since it's nice and dried out and we steamed it and treated it, the frying is gentle. There's not this violent bubbling of
[09:17] moisture rapidly evaporating. So, we're going to allow that to cook, keeping the temperature nice and steady at 350 for about 8 to 10 minutes or until that skin is beautifully crispy and golden brown. Tossing them around frequently. After
[09:31] about 15 minutes or so, I can go ahead and check on the oven wings. They're getting deeply golden brown on that first side, so we can go ahead and flip whatsoever. We're also going to go ahead and rotate our air fryer wings. The air
[09:45] fryer, I like to do more of a frequent rotation. After a few more minutes, roughly around 30, 35 minutes total, the oven wings are done. Deeply browned and super crispy on all sides. We can remove those from the oven and allow those to
[10:00] cool on a wire rack. By now, the deep fried wings have been cooking about 8 to 9 minutes. They're very crispy. They're nice, lightly golden brown. And you'll notice that brown is slightly different than the brown of the oven wings. So
[10:14] than the brown of the oven wings. So here we have the oven, the deep fried, both crispy, different results. The oven is a little bit more brown, a little bit more caramelized. As you can see, there's this puffing creating. Sort of
[10:28] the same idea as the porquetta we cooked. Really delicious to eat. And that's the air fryer. Quite a nice job if you ask me. Now, the three methods lined up next to each other surprisingly is actually hard to discern
[10:43] which one is which. The deep fried ones definitely have a lighter hue, but And the air fryer and the oven baked ones are a bit of a darker, roastier, golden brown. Proof that the simple step of steaming wings first yields a perfect
[11:00] crispy wing. Any method that you choose. Now, let's throw a little bite together before making our final sauce just to see how we did with the wings. A little drizzle of buffalo sauce, a little teriyak sauce, and a little blue cheese.
[11:12] Take a little bite. I get a crispy skin. The meat is moist and tender, and you have to remember, dark meat chicken is tough. If you don't cook them long enough, your chicken will be rubbery, and that's a sin. Now that
[11:26] we've got our wings, we're going to make our buffalo teriyak blue. It involves one part buffalo sauce, one part teriyak sauce, and one part blue. You've got
[11:39] everything in one. No dipping of the blue cheese. All of it is in one. In with the wings and toss. These have been sitting. See how crunchy they are.
[11:53] Now, those are good looking wings. I actually like serving them in a basket. wing like this. You're gonna find the soft edge, the thing you can rip off
[12:05] right here. When you rip that off, you could just go in. minutes while I've been screwing around getting these photos. They haven't getting these photos. They haven't really lost that beautiful crisp.
[12:25] Let me see if I can find an air fryer. Can't even tell. Now, some are definitely crispier than others, but none of them are not crispy, even after sitting out for a good 10 minutes. They're moist inside and tender
[12:38] out of a chicken wing. And the sauce is just killer. Once you get over the idea that to get good chicken skin or skin on anything takes time in the refrigerator that crispy skin, and you can't just throw a wet piece of skin in an oven or
[12:53] a fryer. A little planning ahead is our way of acting more like a restaurant but be down in the description. I urge you to also check out our Patreon. All of these videos are posted a day early there and without any ads. And we also
[13:07] do two new cooking lessons apart from everything you see on this show. Focused today. I'll see you guys next time. Until then, take care of yourself and go Until then, take care of yourself and go feed yourself.

⚡ Saved you 0h 13m reading this? Transcribe any YouTube video for free — no signup needed.