Why You’re Losing Gunfights (It’s Not Your Aim)
44sChallenges the common belief that aim is the main problem, promising a deeper solution.
▶ Play ClipThis video argues that losing gunfights in Valorant is less about poor aim and more about creating unfavorable fight conditions before a shot is fired. The creator breaks down how positioning, movement, and information usage dictate whether a fight is easy or hard, shifting focus from mechanical skill to strategic fight setup.
Most players think losing gunfights is about aim (flick speed, spray control), but most fights are decided before any shot is fired due to bad fight creation.
Passive aim is crosshair already on target before the fight; active aim is reacting/flicking during the fight. The goal is to maximize passive aim.
Crosshair should be adjusted based on enemy weapon: wider placement for Spectre (expected wider swings), tighter for Operator (expected tight peeks).
Use passive aim most of the time (holding angles, clearing properly, with info). Active aim is a fallback for unpredictable situations.
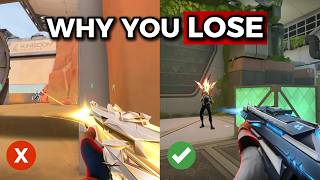
Good positioning forces enemies to flick onto you, making their fight harder. Avoid exposing yourself to multiple angles; isolate fights one at a time.
Use movement to adjust crosshair, not to force shots. Limit bursts to 2-3 bullets; avoid staying still. Jiggle peek before committing to gather info.
Minimap reveals teammate positions, enemy spots, and map gaps. Check it in safe moments (cover, holding site, in smoke). Predict enemy movement from gaps.
After any contact (kill or being spotted), move to a new spot to break enemy pre-aim. Don't stay in the same position.
Gunfights are won by setting up favorable conditions beforehand—good positioning, passive aim, and map awareness—rather than relying on raw mechanics. Make fights easier to win instead of trying to win harder fights with better aim.
"The title accurately promises an explanation for why players lose gunfights, and the video delivers exactly that, focusing on fight setup over pure aim."
What are the two types of aiming in Valorant?
Passive aim and active aim.
[0:43]
What is passive aim?
Crosshair already in the right place before the fight starts, involving pre-aiming, tracking, and crosshair placement.
[0:51]
What is active aim?
Reacting and moving crosshair onto an enemy during a fight, including flicking and high-risk fights.
[2:03]
How should crosshair placement change against a Spectre vs. an Operator?
Wider placement for Spectre (expected wider swings), tighter for Operator (expected tight peeks).
[1:46]
When should you use passive aim most of the time?
When you have information, are holding an angle, or clearing properly.
[2:28]
What does good positioning do for your fights?
Forces the enemy to flick onto you, making their fight harder; avoids exposing yourself to multiple angles.
[3:08]
How should you use movement to help your aim?
Use movement to adjust crosshair position first, then take the shot; don't force a shot if crosshair isn't on target.
[4:55]
What is the recommended burst limit for spraying?
Two to three bullets in the same spot.
[5:24]
Why should you check the minimap in safe moments?
To read teammate positions, enemy spots, and map gaps, allowing you to predict enemy movement.
[6:40]
What should you do after any contact (kill or being spotted)?
Reposition to a different spot to break enemy pre-aim.
[8:14]
What is the purpose of jiggle peeking?
To gather information from multiple angles before fully committing to a fight.
[8:49]
Gunfights are decided before shooting
Shifts the player's mindset from blaming aim to focusing on fight creation.
[0:00]Crosshair placement based on enemy weapon
Provides a specific, actionable adjustment that turns hard shots into easy ones.
[0:51]Good positioning forces enemies to flick
Converts a defensive concept into an offensive advantage that reduces enemy accuracy.
[3:08]Minimap predicts enemy movement
Reveals how map gaps inform decision-making, elevating gameplay beyond visual reactions.
[6:40]Reposition after contact
Simple habit that resets the fight and avoids being pre-aimed, directly improving win rate.
[8:14][00:00] Most players think they're losing their
[00:01] gunfight because of their aim. They
[00:03] spend hours trying to flick faster,
[00:05] spray better, improve their mechanics.
[00:07] But, that's not the real problem. It's
[00:09] only part of it. Because in Valorant,
[00:11] most gunfights are already decided
[00:14] before you even shoot. If you're losing
[00:16] fights, it's usually because you're
[00:17] creating bad fights in the first place.
[00:20] In this video, I'm going to break down
[00:22] exactly how gunfights actually work, so
[00:24] you can stop relying on just your aim,
[00:27] and start taking fights that are already
[00:28] in your favor. Whether you're completely
[00:30] new to the game, stuck in low elo, or
[00:33] even an experienced player, you'll take
[00:35] something from this video that'll
[00:36] improve how you take gunfights and play
[00:39] the game. First, you need to understand
[00:41] how aim actually works in fights. There
[00:43] are two types of aiming in Valorant,
[00:45] passive aim and active aim. Let me
[00:47] explain the difference between the two
[00:49] and when you should be using each one.
[00:51] Passive aim is when your crosshair is
[00:53] already in the right place before the
[00:54] fight even starts. It's about reducing
[00:57] how much you need to react. This
[00:58] consists of pre-aiming, tracking, and
[01:01] crosshair placement. Pre-aiming is when
[01:03] you place your crosshair where an enemy
[01:04] is likely to appear before you peek.
[01:07] But, the biggest mistake players make is
[01:09] pre-aiming every single angle. You
[01:11] should only pre-aim when you actually
[01:13] have information or a strong
[01:14] expectation, like when you know where an
[01:17] enemy is, clearing a common angle, or
[01:19] you're swinging into a known position.
[01:21] If you don't have that information,
[01:23] don't lock your crosshair into one spot.
[01:26] As you clear angles, make small
[01:27] adjustments with your crosshair while
[01:29] moving. This [music] keeps your aim
[01:31] flexible instead of forcing it onto the
[01:33] wrong spot. Now, the most important
[01:35] part, crosshair placement. This is where
[01:37] the majority of your kills should come
[01:39] from. The biggest mistake players make
[01:42] is not adjusting their crosshair based
[01:44] on the situation. For example, if an
[01:46] enemy has a Spectre, you should be
[01:48] [music] expecting wider swings. So, your
[01:50] crosshair should be placed further out.
[01:52] But, if an enemy has an Operator, you
[01:55] You expect tighter peeks. So, your
[01:57] crosshair should be closer to the angle.
[01:59] Making these small adjustments is what
[02:01] turns hard shots into easy ones. Now,
[02:03] let's talk about active aim. Active aim
[02:05] is when you have to react and move your
[02:07] crosshair onto an enemy during a fight.
[02:09] This includes flicking and high-risk
[02:11] fights. Flicking is when your crosshair
[02:13] isn't already on the enemy, so you have
[02:15] to quickly move it onto them. It's
[02:17] reactive, not prepared. High-risk fights
[02:20] happen when you're caught off guard, in
[02:22] a bad position, or peaking without
[02:24] information. These are the fights you
[02:26] want to avoid. Now that you understand
[02:28] both types of aim, here's when to use
[02:30] them. You should be using passive aim
[02:32] most of the time. If you have
[02:34] information, you're holding an angle, or
[02:36] you're clearing properly, your crosshair
[02:38] should already be ready. If the fight is
[02:41] predictable, there's no reason to flick.
[02:43] But active aim is what you fall back on
[02:45] when things go wrong. If you get
[02:47] surprised or the fight becomes
[02:48] unpredictable, now you're forced to
[02:50] react, and those fights are much harder
[02:53] to win. So, the goal isn't to get better
[02:55] at flicking. It's to set up your fights
[02:57] so that you don't have to flick in the
[02:59] first place. Now, here's the thing. If
[03:01] you're constantly forced to use active
[03:03] aim, it's usually not because your aim
[03:05] is bad. It's because of your
[03:06] positioning.
[03:08] Positioning is what decides whether you
[03:10] get easy fights with passive aim or hard
[03:12] fights where you're forced to flick. So,
[03:14] let's talk about how to position
[03:16] yourself so every fight is in your
[03:17] favor. Good positioning isn't about
[03:19] hiding. It's about making every fight
[03:22] unfair for the enemy. Your goal with
[03:23] positioning is simple. You want to force
[03:26] the enemy to flick onto you instead of
[03:28] them just pre-aiming you. Because in a
[03:30] flick, there's a way more room for
[03:32] error. But if they're already holding
[03:34] you and your position is predictable,
[03:36] you're just walking into their
[03:37] crosshair. That's an easy fight for
[03:39] them.
[03:40] The biggest mistake players make with
[03:41] positioning is exposing themselves to
[03:43] multiple angles at once. If two or more
[03:46] enemies can see you at the same time,
[03:48] you're forced into a situation where you
[03:50] have to react to everything. That's when
[03:52] you're relying on active aim. Instead,
[03:55] you want to position yourself so you're
[03:57] only ever fighting one angle at a time.
[03:59] Use walls, cover, and tight peaks to
[04:01] block off other lines of sight. This
[04:03] turns one difficult fight into multiple
[04:05] easier ones. Good positioning is what
[04:08] allows you to isolate fights and control
[04:10] how many enemies can actually see you.
[04:12] This is where everything connects.
[04:14] Positioning and passive aim go hand in
[04:16] hand. If your positioning is good, the
[04:18] fight becomes predictable. And when the
[04:20] fight is predictable, your crosshair is
[04:22] already where it needs to be. That's
[04:24] passive aim. But if your positioning is
[04:26] bad, now you don't know where enemies
[04:28] are coming from. You're exposed to
[04:30] multiple angles, and now you're forced
[04:32] to flick and react. Sure, active aim is
[04:34] needed in some cases like in a clutch
[04:36] situation against multiple people, but
[04:38] it's not the easiest way to win. Your
[04:41] positioning is what makes your fights
[04:43] easier because the better your
[04:44] positioning is, the less you have to
[04:46] rely on raw aim to win. Positioning sets
[04:49] up the fight. But how you actually take
[04:51] it is what decides if you win. And that
[04:53] comes down to your movement and your
[04:55] peeking. Movement isn't just for
[04:57] surviving. It's to help your aim. If
[04:59] your crosshair isn't on the enemy yet,
[05:01] don't force the shot. Instead, use your
[05:04] movement to adjust your positioning and
[05:06] line up your crosshair first, then take
[05:08] the shot. But don't make the mistake of
[05:10] only using your movement. You're
[05:12] supposed to use your aim and your
[05:14] movement at the same time. Don't shoot
[05:16] and hope you hit. Move until the shot
[05:19] becomes easy.
[05:20] Another mistake is over committing to
[05:22] fights. Don't just sit there and spray.
[05:24] Make it a habit to not shoot more than
[05:26] two to three bullets in the same spot
[05:28] because the longer you stay still and
[05:30] keep shooting, the easier it is for the
[05:32] enemy to line up a shot on you. To get
[05:34] used to this, head on over to the range
[05:36] and shoot two bullets in between this
[05:38] wooden wall and focus on only shooting
[05:40] two bullets, then move and repeat. The
[05:42] only right way to spray is if the enemy
[05:44] is really close to you and if the enemy
[05:46] is slowed down, peaking is where your
[05:48] movement, aim, and positioning all come
[05:50] together. And this is where most players
[05:53] mess up. When people say they're dying
[05:55] instantly when they peek, they think the
[05:57] enemy just has better aim, but that's
[05:59] not true. You're just putting yourself
[06:01] in a bad position and making the fight
[06:03] easier for the enemy. If your peek is
[06:05] predictable, wide, or uncontrolled,
[06:07] you're walking straight into their
[06:09] crosshair. That's passive aim for them.
[06:11] Most players take a shot, then instantly
[06:14] go back into cover, then re-peek the
[06:16] exact same angle the exact same way, and
[06:19] then they get one-tapped. That's not bad
[06:21] luck. That's the enemy using passive aim
[06:23] against you. Movement and peaking aren't
[06:26] just about fighting. They're about
[06:27] controlling how the fight happens. If
[06:30] you move with purpose, take controlled
[06:32] peaks, and don't force bad shots, you
[06:34] turn hard fights into easy ones. Now,
[06:37] even if your movement and peaking are
[06:38] good, there's still one thing that will
[06:40] completely decide whether you win or
[06:42] lose fights, and that's the information
[06:45] you're playing off of. So, let's talk
[06:47] about your mini-map. Your mini-map gives
[06:49] you more information than your eyes ever
[06:51] will.
[06:52] Most players make the mistake of only
[06:54] focusing on what's directly in front of
[06:56] them, and that's exactly why they
[06:58] constantly die to things they never saw
[07:00] coming. Your mini-map is constantly
[07:02] giving you information about where your
[07:04] teammates are, what your teammates are
[07:05] seeing, where enemies are being spotted,
[07:08] and most importantly, where there are
[07:10] gaps in the map. These gaps are just as
[07:13] important as enemy locations. Because
[07:15] they tell you where enemies aren't yet.
[07:18] If multiple teammates clear an area and
[07:20] see nothing, that usually means the
[07:22] enemy is somewhere else entirely. You're
[07:24] not just reacting to info, you're
[07:26] predicting it. If nothing is happening
[07:28] on your screen, something is happening
[07:30] on your map. That's the mindset
[07:32] difference between low and high-level
[07:33] players. Low-level players will react to
[07:35] what they see. Higher-level players will
[07:37] react to what they know is happening
[07:39] elsewhere. You don't need to stare at
[07:41] it, but you should checking it at key
[07:43] moments, like when you're safe in cover,
[07:45] when you're holding a site and there's
[07:46] no immediate pressure, when you're
[07:48] inside a smoke and waiting for timing,
[07:50] or even mid-fight. Just quick glances to
[07:53] see if help is coming or if enemies are
[07:55] rotating. These small checks completely
[07:57] change how you read the game. Your
[07:59] mini-map isn't just a support tool. It's
[08:02] your second set of eyes, and the more
[08:04] you use it, the less you'll be
[08:05] surprised. Now, if you understand your
[08:07] aim, positioning, movement, and how you
[08:09] use information, you'll already be ahead
[08:12] of most players. But, there are still a
[08:14] few small habits that don't fall into
[08:16] one category. They show up in every
[08:18] fight you take. So, here are a few bonus
[08:21] tips to help you win more fights. After
[08:23] you take a fight, you should not stay in
[08:25] the same spot. Most players get a kill
[08:27] or take a shot and just sit there,
[08:29] waiting for the enemy to swing them.
[08:31] That's a mistake, because once you've
[08:32] been seen, you're already being
[08:34] pre-aimed. So, after every contact,
[08:36] whether you kill someone or just get
[08:38] spotted, you should reposition. Even a
[08:40] small change is enough to break their
[08:42] expectations and reset the fight in your
[08:44] favor. You don't want to be predictable.
[08:46] You want to be unreadable. And the most
[08:49] significant one, jiggle peeking before
[08:51] fully committing. Every player makes the
[08:53] mistake of committing to a fight even
[08:55] though the enemy could be in multiple
[08:57] angles. Now, you end up flicking late or
[08:59] instantly dying. The correct way to peek
[09:01] when there's multiple angles the enemy
[09:03] could be in is to jiggle first. This
[09:05] lets you gather information first and
[09:07] act on it. And if they back off, let
[09:09] them. That's them giving you space for
[09:11] free. If you take anything from this
[09:13] video, it's that most gunfights aren't
[09:15] decided at the moment. They're decided
[09:17] by how you set them up before they even
[09:19] happen. So, instead of trying to win
[09:21] harder fights with better mechanics,
[09:23] start making the fights easier in the
[09:25] first place. If this helped you, make
[09:27] sure to like and subscribe. There's more
[09:29] videos like this coming. Thanks for
[09:30] watching. I'll see you in the next one.
⚡ Saved you time reading this? Transcribe any YouTube video for free — no signup needed.