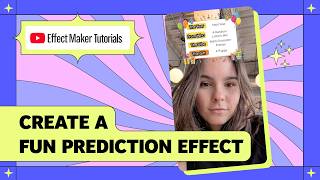

This AR Effect Predicts Your Future 👀
40sPeople love mysterious self-discovery, and a randomized 'future reveal' makes them immediately want to try it.
▶ Play Clip"Delivers exactly what it promises — a clear, step-by-step tutorial for creating a randomized prediction effect."
This tutorial demonstrates how to build an interactive randomized prediction effect using the Future Reveal template in Effect House. The video walks through customizing categories, editing prediction lists, replacing visual assets, and publishing the final effect for mobile devices.
The template works as a randomizer, cycling through options across multiple categories to reveal a list of predictions. It can be repurposed for birthday gifts, travel destinations, or any randomizer idea.
Open Effect House Effect Maker on your computer, head to the template section, and select the Future Reveal template.
The card acts as the background, the category object shows the color frame for each row, and the title and option text objects display category names and results.
Five list variables (home, money, career, family, kids) each contain eight options the effect randomly selects from.
The system uses five subgraphs connected in a single trigger chain, so each category reveals its result in a polished sequence.
An if statement checks a 'done' variable to ensure the animation only triggers when the previous category finishes. A transition node uses a modulo operator and list length to cycle through options.
At transition end, the script updates the option text with the winning result, swaps the purple frame to pink 'done' asset, and updates the done variable to trigger the next subgraph.
Change title text, font, and color for each category; e.g., rename 'kids' to 'dogs' and choose a font like Cherry Bomb One.
Rename the list variable to match the new title and enter new options; e.g., dog breeds for the 'dogs' list.
Upload custom assets for the background card and category frames; use tools like Nano Banana on Gemini. Original card size is 529x722 pixels.
Import new assets and update the asset fields in the properties panel and visual script for the category start and done states.
Use color tint under the asset to adjust frame colors; copy hex codes across categories for a cohesive look.
Click the phone icon, scan the QR code, and interact with the effect on your mobile device.
Upload a 400x400 thumbnail (under 2MB), name the effect, add instructions, and submit for review.
The Future Reveal template is a versatile starting point for any randomized prediction effect, and with simple customizations you can make it your own. Testing on a real device and following the publishing specs ensures a smooth launch.
What is the Future Reveal template in Effect House?
A randomizer template that cycles through different options across categories to reveal a list of predictions.
00:02
What are the five default categories in the Future Reveal template?
Home, money, career, family, and kids.
00:56
How many options does each category list contain by default?
Eight.
00:56
What is the purpose of the 'done' variable in the visual script?
It acts as a gatekeeper to ensure the animation only triggers if the previous category finished or start conditions are met.
01:38
What technique does the transition node use to cycle through text options?
It uses a modulo operator and the list length of the category variable.
01:51
What are the exact dimensions for the background card asset?
529 by 722 pixels.
03:52
What tool is recommended for generating custom assets?
Nano Banana on Gemini.
03:39
What are the thumbnail requirements for publishing the effect?
A 400x400 pixel image under 2 megabytes.
07:17
Visual Script Chain Design
The effect uses five subgraphs in a single trigger chain, demonstrating a clean way to sequence multiple reveal stages.
01:10Gatekeeper Pattern
Using an if statement with a 'done' variable prevents overlapping animations and ensures controlled sequencing.
01:38Dimension Matching for Assets
Designing custom assets to match the original file size (529x722) ensures a perfect drop-in replacement without resizing.
03:52Color Tint Customization
The color tint option lets you change frame colors quickly without creating new assets.
06:06On-Device Testing
QR code preview lets you test the interactive effect directly on your phone, which is the best way to experience it.
06:51[00:02] reveal effect template in Effect House to create a fun and interactive effect. The future reveal template functions as a randomizer. It cycles through different options across multiple categories, eventually revealing a list
[00:16] of predictions for your future. The potential here is huge. You aren't just limited to lip gloss, you could create a birthday gift predictor, randomize [music] a new travel destination, or even choose your next big adventure.
[00:28] To get started, open up Effect House Effect Maker on your computer. Head over to the template section and select future reveal template. structured. In the object panel, we have the card, which acts as our background.
[00:42] The category object, which shows that the color frame for each row. Then we have the title, like home, money, career, and finally the option text, which where the result appears. Over in the variable panel, you'll find
[00:56] list variables that matches those categories: home, money, career, family, Each of these lists contain eight different options that the effect will randomly select from. Now let's dive into the visual script to
[01:10] see how the logic is managed. The entire system is organized into a streamlined trigger chain using five sub graphs connecting in a single line. This ensures each category, home, money, career, family, and kids, reveal its
[01:23] result in a specific polished sequence. you'll find the logic is separated into three functional sessions. The sub graph begin by using an if statement to check a done variable.
[01:38] This acts as a gatekeeper, ensuring the animation only triggers if the previous category finished or if the specific start condition are met. Once triggered, a transition node drive the visual shuffling effect. It uses a mode
[01:51] operator and the list length of category variable, such as home, travel, it cycles through different text options, creating an excitement of randomizer in motion. At the transition end, the script lands
[02:04] on the final random result pulled from the list. The logic then perform two final actions. They update the option text object with the winning fortune. It swaps the initial purple frame to pink category done asset and updates the
[02:19] done variable to trigger the next sub graph in chain. First, let's customize the categories. In the object panel, find the text object named title five. By default, it says kids, but I prefer dogs. So I'm going to change the text to
[02:33] dogs for my future pets instead. We can change the font and the color to make it really pop. Just click on title or option object and in the properties panel, choose your new font. I'm going with cherry bomb one because
[02:46] it fits the vibe perfectly. Just repeat the steps for all five titles. Now we need to update the actual predictions to match. Head over to the variable panel and look for kids list variable. To keep everything organized,
[02:59] I recommend renaming this to match your new title, so I'll change mine to dogs. This is where we enter our options. I'm going to list breeds like dachshund, golden retriever, shiba inu, frenchie, poodles, and huskies. I feel like dogs
[03:14] Dachshunds give me like the pink pilates vibes, while huskies are for more the adventurous ones. You can add or remove as many options as you like. I'll go ahead and add blue dachshund list, too. Next, let's give the effect a fresh new
[03:27] look. You can update the UI component, like the background card and the category frames, by uploading your own asset. I wanted a yellow and orange theme, so I created a new card in a different program. Feel free to use
[03:39] whatever tool works best for you or check out Nano Banana on Gemini to help you create assets for your own projects. Here's a quick pro tip. If you ever need to check the size of the original file, just click in the asset panel. For this
[03:52] card, you want to design your asset at exactly 529 by 722 pixels. If you match those dimensions, it will drop in perfectly without you having to resize a Step one, let's update the background card.
[04:06] Import your new card into the asset panel. On the right side properties panel, click the asset field and swap it with
[04:20] click the asset field and swap it with your new card. Resize and reposition the card using the control in the top right corner of the control in the top right corner of the middle panel.
[04:36] Or by entering a specific value in the properties panel. add your own category start frame. To change the category start frame, the initial state, create and import your new asset.
[04:55] properties panel, update the asset field to your new category start image. You can use a different background design for each one if you like.
[05:07] design for each one if you like. >> [music]
[05:21] replace the category done frame. Finally, let's update the done state. Create and import your done asset. Back in visual script, find the set asset node that currently shows category done.
[05:35] Replace them with your new category done asset.
[06:06] object panel, click on category one. Simply go to color tint under the asset. This will adjust the frame color. You can choose to use a different color for
[06:19] each frame or apply the same color across all frames. Copy the hex code and paste it for each categories. This is a great place to add different This is a great place to add different colors or shape to make each result pop.
[06:51] it right here on your computer, but the best way is to use your phone. Make sure on your phone as you are on Effect House Effect Maker. Click the phone icon on the top right. Scan the QR code and you can interact
[07:04] with the effect directly on your mobile device. the prediction, click submit to finalize. Upload your thumbnail. I created mine using Nano Banana on Gemini to generate
[07:17] using Nano Banana on Gemini to generate a 400 by 400 pixel image. Make sure your thumbnail is under 2 megabytes. Give your effect a name, instruction to start recording. Then submit it now for review.
[07:32] That's all there is to it. For more info on how to use Effect Maker, check out Don't forget to subscribe for even more updates and tutorials.
⚡ Saved you 0h 07m reading this? Transcribe any YouTube video for free — no signup needed.