What is a VTuber? The Cost Problem
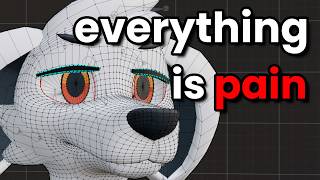
45sExplains the high cost barrier to entry for VTubers, sparking debate about whether artists are overcharging.
▶ Play Clip"Title accurately reflects the content: a first-time VTuber creation guide."
This video provides a comprehensive guide on creating a VTuber model from scratch, covering the necessary software, illustration considerations, rigging in Live2D, and animation setup. The creator shares personal experiences and tips to help aspiring VTubers understand the process and effort involved.
A VTuber is a digital puppet controlled by face and motion tracking software, allowing content creators to act as an animated character, often as an alternative to a facecam.
VTuber models can cost hundreds or even thousands of dollars, raising the question of whether they are worth the price or if artists are overcharging.
To make a VTuber, you need art software for drawing, animation/rigging software to define movement, and face tracking software to translate your expressions.
The video focuses on 2D VTubers, as 3D can be tougher to start from scratch, though pre-made 3D models can be easier.
Free options include Krita and GIMP; paid options include Clip Studio Paint, Procreate, and Photoshop. Export as a Photoshop file with layers and transparency.
Live2D is the most dominant program for VTubers, designed to animate 2D images in layers to create a 3D effect. It has a free trial for 42 days, then costs about $16/month.
OpenToonz is a free open-source alternative to Live2D, and Adobe Character Animator is another option for those with an Adobe subscription.
Options include VTube Studio and PRPR Live. VTube Studio has a watermark for free use but offers a one-time fee for removal and supports iPhone tracking.
Draw every part that will move on its own layer. Overdraw parts to allow for movement without breaking the model. Consider how parts will be separated and animated.
Rigging involves setting deformers (warp, rotator, path deformer) and creating keyforms for different poses. Use parent-child relationships to move multiple parts together.
Create keyforms for start and end positions of movements. Parameters control the animation, and face tracking software alters these parameters in real time.
Mouth movement requires deforming for lip sync; eyes should move symmetrically. Copy symmetrical parts to save time.
Add physics for hair and other parts using pendulum-based inputs and outputs in Live2D to create natural movement.
The effort involved justifies the cost of commissions. The creator encourages viewers to create their own digital puppets.
Creating a VTuber model is a challenging but rewarding project that requires artistic and technical skills. The effort involved justifies the cost of professional commissions, and with the right tools and patience, anyone can bring their digital character to life.
What three types of software are needed to create a VTuber?
Art software, animation/rigging software, and face tracking software.
00:38
What is the most dominant animation software for VTubers?
Live2D.
01:31
What file format and features are required when exporting art for a VTuber?
Photoshop file with layers and transparency.
01:17
What is the cost of Live2D after the free trial?
About $16 per month.
02:09
What is the purpose of a mesh in Live2D?
A mesh is a set of interconnected points on top of artwork that allows deformation for animation.
06:10
What are the three types of deformers mentioned in Live2D?
Warp, rotator, and path deformer.
06:36
How does Live2D create animation between keyforms?
By using parameters (numbers) that control the keyforms and interpolating between them.
08:38
What is the role of face tracking software in VTuber animation?
It captures facial movements and translates them into parameter values that animate the model in real time.
09:04
Why is it important to overdraw parts when illustrating a VTuber?
To allow for movement without breaking the model, providing wiggle room for deformation.
04:49
How does physics animation work in Live2D?
It uses inputs (like head movement) to drive an internal pendulum, which then drives output parameters to animate parts like hair.
11:33
Definition of VTuber
Provides a clear, concise definition of a VTuber as a digital puppet controlled by tracking software.
00:01Live2D Dominance
Establishes Live2D as the industry standard for 2D VTuber animation.
01:31Illustration Tips for VTubers
Offers practical advice on drawing with separate layers and overdrawing for animation.
03:41Deformer Tools in Live2D
Explains the three key deformer types (warp, rotator, path) essential for rigging.
06:36Real-Time Animation via Parameters
Describes the core mechanism of VTuber animation: face tracking data driving parameters.
09:04Value of VTuber Commissions
Justifies the cost of professional VTuber models by highlighting the effort involved.
12:37[00:01] video you've probably heard the term YouTuber before but what exactly is a vtuber a vtuber is a digital puppet controlled by face and motion tracking software allowing content creators particularly live streamers to act as
[00:13] great alternative to FaceCam when streaming whether you want to portray a different personality or represent yourself in a unique way however aspiring YouTubers have a big problem these digital puppets or vtuber models
[00:26] are not cheap they can cost hundreds or even thousands of dollars so our vtuber models worth the price are artists ripping off aspiring streamers how you may not have professional illustration skills or even know how to
[00:38] use the vtuber software but assuming you can Cobble together some digital art it might just be possible to bring it to life and that's exactly what I set out you'll need three pieces of software to make a v tuber some type of art software
[00:51] to draw the YouTuber an animation and rigging software to Define how the character moves and finally a face tracking software to translate your we're going the 2D route with this even though using a pre-made 3D model can be
[01:05] easier than making a new 2D model 3D can be tough starting from scratch you can pick any program you want to draw your vtuber in however you need to export a Photoshop file with layers and transparency sorry Microsoft Paint creda
[01:17] and are good free options while clip Studio paint procreate and of course Photoshop are solid page choices just use whatever program you feel most to pick an animation software that's capable of reading a 2d model for live
[01:31] explain what the process of rigging your model means later in the video but just for now know that it sets up your 2D model for animation live 2D is the most dominant program when it comes to vtubers pretty much any anime girl that
[01:44] looks like this is probably using live 2D the software is designed to animate your 2D image in layers to create a 3d effect you can then export your model to a face tracking program in order to animate it in real time live 2D is a
[01:56] popular choice with a big community and lots of tutorials online however the of how high resolution and complex your model can be you can still get a free trial of the full version for 42 days but eventually it requires a paid
[02:09] subscription of about 16 dollars per month but what if you have no money an OT 2D is an open source program being developed as an alternative to live 2D people have managed to get decent results from the program however I can't
[02:22] might still give it a shot after learning live 2D lastly there is Adobe character animator a lot of what I've seen from this program attempts to mimic flash style animation with real-time motion capture while less popular choice
[02:36] designs if you already have an adobe subscription I would recommend considering whether or not the features work for you as for me I have no Adobe subscription in one of the strong Community Support so I opt did for live
[02:48] 2D with that settled we can move on to picking out face tracking software Adobe own features for viewing your model but if you make your model in live 2D you'll have more options such as vtube studio and prpr live there are technical
[03:01] differences in how each of these work but they share the same goal to track your face and animate your live 2D model accordingly both of these programs should work decently if you're using a webcam to track your face prpr live has
[03:13] basic face tracking for free with the 10 upgrade for a supposedly more accurate look meanwhile vtube Studio puts a watermark for face tracking until you iPhone app that works really well with the PC version I went with vtube Studio
[03:27] because I wanted to use my iPhone and I didn't mind the one-time fee with our to your artist app because it's time to illustrate our character character disciplines that are out of scope of this video everyone watching this is at
[03:41] different skill levels but that's okay as long as you can draw some sort of you can turn it into a v tuber so let's focus on some things I learned that apply specifically to illustrating a vtuber model you might worry that your
[03:54] YouTubers you see this is a valid concern because your style will reflect uniqueness isn't the root of the problem you need to have some idea of how your character is going to be separated in parts to move with your face consider
[04:08] design every part of your model that is going to move needs to be drawn on a shift in Warped in order to create the illusion of Animation you can swap out Parts Midway but you won't be able to draw every possible frame I realize this
[04:22] is a lot to consider from the very start one of the hard things about making a foreshadow and draw things a certain way when you already don't know what you're is find models similar to what you want to do this will be easy if you're an
[04:36] creative avatars out there to take inspiration from look at what parts they move how far they move and how they move together just keep in mind that every part should be fully drawn on its own layer so if your face is usually covered
[04:49] you need to draw the entire face underneath one mistake I made was not giving myself as much wiggle room as I could have when it came to over drawing Parts if you don't over draw as much as possible it's going to limit the
[05:02] to stop it from breaking you might notice that I drew my character as a half body image while many v-tubers are full body I personally plan on only things simple you're welcome to draw out the rest of the body though if desired
[05:16] it is possible to use the upper body movements or other tricks to move the lower half once your art is drawn and broken up into a dozens of little pieces all fully realized and you formulate at least a vague idea of how you want it to
[05:28] move and follow your face you should be good to move on to the next step artwork now we have to import that static image into live 2D in order to excited there's some work you have to do before you can actually start animating
[05:42] you might think of rigging a 3D model for skeletal animation this basically inside a model which defines how a character moves programs like Adobe character animator can do this for 2D images but live 2D Works a little
[05:57] differently when people talk about Regina live 2D model it involves setting deformers then moving them into different poses in order to create the animation in order to set up your vtuber you need to create parts for every
[06:10] imported layer of your model then assign these parts a draw order so you know the other in order to form these parts you must create a mesh for each one a mesh is just a set of interconnected points on top of your artwork these
[06:23] control or automatically generated arrange all those parts into something called a texture Atlas and you have a big file of everything you use to create your model so while you can move points on your meshes individually it is
[06:36] generally tedious and I wouldn't recommend it live 2D gives you several animation process a bit easier the simplest tool is called the warp and can be pulled to deform your arch shape I recommend you put this on every
[06:50] part of your model if you want parts to rotate or bend instead of just warping around use rotators in order to have that rotational motion such as shoulders are tilting your character's neck finally path the formers allow you to
[07:02] draw a path along the mesh of your part so that it can bend easily this is if you want two meshes to be stuck together even when moving you can use a together you can even move multiple Parts at the same time by making one
[07:17] deformer apparent of the other so that the movement of the parrot part affects the movement of a Child part these child deformers will then be affected by the around that's pretty much all the basic tools you'll need to set up your model
[07:30] for live 2D I strongly recommend you take a look at examples and other tutorials out there for more details as you actually work through it I found myself a bit discouraged by the lengthy setup process and how much you had to
[07:42] your time during this segment makes animation a lot easier once the setup is complete we can finally get to the fun part animating your model life CD models the start and end positions for moving Parts in your model suppose you want to
[07:58] make an animation of your model turning its head left and right in that case you would create keyforms for all parts on your head looking forward left and right you will need at least one start and end key form for movement but as in the face
[08:11] example you can put key forms in between other key forms live 2D will fill in all the motion in between remember that a moving paired object will move all of its child objects as well you can even put additional motion on the child
[08:24] object in both the parent and the child's movement will be applied for eyeball looking around but it will follow the eye as it moves with your face as long as the eyeball is child of your main eye this is one of those
[08:38] things I suggest you play around with as it's more intuitive than it sounds on paper but what determines what stage of this animation your model is currently in between keyforms in normal animation this will be a timeline but here time is
[08:51] replaced with values called parameters these are numbers that control the key that can change within a certain range as these values change your model will shift and warp to different key forms you could theoretically have any data
[09:04] change these parameters and move your model so long as the software supports it but the real magic happens is when you take input from a face tracking software and alter the value of the parameters to animate the model in real
[09:16] time this is the final magic of the vtuber facial data translate into numbers controlling parameters controlling the animation on screen and thus creating the illusion of Life take a look at the inputs of your facial
[09:28] tracking software and try to take advantage of those first make parameters for the inputs you want to use many can be considered essential but not all for example you're required to have a cheek buff effect even though your software
[09:40] tracks it but your model won't respond to any inputs you choose to ignore so it's best to rig as much movement as you can assuming is within scope of your project of course once again dissecting example models really helps here go
[09:53] have and how those parameters control their individual key forms you can even link similar parameters together in order to interpolate motion between them for example you can link the X and Y movement of your eyeball and auto
[10:07] generate the diagonal values you still have a lot of Animation to do though it takes some time to deform every part of your model for convincing movement compounded by the number of parameters you want to take advantage of check your
[10:19] work incrementally to ensure that all your smaller animations are blending together nicely theory is nice but execution tends to be difficult let's talk about some areas where I struggle firstly the mouth movement so the
[10:31] animation software like Adobe character animator use visemes are sets of mouth shades for lip syncing animation in life 2D you have to deform with just the gives you some clever people have mapped these values to larger sets of mouth
[10:45] animations for better lip syncing but depending on your model's mouth they may or may not work the style of your model doesn't always match up to reality I opted for a simple mouth opening and closing effect with the smiling value
[10:57] controlling how wide the sides pull up I'm not entirely happy with this result but it works for now just be aware that more Advanced Techniques exist if they fit your style another thing I recommend being careful of is the eye animations
[11:09] especially if any of your design is off center you want your eyes to move at exactly the same time otherwise it just looks weird so make sure they're a similar distance and if any parts of your model are symmetrical you can just
[11:21] copy and paste them over from one side to the other to save yourself animation time so now your model is moving but something's different something's missing from the other models you see where's the Wobble the jiggle jiggle you
[11:33] know for uh hair physics the final polish to your bottle is physics animation but don't worry you don't have to do any math here in live 2D physics works with parameter inputs outputs and an internal pendulum inputs are the base
[11:46] Movement Like Your Head moving this space movement makes an internal pendulum swing you can then use the motion of that swinging pendulum to drive an output parameter making part of your model animate you can even add
[11:58] multiple inputs with different levels of effect just make sure that the inputs are not set to zero or else nothing will animate properly I also personally didn't find the templates live CD comes with very helpful as I have a
[12:10] non-traditional model but feel free to experiment with those if you feel suggest watching a more detailed video if you want the theory of how certain parts should use physics motion like this hair tutorial presumably at this
[12:23] tweaking animations physics and fine-tuning your facial tracking parameters and at some point with weary eyes you'll gaze upon your final model and say good enough so yeah this is the model finished with I'm super happy to
[12:37] first time and I think I've accomplished my goal so now you have some idea of the effort it takes to make a V2 remodel I would argue that the price of a vtuber commission reflects the effort put in by artists and riggers it's a challenging
[12:50] project both technically and artistically but that's my favorite type of project so go forth and create your own digital puppets if any of this was helpful to you feel free to share your Creations on me with Twitter using the
[13:02] corrections needed for this video or questions go ahead and leave a comment I'll try to update the description and respond as needed respond as needed foreign
⚡ Saved you 0h 13m reading this? Transcribe any YouTube video for free — no signup needed.