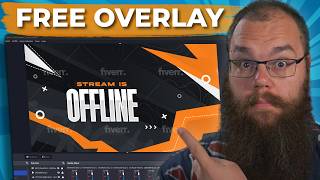

OBS is Hard? Fix It in 60 Seconds!
42sRelatable pain point for new streamers, with a promise of a simple solution, hooks viewers immediately.
▶ Play Clip"Delivers exactly what the title promises — a straightforward, step-by-step OBS setup guide for beginners, with a free overlay bonus."
This video is a comprehensive, step-by-step guide for new streamers on setting up OBS (Open Broadcaster Software) from scratch. The host, Barry, a Twitch partner, walks viewers through installing OBS, configuring scenes and sources, adding alerts and chat, and setting up audio, culminating in a fully functional streaming setup with a free overlay pack.
OBS can be intimidating for new streamers due to its many buttons and settings. The goal of this video is to simplify the process and transform a blank canvas into a professional-looking stream with overlays and widgets.
Barry offers a free overlay pack (Europa packs) in five colors via his website contentdelta.online, using the code 'JamesWeb' (likely a typo for 'JamesWebb'). This is a key incentive for viewers to follow along.
Download OBS from obsproject.com. The auto-configuration wizard will set up basic settings. Optimize for streaming, set base canvas resolution to 1920x1080, and FPS to 60 (or 30 if needed). Log into Twitch to test connection.
The OBS interface includes: Canvas (center), Scenes (bottom left), Sources (next to scenes), Audio Mixer (middle), Scene Transitions, and Controls (bottom right). Scenes are like containers, and sources are the individual elements (game, webcam, etc.).
To add a game, use a 'Game Capture' source. Set it to capture any full-screen application, or if that fails, select 'Capture specific window' and choose the game window.
Add a 'Video Capture Device' for the webcam. For an animated webcam border, use a 'Media Source' and ensure the 'Loop' option is toggled to prevent the border from disappearing. Resize and position the camera and border, optionally grouping them for easier movement.
Use Twitch's built-in alerts (creator dashboard > alerts) to create an alert box. Copy the browser source URL and add it as a 'Browser Source' in OBS. Customize the alert images and colors to match the overlay theme.
Create a new scene for 'Just Chatting'. Add the same webcam source and a media source for the intermission screen. Use StreamElements to create a chat overlay: create an overlay, add a chat widget, customize the theme (transparent), size (450x650), and text color (white). Copy the overlay URL and add it as a browser source in OBS.
Create static scenes like 'Be Right Back', 'Starting Soon', and 'Stream Ending'. Add a media source with the corresponding video from the overlay pack, and optionally include the chat overlay.
Set audio mixer to vertical layout. In settings > audio, set desktop audio to default and mic/aux to the specific microphone (not default). Hide or mute unused audio sources. For Twitch alerts, set 'Monitor and Output' in advanced audio properties to hear them.
Use the 'Docks' menu to add chat, stream information, and activity feed panels. Position them near the gaming monitor for easy visibility. This helps streamers manage their stream without alt-tabbing.
By following this guide, new streamers can set up a professional OBS configuration with scenes, sources, alerts, chat, and audio in a structured way. The video emphasizes that streaming success requires more than just setup, hinting at a follow-up video on growing a channel.
What is the recommended base canvas resolution for OBS streaming?
1920x1080
01:27
What are the two main types of sources used for adding a game and a webcam in OBS?
Game Capture and Video Capture Device
04:05
What is the purpose of the 'Loop' option when adding an animated webcam border?
To prevent the border from disappearing after it plays once.
05:28
How do you crop a source in OBS?
Hold the Alt key and drag the edges of the source.
06:08
What is the purpose of grouping sources in OBS?
To move and resize multiple sources together as a single unit.
07:04
What is the recommended size for a chat overlay in StreamElements?
450 by 650 pixels
12:04
How do you make Twitch alerts audible in OBS?
Set the Twitch alerts source to 'Monitor and Output' in advanced audio properties.
16:21
What are the three docks recommended for streamers to add in OBS?
Chat, Stream Information, and Activity Feed.
16:51
Optimal OBS Settings
Provides concrete baseline settings (1920x1080, 60 FPS) that ensure a professional stream quality.
01:27Loop for Animated Borders
A small but critical detail that prevents a common issue where animated overlays disappear.
05:28Twitch Native Alerts
Highlights a built-in Twitch feature that simplifies alert setup, saving time and reducing third-party dependencies.
07:48Audio Source Management
Emphasizes the importance of selecting specific audio devices and hiding unused sources to avoid confusion and errors.
15:09Docks for Stream Management
Introduces a practical way to monitor chat and stream info without alt-tabbing, improving streamer efficiency.
16:51[00:02] starting streamer is OBS it is finicky feels like it was built into stone age and there are so many buttons you have no idea what they are you might as well no idea what they are you might as well not try streaming is supposed to be fun
[00:15] right so after today you are going to understand OBS have transformed your setup from this blank canvas with nothing in it to a beautiful overlay set up with all the widgets that you are going to need to get started oh and at
[00:29] the end of this video I will show you how to get this overlay in one of the five colors completely for free my name is Barry abs and I'm a twitch partner and if you think I look tired you are right I have a twoe old newborn and
[00:44] honestly she just doesn't let me sleep I've been awake for about 32 hours now so let's get to it in this video let's set up your OBS in the same way that I have done for dozens of clients who by the way still use them to this day and
[00:58] then hopefully I can get some sleep first things first let's get our OBS installed to do that go to OBS project.com and then find whichever once you open it up it will automatically show you the auto
[01:13] configuration wizard we are going to go through the steps and let it set it up all automatically so you can get to it right away this checks your PC and internet and does a very basic setup ready to go for you make sure it's set
[01:27] up to optimize for streaming recording is secondary and then set your base is secondary and then set your base canvas resolution to 1920 by 1080 and your FPS to either 60 or 30 but prefer 60 when possible once you've done that
[01:41] you'll be prompted to log into your Twitch do that so that it can check the connection to the twitch servers closest to you for you then click next and just wait once it's done that just click apply settings and some things will
[01:54] already start popping up you will need those later but for now we can just close them I'll show you where to find those later and this is your OBS here in the center you have the canvas that's what we set to 1920 by 1080 earlier and
[02:10] it is exactly what your stream sees in the bottom left we have the scenes box and this is exactly where you choose what to show your stream you're going to need a few of these starting soon be right back stream ending just chatting
[02:25] but of course first we're going to start with the game scene so the first thing click and we're going to click rename you can also use the hotkey F2 and call this the game scene the box next to it is the sources box and these are the
[02:40] want to display you can think of it a little bit like going to McDonald's and ordering a Happy Meal the Happy Meal box that is the scene that McDonald's wants you to see but then the sources are the burgers the fries the drinks and the
[02:54] toys here in the middle we have the audio mixer and we'll get back to that later the next box is the scene transitions when you switch from one scene to the other it will give you a little bit of a display it will show you
[03:10] right now that is boring it's just a simple fade but later we are going to make that look absolutely awesome here on the bottom right you have your controls and this is where you start streaming start recording or go into
[03:23] your settings there are a few essential things missing for you as a streamer though and that is your chat box your streaming info and your event fee your event fee tells you when you get followers Subs raids and all that jazz
[03:36] and we will get all of that set up right after we get your overlay installed if you don't have an overlay yet and you want one completely for free then check out my website content delta. online I will leave a link in the description
[03:49] below and you can get one of the Europa packs completely for free with the code packs completely for free with the code James web that's James web B I will make description below as well the first thing we're going to do for your gaming
[04:05] thing we're going to do for your gaming scene is add the game we do this with a game capture Source all you need to do is click okay and say that it has to capture any full screen application it will automatically grab most of the
[04:19] games if it doesn't do that for your game go to the mode click capture specific window and pick whichever window you want it to capture usually we've got your game added we are going to need to add your webcam now this
[04:36] could just be your camera as you're seeing right here but this also works for vtuber sources if you need some more detail on how it works with your software I'm not going to provide that here but you can find that online to add
[04:49] a webcam we are just going to add a video capture device and we are going to set that to the camera that we are using which in my case is the a media HD Capture card and then we're just going to click okay there we go however with
[05:04] the Europa pack you also get the webcam border so we are going to add that one too to do this if your webcam border is not animated that is if you're not using
[05:16] one of my packs you need to use an image source if it is animated just like mine then you go to a media Source we're going to call this webcam border and we
[05:28] are going to browse for it right away just double click the source and then make sure to toggle the loop button it is very important because else after a bit your camera just disappears and there you have it it's right there
[05:43] however the size is a little bit off and the camera is completely covering the screen so we are going to resize our sources for now the first thing we are
[05:55] going to do is click the little I symbol to make the webcam border disappear here and then we're going to resize the camera we are going to do that very simply by dragging onto the side that allows you to resize it and if I need to
[06:08] replace it just click in the middle and drag if your Source doesn't fit your webcam border perfectly you can even crop your camera by holding the alt button and dragging in while holding alt you can see that actually cuts off sides
[06:22] of my camera that's called cropping and if your webcam is snapping to bord such as the side just like this where you get close to it you can hold control to temporarily disable snapping and that allows you to drag it completely for
[06:36] allows you to drag it completely for free oh and for completeness sake and probably something you never want to use if you hold shift and drag the sides you if you hold shift and drag the sides you can stretch your source to be wide or
[06:49] even tall okay let's enable the webcam border again and make sure that our camera fits in it but as we are moving them around now we are moving around the webcam border and the camera separately now of course you can do this this is no
[07:04] problem but it can be made a little bit easier click your webcam border and hold shift and click the video capture device right click and go for group selected right click and go for group selected items we will call this group camera and
[07:20] now whenever I move them I move them both at the same time which means when I resize them and maybe resize the Box a little bit to get them in the right place I only have to resize the group and I don't have to resize my camera and
[07:36] box separately put that right there maybe do it a little bit offset from the side yeah that that's fine that's good I like that now that we've done that it is
[07:48] time to set up your alerts and to do this we are going to use the twitch alerts because they are the easiest to set up and super simple Plus plus it's
[08:00] one of the best additions that twitch has done to their platform in a very very long time all you need to do to set it up is go into twitch go into your creator dashboard and click the alerts page here create an alert box and
[08:14] automatically it sets up all the alerts you're going to need follows Subs bits gifted Subs raids everything is there from the GetGo really the only thing
[08:27] that we need to do to integrate this into our OBS is go to the browser Source URL at the bottom right corner click copy and then head into your OBS here click the plus sign browser and call this twitch alerts then where it says
[08:42] this twitch alerts then where it says URL you are going to paste the URL we've just copied from twitch and then all we need to do is say control audio via OBS need to do is say control audio via OBS and click okay resize that a little bit
[08:55] put that wherever you want it I want it somewhat in the middle and there you go now your Twitch alerts are actually already working to test that it works all you need to do is all tab back to your Twitch page click send test alert
[09:10] and then you can see it happening in your OBS in real time one of the issues that we are still having is that the alert is not looking too good and it's also purple instead of the orange we're trying to make our stream to be so what
[09:25] we're going to do is we're going to go into visuals and sound and then we're going to change the image to do this click on upload file and choose the follow alert that comes with the Europa packs then up the scale to a size that
[09:40] actually looks nice and to change the text Color head into text and speech and change the accent color to the orange that we are using or at least close once you've done that just click save changes we can preview the alert and make sure
[09:56] that it looks good and we're going to do that for every single one of these so let's head into subscriptions I will show you guys again upload file sub text
[10:08] and speech turn this into the same orange now to do that we can go into the orange now to do that we can go into the follow and copy this hex code put it in here and that should automatically change it to Orange and just do this for
[10:24] every single one of these with the game scene done it is time for us to set up the just chat in scene and to do that we are going to first create a new scene click the little Plus in the scene box and set it to just chatting you will see
[10:38] that everything disappears this is completely normal if you go back to your game scene everything comes back exactly as you want it to be here we are going to add the webcam again but this time we want it big so we are going to click the
[10:53] video capture device and instead of creating a new one we're going to add the exact same video capture device device which is going to give you the exact same camera we don't need to do anything else for it we are also going
[11:05] to add another media Source this is a new one and I will call it the just chatting box and for this we are once again going to browse and click the intermission and don't forget to set this to Loop now we just move the camera
[11:21] this to Loop now we just move the camera into that box and we are done there we into that box and we are done there we go and because the camera is behind the just chatting box we can resize it a little bit so we come out a little bit
[11:34] little bit so we come out a little bit nicer without any issues whatsoever of it coming through however here we do have a chat box and to set that up we are going to need stream elements head to stream elements.com and log in with
[11:48] your Twitch as a live streamer head into the streaming tools overlays and create the streaming tools overlays and create a new overlay set it to 1 1080P and click okay then click the plus button at the bottom stream tools your stream chat
[12:04] now there are many different styles of chat but I like the transparent one so I'm going to set the theme to custom which automatically makes it transparent then we go into position and size and set this to 450 by 650 or head
[12:19] into the text settings and here you can choose your font whichever font you want our overlay so I'm going to go with B bus and I'm going to set the size to
[12:31] let's start with 20 and just see how that looks to test if this works we're going to click save we're going to go to our twitch and we're just going to write some messages and we're going to send those
[12:45] because once we do that it automatically populates the box and we can see that the text is black now that is not going to look great on an already dark overlay so I'm going to change color of the text to white because that is going to look
[13:01] great and to get this into your OBS all you need to do is click save then click the copy overlay URL button and head back into your OBS add a browser Source call this chat and paste in the URL you've just copied here set the width to
[13:17] you've just copied here set the width to 450 by 650 just as we did in the Stream element page then drag this into the chat box nice and snug and we are done chat box nice and snug and we are done your chat will now appear on your screen
[13:31] as well of course we want the alerts here as well so add a browser Source add wherever you want I'm just going to put them over my face why not and you are done with that if you want your chat to appear on your game as well you can do
[13:46] that by right clicking copy go into your game scene right click paste reference you think it will fit I'm going to put it in the top left corner with your
[13:58] gaming and your just chatting scene in place we are now going to add your static scenes these I call static scenes because nothing happens on them but they are required for you to have a decent stream such as a b right back scene in
[14:12] the Europa pack you will also find these starting soon and stream ending scene set up the B right back scene the rest is exactly the same anyway to start off click the plus sign and add a new scene we're going to add the B right back
[14:27] we're going to add the B right back scene and then click plus media source and call this the B right back video click browse go into the static screens and click be right back make sure to toggle the loop and click okay and now
[14:42] you're done if you want to have your chat in here as well you can of course copy it straight from the other one copy and then paste reference and put that maybe a little bit bigger over here so that people can read chat while you're
[14:57] here as well next next up it's time to set up your audio first things first rightclick your audio mixer and set it to Vertical layout it makes everything
[15:09] so much easier then in the control panel click your settings and go into audio here set your desktop audio to default in your mic Ox audio to specifically the
[15:22] microphone that you are using here you do not want to use the default function it could get confused with other devices such as your webcam if it has a build-in such as your webcam if it has a build-in microphone I use the dlz Creator one to
[15:36] so I'm specifically choosing that one with that in place there is still quite a lot that we can see here and not all of it is what we require so if you want to make stuff disappear because you're not going to be using that anyway you
[15:51] can for example mute it or even right click and then hide it there's just a few things that we really don't need in there such as the video capture device the webcam border doesn't make sound so we can hide that as well and now we can
[16:06] we can hide that as well and now we can only see the desktop audio the mic ox and the twitch alerts however we cannot hear the twitch alerts yet to hear them click the hamburger menu go into the advanced audio properties and find the
[16:21] twitch alerts then set it from monitor off to Monitor and output then click close now you're able to to make your chat hear you through your microphone have your desktop audio come through both on your headset and to the stream
[16:35] and make sure you hear the alerts as well so now it is time to set up the crucial things that we needed as a streamer and that is your chat so you can see it in your OBS in your stream info so you can update your titles and
[16:51] games whenever you need to do this go at to the top of the menu click docs and click chat stream information an activity fee what I like to do is make sure that your chat is on the side closest to your
[17:06] gaming monitor for me my gaming monitor is on the left and my OBS will be to the right of it so I'm going to put my chat all the way to the right I'm going to put my activity feed right next to it so I can see it whenever somebody follows
[17:20] then the stream information I don't really need to keep an eye on during the right side and then I'm going to just set this up so everything looks nice and now you're almost ready to start your streaming Journey click that start
[17:35] streaming button and grow your channel but many streamers think viewers are just going to find them and nothing is further from the truth there is a guaranteed way which has made dozens of small streamers get their twitch
[17:48] streaming and if you want to learn how you can do that too then check out the video right here where I explain exactly how you achieve your goals and as always how you achieve your goals and as always play stream better stream smart
⚡ Saved you 0h 18m reading this? Transcribe any YouTube video for free — no signup needed.