The Threshold Problem: Losing Detail
53sVisually demonstrates how a single threshold destroys image detail, a relatable frustration for anyone editing photos.
▶ Play ClipThis video explores techniques for converting full-color images to pure black and white, moving beyond simple grayscale. It demonstrates the limitations of a single threshold and introduces methods like random noise, ordered Bayer dithering, and blue noise to preserve detail. The video concludes that blue noise offers the best balance of detail and organic appearance for black and white conversion.
Using a single threshold (e.g., 50%) to convert to black and white loses detail. Different thresholds (25%, 35%, 75%) show varying trade-offs between preserving highlights and shadows.
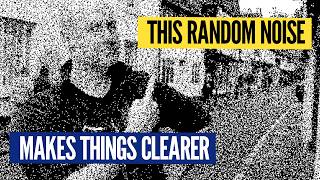
Applying random thresholds to each pixel preserves more detail than a uniform threshold, as it creates shades of gray through pixel density. Comparison shows random noise keeps fine details like the church spire.
Random noise pushes some light pixels dark and dark pixels light proportionally to their brightness, creating grayscale-like effects. This is analogous to a palette of grays made from varying black/white pixel ratios.
Bayer dithering uses a repeating pattern (e.g., 2x2 grid) to systematically turn pixels on/off. The 2x2 grid gives 5 shades of gray, while larger grids (4x4, 8x8) produce more detail but with a newspaper-like texture.
For any 2^n grid, Bayer dithering recursively subdivides and orders pixel flips diagonally to avoid vertical/horizontal lines. The 4x4 grid offers a good balance, revealing brickwork that the 2x2 grid misses.
Blue noise combines randomness with even distribution (no clumping), providing detail comparable to Bayer dithering but without repeating patterns. It looks organic and is analogous to an iPod shuffle avoiding repeats.
Blue noise has evenly spaced variation at small scales (high frequency), unlike true random noise which has hotspots at all scales. When blurred, blue noise goes uniform gray, while true random retains structure.
The creator invented 'Parker dithering' based on a 3x3 grid with unusual thresholds (e.g., 29%, 1%). It introduces a fun texture but is not optimal due to always-on pixels from low thresholds.
While naive thresholding is destructive, techniques like Bayer dithering and especially blue noise can convert images to pure black and white while preserving significant detail, offering a creative alternative for artistic or technical applications.
"The title accurately describes the video's content; it explains how adding random noise to black and white conversion can magically preserve more detail."
What is the main downside of using a single global threshold for black and white conversion?
It loses significant detail because a single cutoff cannot preserve both highlights and shadows.
1:41
How does adding random noise to pixel thresholds help preserve detail?
It creates shades of gray by varying the density of black/white pixels, mimicking grayscale through pixel distribution.
5:27
What is the Bayer dithering algorithm's key property?
It uses a recursive 2^n grid where pixels flip in a specific diagonal order to avoid vertical/horizontal lines.
8:04
How many gray shades does a 2x2 Bayer dithering matrix produce?
Five: all white, all black, plus three intermediate shades.
7:18
What does 'blue noise' mean in the context of dithering?
It is a type of noise with evenly spaced variation at high frequencies, avoiding the clumping of true random noise.
12:48
What is the visual difference between blue noise and pure random noise when blurred?
Blue noise becomes uniform gray, while pure random noise retains hot/cold spots.
13:43
What does 'Parker dithering' refer to in this video?
A novelty dithering technique invented by the creator using a 3x3 grid with thresholds like 29%, 1%, etc.
15:22
Random noise preserves more detail
Demonstrates a counterintuitive technique: adding randomness improves detail retention over a deterministic threshold.
4:03Diagonal ordering avoids artifacts
Key insight into why Bayer ordering is diagonal to prevent vertical/horizontal lines in the dithered image.
8:52Blue noise: best of both worlds
Blue noise achieves detail without repeating patterns, combining randomness with even distribution.
11:43Parker dithering as a creative hack
Shows how personal creativity can lead to fun, albeit suboptimal, dithering patterns.
15:22[00:00] Okay, here we go. How about this one? Any good? This one? I like this
[00:05] one. This one's got something to it. Sorry, I'm dithering.
[00:17] This is a video all about how you take a full color image like this
[00:20] and turn it into a purely black and white image. None of this gray scale
[00:24] ridiculousness. And a while ago, I did a video which was like self-referential where the
[00:30] text would describe how many pixels are in that image of the text. There was
[00:34] a deleted scene about what happens when you go all white or all black using
[00:39] a threshold. So let's go full black and white. What we can do is just
[00:43] pick some threshold and above that level of gray we go white and below it
[00:48] we go black and that's what the slider over here is indicating. I mean that's
[00:52] not part of the The frame, I'm putting that on afterwards. In fact, the count
[00:56] up here for the number of black pixels and white pixels, not part of the
[01:00] image, although spoiler, that's where we're going. The idea with the shot was to demonstrate
[01:04] the difference between black and white, like real black and white, and what people call
[01:08] black and white. It's actually gray scale. And I had a lot of fun, put
[01:12] the code together, we rendered that, and then we cut it. Because do you know,
[01:15] sometimes you put a lot of effort in for the luxury of cutting it out
[01:18] of the edit. And it was already a very full video, a video I love.
[01:21] um underperformed on YouTube what are you gonna do? I liked making it and so
[01:27] we took that scene out but it always kind of stuck with me I was
[01:29] like you know what there is something in that how do you take an image
[01:32] and make it pure black or white and keep as much information as possible we
[01:38] can try it on this shot as well so here it is okay if you
[01:41] did naive 50% threshold it looks like this super dark you can still kind
[01:47] of make me out but uh we've lost basically everything from the background and I
[01:53] mean, classic log perception of darkness, I guess. Cause if we go up to 75%,
[01:57] it looks like this. It's just, it's just, the lamp is the only thing that
[02:02] survives at 75%. And this is 25%. So now the bottom 25% of
[02:08] brightness from zero to 255 goes down to black. Everything else goes to white. You
[02:11] get some detail on my face. There's a little bit up over there, but
[02:17] we're losing a lot there. My head is just vanishing into the wall. I played
[02:21] around for a while, this specific shot I think 35% is the best threshold.
[02:27] That's keeping a decent amount of detail here. You can still kind of see the
[02:32] football's not bad, but like look how severe the shadow is. And this thing, it
[02:36] looks like there's an object there, that's just the shadow of this. The point is,
[02:41] if you're trying to get Detail, and you've only got black or white and a
[02:44] single threshold where you're rounding one way or the other, very hard to keep like
[02:49] fine detail and darker detail, all that kind of jazz. And it gets even worse
[02:54] were we to go somewhere that's much more visually interesting. Such as this! Ah, there's
[02:59] some detail. Now we think the best threshold for this scene is 28.
[03:05] what you're looking at right now. Everything below 28% brightness is going to black and
[03:10] above is going to white. It's the best we could do to kind of keep
[03:12] the detail in the front of the church over there and you can still see
[03:15] some detail in my face but the top of my head is indistinguishable from the
[03:20] sky. The spire is gone on the church. To get that back we tried a
[03:26] threshold of 40 there. That's better but now we've lost so much other detail. So
[03:31] we think 28% is the best. However, what if we weren't applying
[03:37] the same threshold to every pixel, but we mix it up a little? And the
[03:41] result looks like this. Okay, so there's a lot of like static noise going on,
[03:47] but there's definitely more detail. And check it out, you can see me and you
[03:52] can see the spire and you can see basically everything. So somehow by applying
[03:58] randomness, we've put noise into the shot, we've managed to preserve more detail. So
[04:03] compare this to when we had the 28 threshold, the best from before. So over
[04:07] on this side, let's say, random noise. Over here, 28 threshold. Huh?
[04:14] Look at this. Terrible. Different type of terrible. Although actually, if we move the camera
[04:19] around so the spire goes in and out, you can see that it's, you know,
[04:24] we're able to keep that separate from the sky by using randomness and we can't
[04:28] do that with a threshold, at least without losing everything else. So what's the deal
[04:32] with random noise giving us detail back into our black and white image? Well first
[04:36] of all I just want to tell you one thing you don't actually need to
[04:39] know. If we zoom right in on this image down to the pixel level, these
[04:44] individual pixels are actually little groups of 4x4 pixels.
[04:50] Because what I did, I scaled everything down to 1k, because we film at 4k,
[04:55] I go to a quarter the resolution, Then I do all the processing, the black
[04:59] and whiting, and then we pop it back out again to 4K. And we do
[05:02] that with a kind of hard edge nearest neighbor technique, which means what look like
[05:07] pixels are actually little four by four groups of pixels. But if I did this
[05:11] with true pixels in 4K, by the time we're done, if you're watching it on
[05:16] an HDTV, you're watching it on a phone, it would all just blur together. So
[05:20] that's why the true pixels aren't real pixels, but you should be able to see
[05:24] them. You don't need to know. but I just thought it'd be fun to share.
[05:27] Speaking of things you don't need to know, you don't need to know this video
[05:29] is sponsored by Jane Street because their Academy of Math and Programming is now accepting
[05:33] applications. More about that at the end of the video in the description below. Let's
[05:38] talk about the noise. What the random thresholds are achieving is taking some of the
[05:42] pixels in light regions and pushing them dark when they shouldn't be and taking some
[05:47] pixels in the dark regions and pushing them light. And that's happening random or rather
[05:52] proportional to how far from being light or dark each pixel is. And what that's
[05:58] doing is giving us, well, shades of grey. Because if you had to come up
[06:03] with grayscale colouring from scratch, using only black and white, you'd put together like a
[06:08] palette of greys like this, where you've got more or fewer black pixels in each
[06:13] one, so as you kind of lean back and blur your eyes, they become different
[06:17] amounts of grey. And what the random thresholds are doing is basically this. but in
[06:23] an ad hoc fashion, because the brighter or darker a region is, the more or
[06:28] fewer pixels get pushed in the wrong direction. So we're basically hitting all these in
[06:33] between combinations. The only issue is random noise is of course doing that randomly.
[06:39] If only there was another way, we could do it systematically. New location where we're
[06:45] going to try a new filter, which looks like this. It's not bad. I mean,
[06:51] my head, a little bit disappears into that building, but we're keeping like, look at
[06:55] the detail in the hanging basket and the background is not bad, but it does
[07:00] have that weird kind of old school newspaper feel. And that's because it's based on
[07:06] a repeating pattern. Any dithering scheme that uses repeated pattern, like what we just saw
[07:12] is called ordered dithering. Specifically, I was using a two by two Bayer. ordered
[07:18] dithering which gives you five different shades of grey. Well you get all white and
[07:23] all black and then you get three in the middle where you colour in one,
[07:26] two or three black pixels and that's it. That's your whole spectrum.
[07:32] But it kind of works. You just take that, have it as a repeating tile
[07:36] over the entire size of your image and then use that as your series of
[07:40] filters and the way you can get it to gradually step up is you just
[07:43] set them as different thresholds and it works. But the point is they turn on
[07:48] in that order. But what if we don't want just a two by two repeating
[07:54] pattern? Oh well, you can go so much better. In fact, Bayer dithering works for
[08:00] any two to the n by two to the n grid. Allow me to demonstrate.
[08:04] The secret as such to Bayer dithering is the order in which the pixels flip
[08:08] from black to white or vice versa. And they fire off in a very specific
[08:12] order as an area gets brighter and brighter. The first one to go is the
[08:16] top left, that one there flips first, that's pixel number one. As we get brighter,
[08:20] then number two fires, then number three, and finally we fill it in with number
[08:25] four. You might be thinking for a two by two grid, there's not a lot
[08:28] of ways to do it differently. But if you ever think about it, you could
[08:31] do it wrong if you fired one and then two underneath, The moment you go
[08:36] up into a slightly brighter shade of grey, you get weird vertical lines appearing. And
[08:41] you don't want vertical horizontal lines, which is why we go diagonal and then a
[08:44] corner and then the other diagonal. By staggering the order in which we go from
[08:48] white to black or black to white, you are less likely to get weird patterns.
[08:52] And it's better when you look at it with your human eyeballs and you kind
[08:57] of average it out into a grey. Things get more complicated though, when we go
[09:02] to a bigger grid size. Bayer dithering works for any two to the n grid.
[09:07] So you can basically double it each time to get the next one up. And
[09:10] what you do is you imagine this as being like four lots of the previous
[09:14] ones. There's one there, another one there, another one there. And then you do the
[09:18] same pattern recursively as you scale it up. So of these sub grids,
[09:25] you always do them in that order. This one, then that one, then that one,
[09:27] then that one. And then within each one, you do them in this order. So
[09:31] for example, We're going to do top left for all of them first in this
[09:35] order. So we do top left there, one, top left there, two, and then three,
[09:40] and then four. And now we come down to here and we do them in
[09:44] this order. So there's five, six, seven, eight. Now we're going to do that
[09:49] one in all of them in that order. So that's now
[09:57] nine, 10, 11, 12, and finally 13, 14,
[10:04] 15, 16. And you could repeat this and do an 8x8 or 16x16 and so
[10:08] on. It's a fantastic little recursive algorithm and if you turn the pixels on and
[10:12] off in this order you get a fantastic range of shades of grey.
[10:19] But what would that look like back out in the real world? Welcome back to
[10:23] the scene from before. We're still in the 2x2 Bayer filter and just
[10:29] Take a little note of what you can and can't see. And ready? Here's the
[10:33] 4x4! Ah, isn't that special? You can see these bricks! Ready? Okay, back to 2x2.
[10:39] They're gone. 4x4, they're back. You can see all the brickwork over here. Look at
[10:44] the background and my face. In fact, if we do, we'll do a split screen
[10:48] as soon as this car comes through. You know what? Do it now! I'm over
[10:51] here. This is the 2x2 side where that car is just driven through. Ah! Look
[10:57] at the emotion you can see now. And if you're thinking, well, hang on, if
[11:01] the 4x4 is this good, imagine the 8x8. Well, here's the 8x8. It's the same.
[11:07] Here's 16. Up off a point, doesn't make a big difference. So for this scene
[11:12] at the resolution we're using, the 4x4, what a winner. So there's your two options.
[11:17] Use completely random thresholds and get a nice organic look, but maybe not... as many
[11:22] nice separations of grays as we would like or you use something ordered like Bayer
[11:27] dithering you get loads of nice distinct grays but you get a weird repeating newspaper-esque
[11:33] look. There are only two options I'm afraid it's not like there's some fantastic third
[11:39] option in the middle with the best of both of course there is it's called
[11:43] blue noise instead of using pure random noise you can use blue noise and you
[11:49] get much better grays And here is blue noise out in the wild. You don't
[11:53] even know what this scene looks like. All you can see is this dithered version,
[11:57] but it's not bad. Look how the posts, the posts like you can see they
[12:00] get darker as you go back. You can almost make out there's like brickwork and
[12:05] tiles. Just have a look at what detail you can get. We can also compare
[12:09] this to pure random. Actually, we can do our split screen again. So I'm blue,
[12:14] blue noise on this side. Random noise on this side, or come with me, round
[12:19] over here, past producer Nicole with the bounce, because it makes so much difference once
[12:23] we've given the shot. There's a tree, there you go. Blue noise and random noise.
[12:30] You be the judge. Right, we all love blue noise, but what actually is it,
[12:33] and how does it differ from true random noise? If we were to extract our
[12:38] random thresholds for every pixel and just visualize them going from white to black, it
[12:42] would look like this. There you go, it's just standard random noise. Blue noise
[12:48] looks like this, subtly different. So in the true random, your brain is doing
[12:54] human brain things. It's looking for patterns. You might be spotting some like threads or
[12:59] filaments in there because real random noise clumps. Like you're gonna have hot spots and
[13:03] cold spots at every different scale. Whereas blue random noise, that's a lot more like
[13:10] It was like remember when, well some of you might remember when the iPod Shuffle
[13:13] came out and it was true random and everyone got upset because they'd occasionally hear
[13:17] the same song twice in a row? Yes, because that's randomness. You get every possible
[13:22] string and arrangement in there somewhere including things repeating which is why you get like
[13:26] bright spots and dark spots. All people wanted was a shuffle and blue noise is
[13:32] much closer to being a shuffle. You don't just things in randomly you make sure
[13:37] on average they're all roughly evenly spaced. It's nicely distributed noise and
[13:43] you can see that if we blur them both because if we blur blue noise
[13:47] on a small like let's say five pixel radius it goes totally gray whereas true
[13:52] noise you can still see hot spots and cold spots. There's still some structure in
[13:57] there because white noise has structure at every frequency is why it's called white noise.
[14:02] Whereas blue noise only has variation on very small distances, high frequency like blue.
[14:09] You also get different color audio noise, not going near that. I'm pretty sure it's
[14:15] the same thing. But the point is, this is not pseudo random, but it's not
[14:20] true random. It's blue random and it looks a lot better. Isn't blue noise amazing?
[14:27] It's just incredible detail, but you don't get a repeating pattern. And the reason you
[14:31] get the best of both worlds is it is still pretty random, but also it
[14:36] has that same property of bare dithering, whereas the pixels turn on, the
[14:41] order in which they turn on is very evenly distributed. So if I take this
[14:45] blue noise and I cycle it all the way from completely black to completely white
[14:49] and see when the different parts of the filter turn on and, I guess, turn
[14:52] off, you'll see at the extremes, it's just a bunch of points fairly
[14:58] evenly distributed, but yet randomish. In fact, if we pause it there, if you told
[15:02] a bunch of humans arrange themselves in a room randomly, they'd end up standing a
[15:06] bit like this. Because humans would think random means evenly distributed, but a bit offset.
[15:12] It's not a grid. And that's exactly what we get here. Blue noise is what
[15:16] humans think true noise is. But it's not. Blue
[15:22] noise. If you're thinking, come on, Matt, what about the dithering system you came up
[15:28] with? Well, who's to think I'm gonna come up with a course I did. And
[15:32] we'll talk about that in a moment. But first I wanna thank the sponsor of
[15:35] this video, Jane Street, because their AMP course is accepting applications now.
[15:41] AMP is Jane Street's Academy of Math and Programming. It's for recent high school graduates
[15:47] who had some kind of barrier to their education, but they want to pursue an
[15:51] education in math or computer science. AMP runs from the very end of June right
[15:57] through to the very end of July, 2026. And over that month, the curriculum will
[16:00] focus on solving problems involving things like mathematics, computer programming, game theory, and
[16:06] much more. Not only will Jane Street cover your travel to New York City, your
[16:10] accommodation, your food and all fees associated with the course, but if you make it
[16:14] onto AMP, they will also give you a $5,000 scholarship to help you further your
[16:18] education. To apply for AMP, you don't need any particular background in finance or coding.
[16:24] You just need to be intellectually curious and have a love of mathematics and computer
[16:28] science. The deadline for applying for AMP, if you are a high school student or
[16:33] you know a high school student and you can pass this on to them, is
[16:35] the 11th of March. So get onto it. It's a huge amount of fun. I
[16:39] go every year, so you get to see me. I mean, there's a perk. I
[16:43] just love solving the sorts of puzzles that they have at AMP. In fact, they
[16:46] gave me one recently that I could have a go at. Imagine you're in a
[16:50] three-game tennis competition where to be the champion, you have to win two consecutive games.
[16:56] Your opponents are Jenny, the best tennis player in the club, and Carla, who is
[17:01] less good. You either have to play Jenny, Carla, Jenny, or Carla, Jenny, Carla. Your
[17:07] non-tennis challenge is which way around would give you the greatest probability of winning two
[17:13] consecutive games. I like this puzzle because there is kind of an intuitive way to
[17:17] look at it, but also you can just work it out. which I did. Here's
[17:20] all my working. I had a lot of fun doing it. I hope seeing this
[17:24] really clears things up. All the puzzle details will also be in the description if
[17:28] you want to try, as will the details for applying to AMP. Thank you so
[17:32] much. I mean, I know this is not for everyone, but if you are that
[17:34] high school student or you know someone who is, this could be a life-changing opportunity.
[17:38] So please do spread the word. Huge thanks to Jane Street for not only running
[17:42] AMP, but also sponsoring this video. And now for my dithering technique, because I first
[17:48] came across all of this and got obsessed by it when I watched a bunch
[17:51] of YouTube videos about the mass behind the video game Return of the Obra
[17:57] Dinn. And in that game, everything is black and white dithered. Although within each shot,
[18:02] there's different types of dithering and you move around in 3D, but the dithering works.
[18:07] It's just incredible. I will link to the videos I watched below if you want
[18:11] to check them out, but it just got me thinking, oh, you can come up
[18:14] with different types of dithering. In fact they used new types of dithering for that
[18:18] video game. So I was like well I'm going to do my own. But what
[18:21] could I possibly base Parker dithering on? Well I thought what about the
[18:26] original Parker thing? I used the Parker square. I used a three by three
[18:32] grid where that's 29%, 1%, 47% etc thresholds. Now
[18:38] is that a good way to do it? No! In fact I'm now Parker dithered.
[18:43] And you'll see. So the issue is, because we got some one percenters here,
[18:49] they're like always white. Because what's going to get below one percent? So you always
[18:54] get this, if you zoom in, these little pair of diagonal pixels are just always
[18:58] on. But I think that adds a certain amount of fun texture to a scene.
[19:03] And it works outside as well. Check it out. There's the tree from before. That's
[19:07] not a bad amount of detail. If you come over here, other side of producer
[19:10] Nicole again, you can feel of this. There's your tiles up there. We've got the
[19:14] posts from before. That guy walking through, it's not bad. Even this shot isn't bad
[19:20] with the Parker filter, huh? We've got the spire and I think that weird texture,
[19:25] nice moody element on the graveyard. And while we're here, thank you for visiting my
[19:31] MySpace page. So that's it. Thanks for watching. Don't forget to like,
[19:37] subscribe and dither that bell, whatever it is they say. Oh, and I'm still on
[19:42] tour. Come and see me on tour. That's the highest resolution you will ever see
[19:48] me in. Full color too.
⚡ Saved you 0h 20m reading this? Transcribe any YouTube video for free — no signup needed.