Secrets to Perfect Green Screens
45sStarts with a promise to reveal a full green screen workflow, hooking viewers who want to improve their video production.
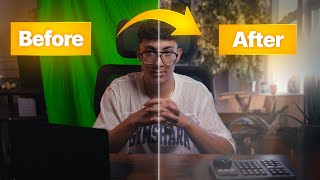
▶ Play ClipThis video provides a comprehensive green screen workflow using DaVinci Resolve, Midjourney, and Photoshop. The creator covers lighting setup, keying in Fusion, AI background generation, and compositing with light wrap for realistic results.
Main key light at 45° angle with SmallRig RC60B and softbox; tube light for green screen; fill light for face.
Use Delta Key in Fusion; sample green near subject; adjust Gain and Balance sliders carefully.
Use Premat to remove green shades by drawing a box; use Map tab with Threshold slider to refine.
Add polygon with garbage mat to mask out unwanted areas; reduce haloing with Erode, Blur, and Fringe Gamma.
Export still frame with green background; use Midjourney to generate background; use Photoshop Generative Fill to remove subject.
Add adjustment clip; use Color page for vignette, exposure, saturation, and lighting color matching; add glow.
Use MatteControl with blurred background in Fusion to create light wrap around subject edges for realism.
"The title promises the ultimate green screen tutorial, and the video delivers a complete workflow from lighting to compositing, including AI tools."
What is the main key light used in the video?
SmallRig RC60B with a softbox.
1:04
What is the purpose of the tube light from UA?
To light the green screen behind the subject.
1:15
What key is used in Fusion to key out the green screen?
Delta Key.
1:50
What are the two main sliders used in the Delta Key?
Gain and Balance.
2:25
What is the purpose of the Premat tab in the Delta Key?
To remove more green shades by drawing a box.
3:37
What is the main slider used in the Map tab of the Delta Key?
Threshold slider (low and high points).
4:21
How does the creator mask out unwanted areas in Fusion?
A polygon with a garbage mat.
5:09
What techniques are used to remove white haloing around the subject?
Erode, Blur, and reduce Fringe Gamma.
5:48
What AI tool is used to generate the background?
Midjourney.
7:37
What Photoshop tool is used to remove the subject from the AI-generated background?
Generative Fill tool.
9:07
What is light wrap?
A compositing technique where background light softly wraps around the subject's edges to make it look less like a cutout.
13:04
How is light wrap created in Fusion?
A MatteControl with a blurred background, using subtract combine operation and combine alpha.
13:22
Key Light Setup
Describes the specific light (SmallRig RC60B) and angle (45°) for optimal green screen lighting.
1:04Delta Key Usage
Introduces the Delta Key in Fusion as the primary tool for keying, with detailed slider adjustments.
1:50Imperfect Green Screen Keying
Demonstrates that even with creases and shadows, a good key is achievable with careful adjustments.
3:16Garbage Mat Masking
Shows how to use a polygon with a garbage mat to clean up the key by masking out unwanted areas.
5:09Light Wrap Technique
Explains and demonstrates light wrap, a crucial compositing technique for realism.
13:04[00:00] So, do you want to know how you can get
[00:01] green screens like this or this or even
[00:05] this all whilst using AI and event
[00:08] resolve? Well, today is the end of
[00:09] gatekeeping because I'll be showcasing
[00:11] my full green screen workflow that I use
[00:14] for both my long form and short form
[00:16] content. Not only will I be walking
[00:17] through the platforms I use, but also
[00:19] how I key out my green screens, the
[00:21] lighting, and how I composite everything
[00:23] inside the Vincent Resolve. And don't
[00:25] worry if you don't use a Vincent Resolve
[00:27] because everything I teach in this video
[00:29] can still be applied in every single
[00:31] editing software as well. Now, this is
[00:32] going to be part of a long series on
[00:34] YouTube. We'll be breaking down my
[00:36] filming and editing process throughout
[00:38] the coming months. So, if you don't want
[00:39] to miss out, make sure you subscribe and
[00:41] hit the notification bell because I'll
[00:43] be revealing everything. And before I
[00:45] forget, if you do have any suggestions
[00:46] of any videos you'd like me to make,
[00:48] make sure you write it down below
[00:49] because I'll be reading everything and
[00:51] maybe picking out any that I see fit for
[00:53] the future of this channel. So, to break
[00:55] down my lighting setup that I use in my
[00:56] videos, firstly, I've got my main key
[00:59] light shining from this direction at 45°
[01:02] angle pointing downwards. And the light
[01:04] I'm specifically using is the Small Rig
[01:06] RC60B. Now, it's portable and I've just
[01:09] got a massive soft box just to soften
[01:11] the light. And secondly, just on my left
[01:13] here, I've got a tube light from UA. And
[01:15] just the main purpose of that is to
[01:17] light the green screen behind me. And
[01:18] thirdly, light here I have on my right
[01:20] is the Small Rig portable
[01:23] light box or panel. And again, it's just
[01:26] for a fill light just to fill this side
[01:29] of my face. And now we're going to be
[01:31] moving on to keying out the green
[01:32] screen. So the first thing I've done is
[01:34] I've just color graded the footage by
[01:36] converting it into Rex 709 and then just
[01:38] doing my basic adjustments. Then I've
[01:40] converted it into a compound clip just
[01:42] so it the grade is baked in when we come
[01:44] to actually key it out in the fusion
[01:46] page. So head to the fusion page now.
[01:49] And the key I'm going to be using is a
[01:50] delta key. So you can go ahead and
[01:52] search for that by pressing shift space.
[01:55] You can add that. I'm also going to view
[01:57] the delta key on the left viewer here.
[01:59] And I'm going to turn off show color.
[02:01] Now you're just going to see it appear
[02:03] white here. But what we need to do is
[02:05] using the eyedropper tool here on the
[02:07] right is we just need to go very close
[02:08] to the subject.
[02:11] Just like that. And we just have a very
[02:14] basic selection so far. Now we can see
[02:16] on the left it's black and white. And
[02:18] the easiest way to think of this is
[02:20] black is everything we don't want and
[02:22] white is everything that we do want. So
[02:24] So the main two sliders that we're going
[02:25] to be using are the gain and balance
[02:27] sliders. So if we just increase the gain
[02:31] a little bit, we can see that a lot of
[02:33] the green screen starts to be keyed out,
[02:36] but we also start to lose some of the
[02:39] subject as you can see here.
[02:42] So we need to move very carefully. And
[02:45] then using the balance slider, we're
[02:47] just doing the opposite thing. So by
[02:49] decreasing it, we can see a lot of the
[02:51] subject becomes more visible.
[02:54] Also, we start to introduce back a lot
[02:57] of this green screen. So, very minimal
[03:00] movements.
[03:02] [Music]
[03:03] Just like that.
[03:06] And now moving on to the premat. So,
[03:08] we're going to be moving from left to
[03:10] right. And one thing I forgot to
[03:11] mention. So,
[03:13] if I bring back the media in one clip.
[03:16] So the better you light your green
[03:19] screen, the easier it is going to be to
[03:20] key out only because as you can see
[03:22] here, there's a lot of creases in mine
[03:24] and so there's a lot of disparity in
[03:26] between the green shades just because of
[03:28] the shadows. But that's fine. I'm still
[03:29] going to show you how you can key out a
[03:31] imperfect green screen. So if you move
[03:33] back to the delta key, disable color
[03:36] once again.
[03:37] Now the way you can think of the premat
[03:39] is we're just removing more of these
[03:41] green shades by just drawing a box. Now
[03:44] we can see when we do that we start to
[03:47] remove some of the subject. So we can go
[03:50] back.
[03:51] Just select one more.
[03:55] Now I'm not going to select too much cuz
[03:57] as you can see now we've just gotten rid
[03:59] of a lot of the subject. So this is good
[04:02] enough. Now we can also improve the
[04:05] selection by increasing the blur.
[04:08] Just like that. We can see here that we
[04:11] start to reintroduce some of the
[04:13] subject.
[04:15] And so let's move on to the map. And
[04:17] this is probably one of the most
[04:18] important tabs. And the main slider
[04:21] we're going to be using is the threshold
[04:22] slider. So what I normally do is just
[04:25] increase the low point. You can see that
[04:27] a lot of the green screen is keyed out
[04:31] now. And then we just decrease the high
[04:34] point
[04:36] just like that.
[04:38] Now this is a very good selection.
[04:39] Obviously, we still have some
[04:41] imperfections here, which we're going to
[04:44] be able to mask out this one. But this
[04:45] one, we can get rid of just by going
[04:48] into the premat.
[04:51] And we can select some of that. And for
[04:53] small imperfections like this, then
[04:55] that's fine. We can keep it only because
[04:56] they won't be as visible when we come to
[04:59] actually add in our realistic
[05:01] background. I'm going to show you how to
[05:02] do that later. But right now, let's
[05:05] actually mask out everything that we
[05:07] don't need. And the way I'm going to do
[05:09] that is I'm just going to add a polygon.
[05:11] And then by pressing on option, I'm just
[05:13] going to
[05:15] press some garbage mat. And what I'm
[05:17] going to do is I'm just going to go
[05:18] around everything that we need.
[05:29] And now if we invert the selection, now
[05:31] we've just selected everything that we
[05:33] do need. And then we've just gotten rid
[05:35] of everything here on the left and right
[05:37] that were just distracting us from the
[05:39] main subject. And if we zoom in closely,
[05:42] we can see here that just got a bit of
[05:43] haloing. And the way we can get rid of
[05:45] that is by going into the map.
[05:48] And then we can just erode slightly.
[05:53] Can also introduce just a little bit of
[05:55] blur. And in the fringe, we can just
[05:58] reduce the fringe gamma as well. And now
[06:02] we can see we got rid of that white
[06:03] haloing that was around the subject. Now
[06:06] we can go around the edges just to have
[06:08] a look.
[06:13] Just like that.
[06:21] And there we go. Now I've just gotten
[06:22] rid of the haloing all around. Now, I'm
[06:26] just going to change the replace mode to
[06:28] source because that's just a more
[06:30] accurate representation of how we
[06:31] actually graded the footage. And so, we
[06:34] can move over to the fringe. And so,
[06:35] what I'm going to do is I'm just going
[06:37] to change the spill mode over to medium.
[06:39] Depending on how much spill you actually
[06:41] have on your subject, you can change
[06:42] that to medium or even well done. But
[06:44] I'm just going to keep it on medium for
[06:46] now. And that should be everything for
[06:48] the Delta Kia. So, what we can do now is
[06:51] we can move back to the edit page. What
[06:54] I'm also going to do is I'm going to
[06:56] effects and I'm just going to search for
[07:02] generators
[07:04] and I'm going to drag a solid color
[07:06] underneath our subject. I'm just going
[07:08] to make that a very bright green and
[07:11] you're going to see why when we actually
[07:12] come to import it into Mid Journey so we
[07:15] can actually get our background. Now
[07:17] head over to file, export, current frame
[07:21] as still.
[07:23] And then we're just going to grab a
[07:24] still of our video. We can name that
[07:27] green
[07:29] screen.
[07:30] Still
[07:33] just like that. So after you've exported
[07:36] your still frame, now head to midjourney
[07:38] and then hover over to the edit section.
[07:41] And then we're going to press on edit
[07:42] uploaded image. We're just going to
[07:44] import our green screen still. Using the
[07:46] smart select tool, we're just going to
[07:49] select the subject.
[07:54] And after you have a fairly decent
[07:56] selection, you're just going to press on
[07:57] erase background. Now, type in anything
[08:00] that you want. For example,
[08:02] a man sat in a cozy living room.
[08:08] Warm
[08:10] match lighting.
[08:13] You can also play around with the
[08:14] settings. So, you want to 16 by9. You
[08:17] can play around with the aesthetics, but
[08:19] we're just going to submit edit.
[08:21] [Music]
[08:24] Now, I've got some examples right here.
[08:28] Let's see.
[08:30] And you can just keep on generating
[08:32] samples until you settle on one that you
[08:34] actually like. So, let's try out a few
[08:37] more.
[08:40] [Music]
[08:47] Okay. So, let's just pick out this one.
[08:48] It's a decent example. There's a lot
[08:50] going on and we can then come to
[08:52] composite it later on in the Vinci
[08:53] Resolve. So, go ahead and download
[08:55] image.
[08:57] Now, the third program we're going to be
[08:59] using is Photoshop. So, go ahead and
[09:02] open
[09:04] the frame that we just downloaded from
[09:05] Midjourney and we're going to be using
[09:07] the generative fill tool. So go ahead
[09:10] and select everything that you want to
[09:12] get rid of because we just want the
[09:14] plain background.
[09:17] Just like that. Got some generative
[09:19] fill. And then we can just type remove.
[09:25] Now we're going to just get a few
[09:26] examples. You can go ahead and pick out
[09:28] which one you like. I'm just going to go
[09:30] with the first one. And then I'm going
[09:31] to go to file, export, and quick export
[09:35] as PNG.
[09:37] Now it's time for my favorite part,
[09:39] which is the compositing. So, you want
[09:41] to listen very closely because I'll be
[09:42] giving away some tips and tricks that
[09:44] you definitely don't want to miss out
[09:45] on. So, to begin, we're going to grab
[09:48] our plain background that we exported
[09:51] out of Photoshop and we're just going to
[09:53] line it below our subject. And then for
[09:56] the first part of compositing, I'm just
[09:57] going to add an adjustment clip
[10:01] just like that. And then we're going to
[10:04] move on to the color page. So, I'm just
[10:07] going to add a few corrections and a few
[10:10] effects that will really make the whole
[10:12] scene pop. So, to begin, I'm just going
[10:14] to add a vignette.
[10:19] It's a bit too strong. So, using a lips
[10:24] mask,
[10:26] just going to soften it slightly.
[10:34] Just like that. And the global blend, we
[10:36] can just bring that down ever so
[10:38] slightly as well.
[10:42] Just like that. And if I press on option
[10:45] P, it's going to get a parallel node.
[10:48] We're going to do a similar thing,
[10:51] but we're just going to make the subject
[10:54] pop by just increasing the exposure
[10:56] where our subject is. Just very
[10:58] slightly.
[11:01] Not too much.
[11:05] And we can see that already
[11:08] this makes a big difference. But we're
[11:11] not done yet.
[11:14] Another thing, we're also going to
[11:17] increase the saturation just a little
[11:20] bit.
[11:22] Just like that.
[11:24] And if you take a look at the viewer, we
[11:26] have some warm light casting on our
[11:28] subject from the left. And we have a
[11:31] cool light shining on our subject from
[11:33] the right. So we're just going to
[11:34] accentuate that by adding
[11:37] two ellipse masks once again.
[11:42] Just like that.
[11:44] And then we're going to move the offset
[11:48] towards the orange. Just like that.
[11:51] Another parallel node. Very similar
[11:54] thing, but this time with the cool light
[11:57] on the right hand side.
[12:07] Just like that.
[12:11] And already if we take a look,
[12:14] it just makes the lighting pop much
[12:18] more.
[12:21] And if you have a look at before and
[12:24] after,
[12:26] we've just added that very, very slight
[12:31] touch to it.
[12:34] Now, finally, we're just going to add
[12:35] some glow.
[12:38] We don't want it to be too much. Just
[12:40] going to lower the threshold. Just like
[12:43] that.
[12:45] And the spread. Can also lower the
[12:48] gamma.
[12:49] So that's
[12:51] we can see
[12:53] that this makes the bright areas pop as
[12:57] well.
[13:00] And now for the very important part
[13:02] which is adding light wrap just around
[13:04] our subject. If you don't know what that
[13:05] is, light wrap is basically a
[13:07] compositing technique where a bit of the
[13:09] background's light softly wraps around
[13:11] the edges of the subject and it just
[13:13] makes it look less like a cutout. So
[13:16] let's move on to the fusion page for
[13:19] that.
[13:22] So first thing I'm going to do is I'm
[13:24] going to add a Mac control
[13:28] and then I'm just going to connect Delta
[13:30] Kia from earlier into the yellow input
[13:32] of the Mac control and I'm just going to
[13:34] view it on the left here. Now we want to
[13:36] change the combine operation to subtract
[13:39] and the combine to combine alpha. You're
[13:42] going to see why later. And we also want
[13:44] to add a blur node as well.
[13:48] Then connect the blur node to the green
[13:50] input of the mat control.
[13:53] Now if we view we can see a very slight
[13:56] outline. We can make that more prominent
[13:58] by just increasing the blur size.
[14:02] Just like that. And then we're going to
[14:05] merge the Mac control on top of the
[14:07] delta key but just changing the input to
[14:10] the blue one. And then we're going to
[14:13] grab our background from earlier. Once
[14:14] again,
[14:17] we're going to add a blur just to blur
[14:20] it out all the way so you can view it
[14:24] here.
[14:28] And then we will add a transform.
[14:34] Plug it into the green input.
[14:37] And we're just going to
[14:40] increase the size just so it fits the
[14:43] whole frame. Just like that. And we can
[14:46] see already we have some light wrap. If
[14:49] I go before and after, you can see it
[14:52] more clearly.
[14:54] Just like that.
[14:57] And if you want a stronger light wrap,
[15:00] you can always up the blur. That's a bit
[15:02] too much. So, we just want to keep it
[15:04] very minimal. Just like that.
[15:09] Now head back to the edit page. And as
[15:12] you can see already, we have some light
[15:14] wrapping around the chair and around the
[15:16] laptop. This makes it 10 times more
[15:19] realistic.
⚡ Saved you time reading this? Transcribe any YouTube video for free — no signup needed.