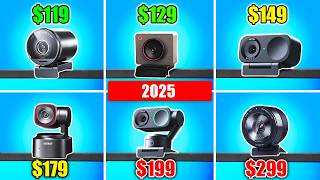

Why OBSBOT Meet 2 is INSANE
46sShows a $130 webcam rivaling expensive ones with stunning color and settings, making viewers question their budget.
▶ Play Clip"Delivers exactly what the title promises — a thorough head-to-head comparison of six popular 4K webcams with standardized tests."
This video compares six popular 4K webcams ranging from $100 to $300, including the Elgato Facecam Pro, OBSBOT Meet 2, Insta360 Link 2C, OBSBOT Tiny 2 Lite, Razer Kiyo Pro Ultra, and Insta360 Link 2. The reviewer tests each under identical lighting conditions, adjusts settings via software, and evaluates image quality, autofocus, and microphone performance to help viewers choose the best webcam for streaming and content creation.
4K 30fps, 1080p 60, sturdy build, manual shutter, but initial low saturation and less sharp compared to others.
4K 30fps, 1080p 60, magnetic mount for vertical orientation. Settings: HDR on, shutter 1/60, ISO 500, white balance 5500K, contrast +10, saturation +3. Natural skin tones and vibrant colors.
4K 30fps, 1080p 60, magnetic mount but no vertical orientation. Manual shutter, HDR reduces artificial sharpening. Image is sharp but may have artificial sharpening.
4K 30fps, 1080p 60, PTZ auto-tracking camera. Same image quality as Meet 2, tracks smoothly without lag. Ideal for moving subjects.
$300, large sensor, uncompressed 4K, heavy build, lens distortion compensation (82° to 72.5° FOV). Natural background blur, but autofocus is slow though accurate.
Auto-tracking version of Link 2C, similar image quality. White balance set to key lights, saturation boosted. Tracking works well.
Elgato Facecam Pro is least sharp. OBSBOT webcams have natural look, Insta360 has artificial sharpening. Razer has best image but slow focus. All can be color-adjusted.
Best value: OBSBOT Meet 2 ($130). Best auto-tracking: OBSBOT Tiny 2 Lite. Highest quality (if budget allows): Razer Kiyo Pro Ultra ($300).
For most streamers, the OBSBOT Meet 2 offers the best balance of quality and price, while the Razer Kiyo Pro Ultra is a premium option with DSLR-like quality but slower autofocus. The auto-tracking models are ideal for those who move frequently.
What are the key specs of the OBSBOT Meet 2?
4K 30fps, 1080p 60, magnetic mount for vertical orientation, supports HDR.
02:16
What settings did the reviewer adjust on the OBSBOT Meet 2?
HDR on, shutter 1/60, ISO 500, white balance 5500K, contrast +10, saturation +3.
02:59
How does the Razer Kiyo Pro Ultra achieve background blur?
It has a large sensor that captures more light, creating natural background blur.
07:38
What is a major flaw of the Razer Kiyo Pro Ultra?
Slow autofocus, though once focused it is laser sharp.
12:54
Which webcam has artificial sharpening according to the reviewer?
Insta360 Link 2C and Insta360 Link 2 have artificial sharpening.
11:55
What is the price range of the webcams tested?
From about $100 to $120 on sale, up to $300 for the Razer Kiyo Pro Ultra.
00:18
Which webcam does the reviewer recommend as the best value?
The OBSBOT Meet 2 at around $130.
15:59
What is the field of view range of the Razer Kiyo Pro Ultra with lens distortion compensation?
82° without compensation, 72.5° with compensation enabled.
08:34
Which webcam has a manual shutter?
Elgato Facecam Pro and Insta360 Link 2C have a manual shutter.
00:48
What is the advantage of the OBSBOT Tiny 2 Lite over the OBSBOT Meet 2?
It has auto-tracking (PTZ) that follows the user smoothly.
06:36
OBSBOT Meet 2 Image Quality
Demonstrates the best balance of natural skin tones and vibrant colors among the tested webcams.
02:47Razer Kiyo Pro Ultra Quality
Shows DSLR-like quality but with a major autofocus flaw, making it a trade-off decision.
07:54Standardized Testing Method
The reviewer uses identical lighting and settings to provide fair comparisons across all webcams.
11:07Artificial Sharpening Comparison
Highlights the difference between natural look (OBSBOT) and artificial sharpening (Insta360), a key preference factor.
12:07Final Recommendations
Provides clear, value-based recommendations for different use cases (streaming, content creation, auto-tracking).
15:46[00:00] 4K webcams have become insanely good over the past years. I still remember my first webcam comparison video from 3 years ago, and the quality you could get back then compared to right now for the same price is worlds apart. That’s why I decided to test six very popular 4K webcams ranging
[00:18] from about $100 to $120 when sales are going on, to about $300 for this premium beast. I am sure that one of these will be perfect for you. These two are sponsored by OBSBOT, but just as always, I
[00:30] test them in exactly the same way. I even stepped up my testing game, and you will very accurately be able to compare all of these webcams, starting with the first one, which is the Elgato Facecam Pro. This is a 4K webcam. It offers 4K 30fps or 1080p 60. It doesn’t feel as heavy as it looks,
[00:48] but it felt pretty sturdy. The mount is very versatile; you can pan or tilt, and in general, all necessary movements are possible. Now, it does have a manual shutter, so that’s very useful.
[01:00] It does feel pretty cheap and wonky, but it’s there, so can’t complain too much. And overall, what came in the box is very simple: the webcam, a detachable cable, and the manual. Okay, I’ve been playing around with these settings for a while, so I have two LED panels shining on
[01:15] me and then a floodlight in the back—actually, two floodlights, but one is on that side, the other one is on the other side—and it’s as close to the reference image as I can get it in the software. Currently, the biggest thing I had to change is the saturation. Right here,
[01:28] I boosted this quite a lot. Sometimes boosting the saturation might break some other parts—for example, my t-shirt might look blown out, or the lips might look super red or super pink—but it looks good. Also, when I come closer, I pretty much like it right now. Like, I was a bit hesitant
[01:44] because at the start, I didn’t really like the webcam. I plugged it in, I was like, “Oh my God, that’s a very low-saturation, grayish-looking, pretty bad quality webcam.” But now I do like the image, and I’m curious to see how it compares to other webcams. Now, I was indeed very happy
[02:00] with the colors, but while testing, I didn’t realize how much sharper the other webcams would look. We will test everything in depth in the coming tests, so you’ll definitely see. Next is the OBSBOT Meet 2. It comes in three colors; I have the space gray one. I have
[02:16] reviewed this webcam in the past already, but since I’m doing way more in-depth testing now, I was really curious to see how it would compare to all the other ones. People in general love this webcam; they are always very positive about it in the comments. It’s 4K 30 FPS, 1080p 60. Since it
[02:32] magnetically connects to the mount, you can film horizontal but also vertical for TikTok and stuff, and I like this webcam a lot, partly because it looks like a tiny block of production equipment. But we’ll have to put it to the test. And I mean, look at the result here; this webcam
[02:47] is insane. I tested the webcam before already in comparison videos, but never as in-depth as I’m doing right now with all webcams. But look at how great the skin color is, how great the
[02:59] blue in the background is. The webcam does come with software; it’s called OBSBOT Center, and I basically went to image right here, I enabled HDR, then I set it to autofocus. I didn’t touch that. Then the exposure—this was set to auto exposure, so I turned it off. I set a shutter speed to
[03:16] 1/60. In general with video, if you’re using 30 FPS, you want to double your FPS, and that’s the perfect shutter speed, so I did that. And then I adjusted the ISO to 500. Look at this webcam; this is absolutely crazy. Then the white balance, it was set on auto, so I disabled it. I set the
[03:33] color temperature to 5500K because the two LED lights shining on my face are both 5500K. And then image—these are your general adjustments. Everything is 50 by default, so I added 10
[03:45] contrast, three saturation, and that’s it. So far, this is probably the best 4K webcam I’ve tried. It’s crazy that it comes at around $130. The software was also easy to install; it was quick
[03:57] to make the adjustments, so so far, I love it. Next, we have a very similar webcam, the Insta360 Link 2C. It is also 4K 30fps or 1080p 60. The packaging felt very premium, but the webcam itself
[04:12] looks way heavier than it actually feels. It also has a manual shutter, just like the Elgato Facecam Pro, and it also magnetically connects to the mount. However, you can’t turn it vertically like the OBSBOT Meet 2. This might not be a dealbreaker for you, but for some people, it could be very
[04:28] handy. Okay, so I’ve done what I always do when I test these webcams: I’ve installed the software, and I’ve tweaked the settings a bit. And what I noticed with the Insta360 Link 2C is that as soon as I connected it to the PC, it looked very good. I made a few tweaks. I adjusted the white
[04:44] balance to manual because with the blue light in the background, usually it’s very hard for a webcam or a camera to accurately adjust the white balance because this is what it should focus on, and all the rest is going to be way too blue. So it always tries to adjust a bit, and besides that,
[04:59] I boosted the saturation a bit, and then I did turn on HDR. And I feel like turning on HDR limits my options. I feel like there’s some auto-adjusting going on as soon as I turn on HDR. Like, without HDR, it looks like there’s some artificial sharpening going on that’s not there
[05:14] when I turn on HDR. Okay, I just turned it on; it’s going to readjust a bit again. Let’s make it focus here, focus on my face. Overall, I like it more with HDR turned on, but this looks amazing,
[05:26] and it looked like this from the start. It’s definitely a high-quality webcam. Next, we have the OBSBOT Tiny 2 Lite. This is an auto-tracking PTZ camera, which means pan, tilt, zoom, and that basically means that it can track you and it can move in any direction,
[05:41] zoom in and out to reframe you, to track you, and basically always perfectly frame you in the middle of the shot. It is also 4K 30fps, 1080p 60. All these webcams have those specs; that’s why we’re
[05:53] comparing them. The stand is very simple because it doesn’t need to allow lots of movement since the camera can move on its own. The USB cable is detachable, and there’s a threaded mount on the bottom in case you want to attach it to a desk stand. Okay, so I just set up the webcam,
[06:09] the OBSBOT Tiny 2 Lite. I installed the software, I adjusted all the color and the brightness settings, and it looks amazing. It looks very vibrant, just like the OBSBOT Meet 2. I was very
[06:21] surprised with the quality of that webcam, and actually, this one came first. I tested it in the past already. I usually go for manual exposure, especially with RGB in the background, same with white balance. And as you can see, the webcam is tracking me. That’s the great thing
[06:36] about this one. The OBSBOT Meet 2 looked amazing, but this one has the same image quality; however, it is physically auto-tracking, so it will completely follow you everywhere you move. And it’s honestly a great feeling that no matter how you move, the webcam will always keep you in the
[06:52] frame. And it’s also very snappy, like it really follows you. It doesn’t lose you or start lagging or anything like that. If you’re gaming and you’re slowly moving sideways and downwards and stuff,
[07:05] it will just keep you in the frame. You can be chilling with your stream, no matter how you want, and it will always just make sure you look good, make sure you’re in the frame. It’s a great thing, and I think you can say for yourself, it looks very good for a webcam.
[07:21] Next, we have the Razer Kiyo Pro Ultra. This is a crazy webcam which, to be honest, should be called a camera instead, and it was super interesting testing this. It is able to send uncompressed 4K quality to your PC, but optionally, it also allows you to choose a custom compression in
[07:38] the software. It is a beefy webcam, super heavy, super solid, and you can just feel that this is a very premium product. Since it has a very large sensor, it captures a lot of light. You have a lot of background blur, and you will see that in the testing clips. I was astonished with the quality
[07:54] of this webcam, but it did have one major flaw for me. Okay, so I’ve been testing around with the Razer Kiyo Pro Ultra—that’s a long name—and this right here is about the best I can get. I changed
[08:06] a lot in the software. Now, one major thing is that I disabled HDR. Usually, when it’s available with webcams, I enable it, and it kind of makes my face look well-exposed and in the background as well. And for example, right here, you see like a bit too much light on my forehead. If I enable
[08:22] HDR, that’s gone, but I was never able to get an image that’s close to the one on the right because my face was always too bright with HDR. Now I have lens distortion compensation enabled, and
[08:34] if you look at the light here, it is straight now. If I turn this off, I have a bigger field of view, but it’s kind of distorted, indeed, like we see on the bottom. Now there’s an 82° field of view. If I enable this again, we go to 72.5°. So it’s up to you if you want a very wide field of view,
[08:52] but then you will have distortion around the edges, or if you want the more narrow one and for it to look a bit better. In general, I will save the settings on the bottom, and that is because you have to turn off the preview in order to use it in OBS Studio. I will try to activate it
[09:06] again now; it will work, and you cannot adjust the settings in the software if it’s linked to OBS. But the webcam looks really nice. The autofocus, I will have to test this because so far, I’m not a big fan of it. I’ve seen some focus hunting and focus breathing, and when stuff happens,
[09:22] especially if you move, like the focus—like now it’s pretty good, but I saw some hunting. We’ll have to check that out, but it looks very, very good like this, very crisp, very professional. There’s natural background blur. It’s a very pricey webcam; it’s very close to DSLR quality,
[09:38] but also pricing. So the question with this webcam is if it’s that good that it will replace a secondhand or budget real DSLR camera. Next, we have the Insta360 Link 2. This one,
[09:52] just like with the OBSBOT Tiny 2 Lite, is the auto-tracking version of the static one, in this case being the Insta360 Link 2C, which we tested before. I will go over this one more quickly since you’ve seen the software and the quality and stuff with the other webcam. It is very similar,
[10:08] but I do quickly want to show you what it offers, and then after that, we will test all of these webcams with standardized tests, which means you will be able to effectively compare all of them and see which one is your actual favorite. Okay, so this is the first working image of the Insta360
[10:23] Link 2. I set a white balance to what my two key lights are. I boosted the saturation a bit, but I’m wondering if it was actually too much, and that’s it. Now it looks extremely similar, if not identical, to the Insta360 Link 2C; that’s the non-gimbal version of this webcam. I can move
[10:39] it manually now, but I haven’t set up the tracking yet. I think if I do this, it will start tracking me, but I’m not sure. It might be—ah, yes. So this is the auto-tracking version. Obviously, you also have a static version that’s a bit cheaper and that doesn’t have the
[10:52] auto-tracking features if you don’t need it. So now this is where things get very interesting. I did several tests with each of the webcams one by one, and for example, this here is the first one where I compared all webcams in the same lighting conditions without RGB in the background,
[11:07] and I try to match the colors as close as possible so you can very effectively compare them. First of all, we can see that the Elgato Facecam Pro is not at all up to par with the other webcams. It looks less sharp, almost like a 1080p webcam compared to these other 4K beasts. Now it is 4K, don’t
[11:24] get me wrong, but I really don’t know why I wasn’t able to make this look as good as the other ones. At first, I thought I had set this to 1080p, but then I checked, and it was 4K because when I made it 1080p, it looked even worse. I might have to test it again in the future. I hope I did nothing
[11:38] wrong, but let’s compare the other webcams. The OBSBOT Meet 2 in comparison looked great, to be honest, and I’m a bit torn when it comes to the competitor, the Insta360 Link 2C. Pay close attention right now to my face around the eye area as I will switch to the Insta360 webcam. Okay,
[11:55] this here is the Insta360 Link 2C. At first sight, you would say that it’s sharper, and it is, but it kind of looks like artificial sharpening. I once reviewed a $6 Wish.com webcam,
[12:07] and this had crazy artificial sharpening, and of course, it doesn’t look cheap like this. The Insta360 is definitely a good webcam, but the type of sharpening is comparable, and I don’t really like this. Next in line were the two auto-tracking webcams from OBSBOT and Insta360. They look very
[12:25] similar to their non-auto-tracking versions, so I won’t keep comparing them in depth going forward. And then we had the Razer Kiyo Pro Ultra. Keep in mind, though, that this webcam costs $300,
[12:38] which compared to the other webcams is about double the price or even more, but it does, however, look amazing. Now I’m not sure how clearly you notice this during the testing, but the autofocus is miles apart from the other webcams, and not really in a good way. This webcam
[12:54] has crazy slow autofocus; however, as I may have mentioned before, it is extremely accurate. Now what I will show you next is an autofocus testing clip for each webcam back-to-back so you can compare all of them. In general, I felt like all the webcams did very well, and none of
[13:10] them will make you worried in terms of being in focus. And this is also a great opportunity for you to compare the sharpness of the OBSBOT versus the Insta360. Do you like the more natural look of the OBSBOT webcams, or do you like the artificial sharpening of the Insta360 ones? I kind of like
[13:27] the natural look more because you can also add sharpening yourself afterwards with OBS filters or in the webcam software. So I like to have the natural look and then increase it myself if I want to, but this will 100% depend on people’s preferences. In general, all these webcams here
[13:43] are quality devices, and that means that all of them can be adjusted in terms of color to make it look like you want. They will keep you in focus, and they are good investments for your streaming or content creation setups, besides the Elgato Facecam Pro, of course. I’m really not sure what
[13:58] went wrong with that one. And once again, don’t look too negatively at the slow focusing of the Razer Kiyo Pro Ultra because if you look at this clip, once it focuses, it is laser sharp. So it will really depend on what you’re looking for and how you will be using it.
[14:13] Now, if you’re still confused about which webcam you like the most, the following test usually gives you some kind of preference since you will be able to see differences in color on the remote as well as the sharpness of the remote itself, the autofocus, the depth of field in the background
[14:28] when the remote comes close, the noise in the background in darker areas, etc. When making and editing these test clips, I always try to make the colors and the exposure of all webcams look as similar as possible. I don’t do this to fake how colorful they look or anything like that. I
[14:44] do it because it’s very hard to perfectly adjust the colors of each webcam while testing and make them all look very similar. So while editing, it’s easier to adjust the white balance a bit, adjust the exposure a bit, and these are all things you can manually do yourself as well in
[14:59] OBS or in your webcam software. I’m not doing it to make them look better than usual; I’m just trying to make everything look as similar as possible in order to effectively compare them. Here’s a quick compilation of the microphone quality of all six webcams. This is a test of the
[15:13] microphone of the Elgato Facecam Pro. Okay, now when it comes to the microphone of this webcam. Okay, now I’ve listened to the microphone of this webcam, and I can’t hear it right now, but if you’re gaming, streaming, creating content, you’ll be going for a microphone like this. Okay,
[15:29] then the microphone of the Insta360 Link 2, and the microphone quality is definitely usable. Now, just like with all webcams, I’m testing them for streaming, gaming, content creation. So in this comparison, these were my three favorites. The Razer Kiyo Pro Ultra looked amazing. It is
[15:46] it does have pretty much the same quality as a 4K camera, which is going to be more expensive. So if the fact that the autofocus of it isn’t super quick and you think you will be
[15:59] setting the same range from your webcam anyway, it is actually a viable option, especially if there would be some kind of discount. However, you really have to be asking yourself if spending around $130 for this one compared to $300 for this one is worth the difference in looks. For me,
[16:15] if I would be looking for something for streaming but also content creation, then this one wouldn’t really be part of my options because I would want the camera to do some other content creation as well. And if it’s just for streaming, then I wouldn’t pay almost three times as much
[16:29] for this one. I would be super happy with the 4K nice quality of the OBSBOT Meet 2. And of course, if this quality is good enough for you, but you’re moving a lot or you want to do kitchen streams or something like that where the webcam is following you around the room, then the OBSBOT
[16:43] Tiny 2 Lite is also an amazing option. Thank you so much for watching. The links to all of these webcams are in the description. There is a discount code for the OBSBOT webcams; it only works on their website. It will also be in the description. Thank you so
[16:57] much for watching, and I hope I will see you in my next video. Have a nice day.

⚡ Saved you 0h 17m reading this? Transcribe any YouTube video for free — no signup needed.