Smart Home Network Hardware Setup Guide
45sViewers love step-by-step guides for setting up their own smart home networks, and the promise of a complete guide in the title grabs attention.
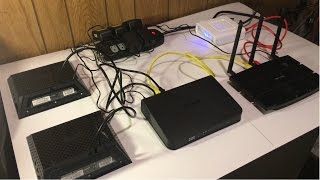
▶ Play ClipThis video presents a step-by-step guide to selecting and setting up the hardware for a smart home network. The creator demonstrates the physical connections between modem, router, switch, and Wi-Fi access points, emphasizing the importance of proper factory reset and power distribution with surge protection. The video concludes with a plan to cover software configuration in the next installment.
Modem is ARRIS Surfboard SB1641; main router is TP-Link Archer C7.
D-Link 16-port gigabit switch for more wired devices.
Two NetGear AC1750s used as Wi-Fi access points for extended coverage.
Reset routers by holding WPS/Reset button for 10 seconds until LED flashes quickly.
Use Cat6 ethernet cables; modem connects to router's WAN port; switch connects to router's LAN port; access points connect to switch.
"The title accurately reflects the content: a complete guide to smart home network hardware setup."
Which model of main router is used in the setup?
TP-Link Archer C7
00:38
What type of switch does Matt use to add more ethernet ports?
16-port D-Link gigabit switch
00:54
What model of routers are repurposed as Wi-Fi access points?
NetGear AC1750
01:11
How do the NetGear AC1750 routers function as access points?
They use an access point feature in their software to extend Wi-Fi range.
01:24
What type of ethernet cable does Matt use for connections?
Cat6
03:36
How do you reset the TP-Link Archer C7 to factory settings?
By pressing the WPS/Reset button for more than 10 seconds until the LED flashes quickly.
01:56
Router Choice
TP-Link Archer C7 is chosen for its positive reviews and suitability as main router.
00:38Using Routers as Access Points
NetGear AC1750 routers can be converted to Wi-Fi access points via built-in feature.
01:11Cable Internet Setup
In cable internet, coaxial cable from ISP connects directly to the cable modem.
03:10Access Point Placement
Place access points where most devices will be used and where Wi-Fi needs boosting.
04:21[00:00] Hey guys, Matt here from mksmiles.com and in this video we're going to be configuring the hardware in the network.
[00:14] To start off, let's talk about the hardware we are going to be using in the network. But before we do that, make sure you like this video because when each one of these four videos and then our work series hits 100 like, I'll release the video of setting up the home automation server with
[00:26] open app to sooner than it is planned. Anyway, the modem we are going to be using is the Eris surfboard sp1641. Please note, I will not be showing in detail how to set up the modem with the ISP
[00:38] because it is different with each ISP. This is an amazing modem and has many positive reviews all over the internet. Speaking of positive reviews, the main router I chose also does. I chose the TP-Link Archer C7. So these two devices take care of the basic network and for most
[00:54] people that's it for the network. But since in my house there are a little bit more wired devices, I'm going to need an ethernet switch and that is where the D-Link 16 port gigabit ethernet switch comes into play. Lastly, since I want more Wi-Fi coverage, let me rephrase that, since I need complete Wi-Fi
[01:11] coverage, I'm going to use these two NetGear AC-1750s. Now you might be asking why I need two more routers. Well these two devices have an access point feature in their software that allows them to act as Wi-Fi
[01:24] access points instead of routers and extend the range of the Wi-Fi network. The link to where to get all the hardware I will be using is in the description below. First we are going to reset all the devices to factory settings. So we are going to connect our power strip to power and then turn it on.
[01:40] The modem and switch don't get reset so we will skip those and move on to the routers, starting with the main one, the Archer C7. Plug the adapter into the power strip and into the router. Next press the power button in the back to turn it on. Then wait a minute or two until the device
[01:56] powers on and the asterix looking thing flashes slowly. After pressing hold the WPS slash reset button for more than 10 seconds until the SIS LED or asterix looking thing becomes a quick flash from a slow
[02:12] flash. Then release the button and wait for the router to reboot to its factory default settings. Next we are going to reset the neckier AC1750. So first we are going to plug the power adapter
[02:24] into the power strip and then into the device and press the power button into the on position. Then let the device boot for a minute or two. Once it is booted take a paper clip and press and hold the red button down for 10 seconds. Finally the device will reboot. Repeat this process for
[02:42] any more AC1750s or access points you have. To finish off power distribution let's connect the D-link Ethernet switch to power and the ares modem to power which is just connecting the power
[02:54] bricks to the power strip and then the other ends into the devices. Speaking of power this power strip is one that has a surge protector built in which is very important to protect all the network hardware. Now that everything is reset and set to as if it's brand new let's get to work. To test
[03:10] everything before we install it we're going to connect everything on a separate table. To start off let's talk about internet connection. Personally I have a cable internet meaning I get my internet from my ISP over a coaxial cable. Therefore I have a cable modem which is the first thing we're going
[03:24] to connect. So I'm going to take the coaxial cable from my ISP and plug it into the modem. Next is the main router which again is the TP-link Archer C7. To connect the devices together we're
[03:36] going to be using cat six ethernet cables and I got some in different colors to color code the network a little. To connect the modem and the router together I'm going to use a red ethernet cable. So one end is going into the ethernet port of the modem and then the other end is going into the
[03:52] WAN port of the Archer C7. For most people this could conclude the network setup due to the fact that this could provide you enough Wi-Fi coverage and enough ethernet ports for all your wired devices.
[04:04] But for me I require more of both these devices. So to solve the problem of more ethernet ports next we're going to connect the 16 port ethernet switch. And to do so we're going to take the yellow ethernet cable and put one end into the first LAN port of the router and then the first ethernet port
[04:21] of the ethernet switch. After that let's tackle the problem, the Wi-Fi. The easiest way to determine how many Wi-Fi access points you need is just to assume where most of your devices are going to be
[04:33] as well as where you think the Wi-Fi needs to be stronger. So let's connect our two routers that we are going to be using as Wi-Fi access points. The thing about these access points is that they are wired access points which means they require an ethernet connection to the network. So the places where
[04:47] I want these to increase the Wi-Fi need to have an ethernet connection of some sort. And I am lucky because they do. As I want to put one of these access points in my garage where I have an ethernet cable ran to and then I'm going to put the other access point in my room where I have an ethernet jack
[05:02] that goes to the main network as well. But anyway for now we're going to use another cat six cable for each of these access points and one end goes into the next available ethernet port of the switch and the other end goes into the wind port of the access point. And that's it for the
[05:16] hardware of the network. You do not necessarily have to use this exact setup as I have but I have found it to work perfectly for this smart house and transmit data very fast and reliably. In the next video we're going to talk about the software and configuring all the devices.
[05:31] Alright thank you for watching and if you have any questions leave them in the comments section below or head over to the mksmarthouse.com slash forum where you have a better chance of getting answered. Goodbye!
⚡ Saved you 0h 05m reading this? Transcribe any YouTube video for free — no signup needed.