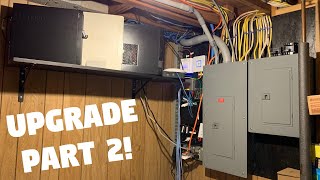

I almost blocked my switch's airflow
40sThe close call of blocking ventilation resonates with anyone who has built a network rack, and the fix is a simple pro tip.
▶ Play Clip"Delivers the promised UniFi overhaul and a real AP repair trick, though 'massive' is generous for a basement rack."
Matt from MK Smart continues his Ubiquiti UniFi network transformation, moving servers onto shelves, wall-mounting a modem, security gateway and switches, and wiring everything together. The highlight is reviving a dead UniFi AP AC LR by removing the D23 diode and adding a 48V-to-24V adapter. The episode wraps with a tour of the finished rack and next steps for cameras and access point placement.
Matt from the future introduces the finale: finalize the network, put everything in place in the basement, and try to fix the AP AC LR or throw it away.
Time-lapse of moving all servers and gear onto the top shelf; surveillance server, APC backup, and web server are placed sideways, and switch placement must avoid the vent for airflow.
PCBWay offers full-featured PCB prototyping, SMD stencils, fast turnaround, and free DFM; the December holiday festival has coupons worth up to $470 and discounts up to 70% off services.
After clearing the area, the modem, UniFi Security Gateway, and switches are mounted on the wall and wired together.
Modem, security gateway, and switches are on the wall; Raspberry Pis stay on the wall, connected to the switch and power; a temporary access point provides Wi-Fi during work.
Surveillance server, APC backup battery, and file server are running; camera cables loop upward; all cables are color-coded; the Cloud Key still needs double-sided tape.
An AP AC Pro is wired through the wall from a Raspberry Pi to the UniFi switch and used temporarily; eventually it will be wall-mounted.
Found a guide online: remove diode D23, a TVS diode that acts like a fuse; combine with a UniFi 48V-to-24V adapter; the Cloud Key recognized the AP again.
The access point goes in the garage pointing outside; cable runs for cameras may become a separate surveillance series; links to parts and smart home kits are in the description.
The network upgrade is largely complete: all core devices are mounted, cabled, and running, and even a supposedly dead access point was saved with a simple diode fix. Remaining work focuses on placing access points in their final spots and running camera wires, likely in a future surveillance series.
Which diode should be removed to fix a burned-out Ubiquiti AP AC LR?
The D23 TVS diode — it acts like a fuse.
10:15
What voltage conversion does the Ubiquiti adapter used in this fix provide?
It converts 48V to 24V.
10:34
Where was the access point mounted to provide outdoor coverage?
In the garage, pointing outside.
11:01
What network devices were mounted on the basement wall?
The modem, UniFi Security Gateway, switches, and Raspberry Pis.
06:19
Why shouldn't a switch be placed directly over the shelf's vent?
It would block airflow for cooling.
02:30
According to the sponsor, what savings does PCBWay offer during the December holiday festival?
Coupons up to $470 in savings and discounts up to 70% off services.
03:44
D23 diode acts as a fuse
A simple, free fix for a 'dead' access point that most people would throw away.
10:1548V-to-24V adapter
Shows that matching voltage requirements can revive hardware that appears bricked.
10:34Wall-mounted network stack
Demonstrates a clean, centralized approach to organizing a home network.
06:19Color-coded cabling
Good cable management makes future troubleshooting and expansion significantly easier.
07:51Garage access point placement
Strategic placement extends Wi-Fi to outdoor areas without extra hardware.
11:01[00:01] society Matt here from MK smash calm and in this video this is going to be actually part two in the ubiquity upgrade network transformation series
[00:13] upgrade network transformation series enjoy so I am Matt from the future the
[00:33] rest of the video you're gonna be seeing Matt from the past but Matt from the we're gonna be finalizing in the network we're gonna putting it in all of its place in the basement and then we're also gonna see if we can fix the APA CLR
[00:49] or I'm gonna have to throw it away who knows that's at the end of the video alright let's get into part two alright so first we're gonna start off by moving so first we're gonna start off by moving all of the servers and all of this stuff
[01:02] onto the shelf up there so here's a time-lapse time-lapse [Music]
[02:17] all right so so far I think this is how I like the top shelf so I put all of them sideways like that we got the surveillance server the APC the webserver and I think I might put the switch like this actually now that I
[02:30] think about it that's not a good idea because there's a vent down here and that's for airflow so actually that's not gonna be like that I might put it like this I gotta figure out what I'm gonna do with this but now I'm going to
[02:43] gonna do with this but now I'm going to start over here and I'm going to are three pies I think I'm also going to put them up here and I have to reorganize this because I have to put the new security gateway up there so
[03:00] the new security gateway up there so there's another time-lapse whoa whoa whoa whoa we take a break from these super epic Network time lapses to bring you a message from the best PCB company in the world and that is PCB way PCB way
[03:14] is a company that is full feature PCB prototyping so they have SMD stencil PCB prototyping advanced PCBs and they have SMD stencil as well as so many more things that they can do for you they have high quality PCBs fast turnaround
[03:29] have high quality PCBs fast turnaround times on time shipping 24-hour customer service free DFM and no minimum requirement right now PCB ways having their PC vo a big sale which is their holiday festival and this month in
[03:44] December which is from the 1st to the 31st they have so many coupons up to four hundred seventy dollars in savings they also have big sales up to 70% off of their services which in addition to my cash code which is on the screen you
[03:58] can get $5 off your order which depending on how many PCBs that you get your order might be free so head on over to PCB Wacom now to PCB Wacom now [Music]
[05:00] all right so I got all of this all cleared out all the all networking equipment is here I just have modems sitting right there and then it's all right here just a big mess we got the two old routers sitting there but now
[05:16] we're going to go ahead and mount up the Ubiquiti we're gonna mount up the modem and the other switches and then wire it all together
[05:59] [Applause] [Music] [Applause] [Music]
[06:19] so little update we got everything all mounted up on this wall now the modem is mounted up there the new unified security gateways their
[06:32] switches right here and I actually I originally said I was going to put these up here but I decided to keep the raspberry PI's on this wall just because I turns out that I did have the space for it so got those all connected to the
[06:44] switch which I also mounted over here and those are all connected to power 2 and those are all connected to power 2 and everything is all running I also have the access point sitting here right now just I would have Wi-Fi while I work
[06:57] so next I'm going to work on wiring up all these servers and switch right up there [Music]
[07:51] all right serious progress has been made so basically this entire part of the network is I think so far complete for what I have so far when I mean so far as I still have to run cables into the house for the security cameras
[08:07] eventually and I also put this access point up here temporarily because that needs to be mounted somewhere over there in the basement but I'm gonna walk you through what I have so far so again here we have the surveillance server this is
[08:22] up and running already then we have the APC backup battery and then we also have the file server which is also up and running and then here we have the POS
[08:35] which this as well security cameras me it plugged it and actually one of them is already connected it's right here and so what my plan is is all of them are just gonna loop up like that since there's only uh nine more I believe and
[08:49] there's only uh nine more I believe and then we got the air surf board SP one then we got the air surf board SP one six four one then I got the the main ubiquity router the switch the PI's are all up there all these cables are
[09:03] all up there all these cables are color-coded there's that switch there's this switch it's on right there and then I still have to get double sided tape and I think I'm gonna tape it right there the the cloud key and that's what
[09:17] we got so far that wasn't a proper walk around but that's what I got so far now I gotta go change out the other access points all right so for now I have the AP AC pro sitting here in my room to replace the
[09:31] old access point well it was that technically a router but I called an technically a router but I called an access point so I have the AP AC pro sitting here I have one of them coming in from the PIO II through the wall from
[09:44] in from the PIO II through the wall from the unify switch and then I also have it going to my computer as a pastor but in the future this will be mounted in the there and I haven't done that yet but the next access point we technically
[09:59] should install is the APA CLR but the access point is currently dead so I guess we're just gonna move on with the video all right so good news I figured out how to fix the APA CLR I found a guide online that
[10:15] told me exactly which diode to remove and it was d23 that is it's basically acts like a fuse and so I did that as you can see it's removed right there I also purchased one of these adapters from ubiquity and it converts 48 volts
[10:34] to 24 volts which is exactly what I need and the I just have to put it back in the case but it's up and running and working I checked on ubiquity and it's working I checked on ubiquity and it's the cloud key recognized it so that's
[10:47] good so if you guys ever burn out your APA CLR just you can either remove or APA CLR just you can either remove or replace the d23 diode that's right there it's a T vs diode so basically acts like a fuse so cool I'm gonna close this back
[11:01] up and then we're gonna go put it in the garage place the access point right here there and then the actions points it in there so it's gonna be in the garage and pointing outside and that is a wrap for the network series that I made it's so
[11:17] far it's two parts I'm not sure if I'm gonna make any more I just have to tidy up a little things in the network such as put the access points in there spots that they're gonna be and then run all the cameras but I might save the cameras
[11:29] the cameras but I might save the cameras for the surveillance system guide video series but in the description you'll find links to all the parts and devices use in this video as well as a link to MK stars' comm slash shop where you can
[11:45] pick up smart home kits such as the fire sensor we talked about in the first episode or a blinds control and those are all kits that you can put together or you can get the assembled option and I'll put them together for you if you
[11:57] it please press that like button it really helps YouTube's algorithm and push my videos so you can get more smart home enthusiasts on this channel and grow the smart house society but if you have any questions leave them in the
[12:09] comment section below or head on over to MK smart calm goodbye [Music]




⚡ Saved you 0h 12m reading this? Transcribe any YouTube video for free — no signup needed.